

Where you can do something creative everyday
Sunday, October 19, 2014
Happy Halloweenie

Happy
Halloweenie
written
10/4/2014
Supplies
Needed:
Tube of
your choice. I am using the work of Scott Blair. I got this tube at
MPT when it was open.
Scrap Kit
is a freebie by True Taggin Love. It is called Elegant Halloween and
you can get it at
http://truetagginlove.blogspot.com/2011/10/got-new-kit-to-offer-up.html
Font of
your choice. I am using Parsel Tongue. You can get it at
http://www.dafont.com/parseltongue.font
Lets
Begin:
Open
TTL_frame1 from the kit and shift+D to duplicate.
Close the
original.
Make your
canvas large enough to give you room to work with.
Using your
magic wand select the inside of the frame and go to selections modify
and expand by 8.
Layers new
raster layer and drag under the frame.
Open
TTL-pp1 and edit copy.
Paste into
selection.
Selections
select none.
Add a drop
shadow to the frame.
Open your
tube and copy and paste as a new layer and place where you want in
front of the frame.
Mine is to
the right side.
Add a drop
shadow to your tube.
Open
TTL-web1 from the kit and copy and paste as a new layer.
Drag to
the bottom.
I re-sized
mine by 90% as it was just a bit too big.
Adjust
add/remove noise and add noise at 100% using uniform and monochrome.
Add a drop
shadow to the web.
Open
TTL-wrought iron fence from the kit.
Make your
paper layer active and edit copy and paste as a new layer.
Re-size by
50%.
Drag to
the bottom of the frame.
Erase any
bits hanging out the edges.
Adjust
add/remove noise @ 100% as above.
Add a drop
shadow.
Open
TTL-tree from the kit.
Re-size by
85%.
Copy and
paste as a new layer.
Position
opposite of your tube.
I erased
bits to make it appear to be coming out of the frame.
This is
completely up to you.
Add a drop
shadow.
Open
TTL-spider and re-size by 50% twice.
Copy and
paste as a new layer and place where you want.
Mine is in
front of my tube on the lower left.
Add a drop
shadow.
Open
TTL-sequins from the kit and re-size by 50%.
Copy and
paste as new layer and drag under your tube.
Place
along the bottom of the frame/tag.
Move to
the right side.
Duplicate
and image flip horizontal.
Move this
duplicate to the left side.
Merge
these 2 layers together and add a drop shadow.
Open a few
of the different pumpkins from the kit and re-size each one to
different sizes.
Copy and
paste them all as different layers and place in front of the frame in
front of the tree.
Add a drop
shadow to each.
I used 3
pumpkins.
Open TTL-
murder or crow from the kit and re-size by 50%.
Copy and
paste as a new layer at the top and place in the middle of the frame
at the top.
Add a drop
shadow.
Add your
name and copyright/licensing information.
Crop and
save.

Saturday, October 18, 2014
Blood Thirsty
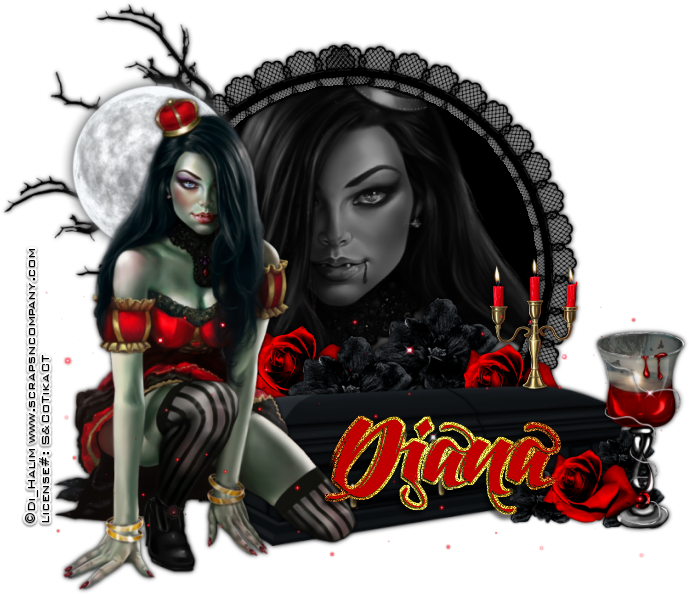
Blood
Thirsty
written
10/18/2014
Supplies
Needed:
Tube by Di
Halim. You can get it at
http://scrapsncompany.com/index.php?main_page=product_info&cPath=161&products_id=6155
Scrap Kit
By Designs By Joan. You can get it at
http://scrapsncompany.com/index.php?main_page=product_info&products_id=6157
Font of
your choice. I am using Feathergraphy. You can get it at
http://www.fontspace.com/m%C3%A5ns-greb%C3%A4ck/feathergraphy-decoration
Lets
Begin:
Open
element 14 and shift+D to duplicate.
Close the
original.
Re-size by
85%.
Make your
canvas large enough to work with.
Using your
magic wand select the inside of the frame and go to selections modify
and expand by 3.
Layers new
raster layer and drag under the frame.
Flood fill
this new layer with black.
Open the
close up of the tube and copy and paste as a new layer and position
within the frame.
Selections
invert and hit delete to clear the excess.
Selections
select none.
Adjust hue
and saturation colorize and set both properties to 0.
Lower the
opacity on this layer to 60.
Add a drop
shadow to the frame.
Open your
full tube and copy and paste as a new layer.
Re-size to
fit nicely along the side of your frame.
Place on
either side.
Add a drop
shadow.
Open
element 9 and re-size so it will fit nicely behind your tube and
frame and able to peek out.
I also
flipped mine horizontal as my tube is on the left and I wanted the
branches facing the correct direction.
Add a drop
shadow.
Open
element 92 and re-size by 50% and then again by 85%.
Copy and
paste as a new layer and drag under your tube.
Place
behind her head and to the left.
Add a drop
shadow.
Open
element 67 and re-size by 85% 2 times.
Copy and
paste as a new layer and drag behind your tube.
Move to
the bottom along the bottom of the frame.
Add a drop
shadow.
Open
element 59 and re-size by 50% 2 times.
Copy and
paste as a new layer and drag behind the coffin.
Place
along the top and peeking out.
Add a drop
shadow.
Duplicate
a couple of times and place them randomly.
I moved
one in front and at the bottom.
Repeat
these steps with element 29.
Open
element 8 and re-size by 50% 2 times.
Copy and
paste as a new layer and place on the top of the coffin opposite end
than your tube is on.
Open
element 73 and re-size by 50% and then again by 85%.
Copy and
paste as a new layer and place along side of the coffin at the end
where the flowers are in front.
Add a drop
shadow.
Open
element 25 and re-size by 75%.
Copy and
paste as a new layer and place at the bottom.
Add your
name.
Add your
copyright and licensing information.
Crop and
save.


Nina Bonita
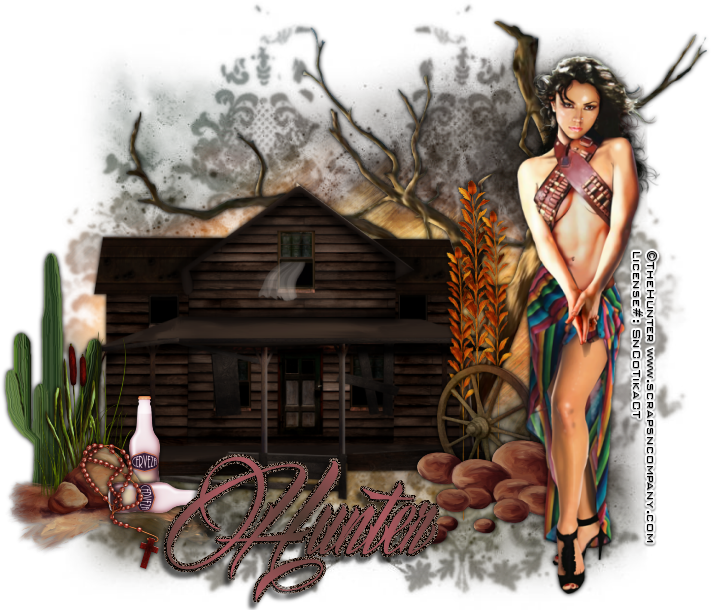
Nina
Bonita
written
10/17/2014
Supplies
needed:
Tube by
The Hunter. You can get it at
http://scrapsncompany.com/index.php?main_page=product_info&cPath=161&products_id=6104
Scrap Kit
by Bibi's Collection. You can get it at
http://scrapsncompany.com/index.php?main_page=product_info&products_id=6103
Mask of
your choice. I am using mask # 31 by Millies PSP Madness. You can get
her masks at http://milliespspmadness.blogspot.com/
Font of
your choice. I am using Billion Stars. You can get it at
http://www.fontspace.com/m%C3%A5ns-greb%C3%A4ck/billion-stars-personal-use
Lets
Begin:
Open
element 21 and shift+D.
Close the
original.
Re-size it
by 60%.
Make your
canvas large enough to work with.
Open paper
7 and copy and paste as a new layer and drag to the bottom.
Apply the
mask of your choice.
Delete the mask layer and merge the group.
Delete the mask layer and merge the group.
Add a drop
shadow to the house.
Open your
full tube and copy and paste as a new layer and move over to the far
right side.
Add a drop
shadow.
Open
element 103 and re-size by 75% 2 times.
Copy and
paste as a new layer and drag under the house.
Place to
the right side peeking out behind the house and your tube.
Add a drop
shadow.
Open
element 98 and re-size by 50% 2 times.
Copy and
paste as a new layer and move to the far left side at the base of the
house and in front of it.
Open
element 97 and re-size by 50% 2 times.
Copy and
paste as a new layer and move to the right side of the house and drag
behind your tube.
Open
element 81 and re-size by 50% and then again by 70%.
Copy and
paste as a new layer and move to the far right side between the house
and your tube.
Drag under
the rocks layer and add a drop shadow.
Open
element 78 and re-size by 50% and then again by 75%.
Copy and
paste as a new layer and move to the far left of the house.
Drag under
the rocks and plants layer.
Add a drop
shadow.
Open
element 58 and re-size by 50% 2 times.
Copy and
paste as a new layer.
Move over
to the right side of the rocks and plants element.
Add a drop
shadow.
Duplicate
this layer and image rotate to the right 90 degrees.
Adjust
sharpen.
Move so it
is laying in front of the rocks and plants and also the other bottle.
Open
element 31 and re-size by 50% 2 times and copy and paste as a new
layer in front of the rocks and plants and the bottle that is laying
down.
Add a drop
shadow.
Open
element 27 and re-size by 50%.
Copy and
paste as a new layer and place on the right side of the house between
it and your tube.
Drag under
the other elements there.
Add a drop
shadow.
Duplicate
a couple of times and place them next to each other in varying
lengths.
Add your
name.
Add your
copyright and licensing information.
Crop and
save.


Tuesday, October 14, 2014
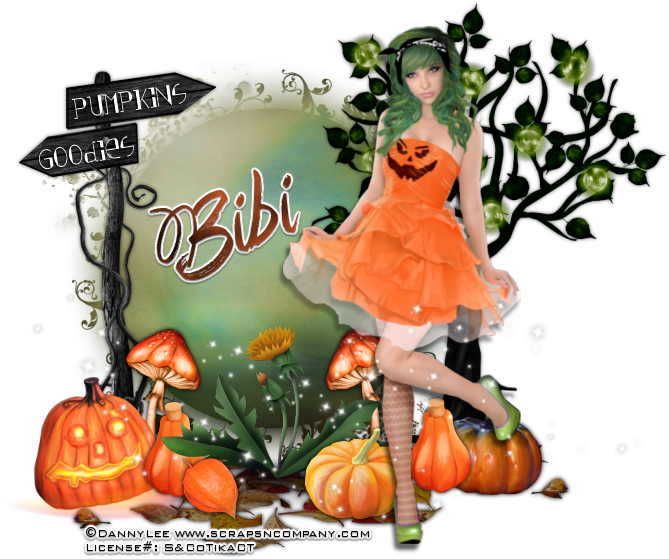
Pumpkin Patch Cutie

Pumpkin
Patch Cutie
written
10/14/2014
Supplies
Needed:
Tube by
DannyLee. You can get it at
http://scrapsncompany.com/index.php?main_page=product_info&cPath=161&products_id=6007
Scrap Kit
is by Bibi's Collection. You can get it at
http://scrapsncompany.com/index.php?main_page=product_info&products_id=6006
Mask is by
Moonbeams and Spiderwebs. You can get it at
http://moonbeamsandspiderwebs.blogspot.com/2013/05/mask-53-and-forum-mask-32.html
Font of
your choice. I am using Art Brewery. You can get it at
http://www.dafont.com/art-brewery.font
Lets
Begin:
Open paper
2 and shift+d to duplicate.
Close the
original.
Re-size by
85%.
Promote
the background layer to a raster layer.
Make your
canvas large enough to work with.
Apply your
mask.
Delete the
mask layer and merge the group.
Open your
full tube and copy and paste as a new layer.
Re-size so
it is just slightly larger than the mask.
Move to
the far right side.
Add a drop
shadow.
Open
element 73 and re-size by 50%.
Copy and
paste as a new layer and position bottom center of the mask.
Open
element 59 and re-size by 65%.
Copy and
paste as a new layer and drag under your tube.
Move to
behind your tube and peeking out the far right side.
Add a drop
shadow.
Open
element 7 and re-size by 50%.
Copy and
paste as a new layer and move to the far left of the tag.
Add a drop
shadow.
Using a
font of your choice.
Write a
couple of things on the different directions of the sign post.
Open
element 19 and re-size by 50%.
Copy and
paste as a new layer and drag under the flower layer.
Move to
the bottom and duplicate a few times and make them appear scattered
on the ground.
Open
element 15 and re-size by 50% and then again by 80%.
Copy and
paste as a new layer and move to in front of the bottom of the sign
post.
Open
element 28 and res-size by 50% 2x.
Copy and
paste as a new layer and move to the right of the first pumpkin.
Duplicate
and move this one over in front of the bottom of the tree.
Merge
these 2 together and add a drop shadow.
Open
element 47 and re-size by 50% 2x.
Copy and
paste as a new layer and place to the right but in front of the last
pumpkin.
Add a drop
shadow.
Open
element 62 and re-size by 50% 2x.
Copy and
paste as a new layer and drag under all the pumpkin layers.
Move to
the right of the sign post and up behind the pumpkins.
Use my tag
for reference if needed.
Duplicate
and flip horizontal.
Move over
to the left peeking out from behind your tube.
Merge
these 2 layers and add a drop shadow.
Open
element 69 and re-size by 50% 2x.
Copy and
paste as a new layer and move to the far right in front of the tree
base.
Add a drop
shadow.
Open
element 74 and re-size by 50% 2x.
Copy and
paste as a new layer and move to the left of your tube peeking out
from behind her leg.
Add a drop
shadow.
Open
element 83 and re-size so it will fit nicely along the bottom of your
tag.
Copy and
paste as a new layer and position.
Add your
name.
Add your
copyright and licensing information.
Crop and
save.

Friday, October 10, 2014
Hag Hangout

Hag
Hangout
Written
10/10/2014
Supplies
Needed:
Tube is by
Di Halim. You can get it at
http://scrapsncompany.com/index.php?main_page=product_info&cPath=161&products_id=5994
Scrap Kit
is by Bibi's Collection. You can get it at
http://scrapsncompany.com/index.php?main_page=product_info&products_id=5995
Font of
your choice. I am using Blackboard. You can get it at
http://www.dafont.com/blackboard.font
Lets
Begin:
Open
element 47 and shift +D to duplicate.
Close the
original.
Make your
canvas large enough to work with.
Add a drop
shadow to the web using the orange from the web itself.
Open
element 48.
Copy and
paste as a new layer.
Re-size by
85%.
Place in
the center of your web.
Using your
magic wand select the inside of the frame.
Selections
modify and expand by 6.
Layers new
raster layer and drag under the frame.
Open paper
2 and edit copy and paste into selection.
Selections
select none.
Add a drop
shadow to the frame.
Open
element 29 and copy and paste as a new layer.
Place just
above your paper layer.
Re-size
until the moon is just bigger than the moon that is on the paper and
position to where it covers the moon on the paper.
Open
element 28 and copy and paste as a new layer.
Re-size by
50%.
Position
on top of the moon.
Add a drop
shadow.
Open your
tube.
Copy and
paste as a new layer.
Re-size so
she fits nicely along the left hand side of the frame.
Add a drop
shadow.
Open
element 31.
Copy and
paste as a new layer.
Re-size so
its just slightly larger than your tube.
Position
behind your tube.
Use my tag
for reference if needed.
Open
element 22 and re-size.
Copy and
paste as a new layer and place to the bottom right of your tubes
feet.
Drag
behind your tube.
Duplicate
a couple of times and re-size.
Open
element 40 and copy and paste as a new layer.
Drag down
to just above the tree.
Place in
the center bottom of the tag.
Open
element 90 and copy and paste as a new layer.
Re-size so
it will fit to appear to be hanging from one of the top branches of
the tree.
Add a drop
shadow.
Using a
font of your choice and the color white write some text on the sign.
Lower the
opacity of the text layer to make look worn in.
Open
element 25 and copy and paste as a new layer.
Move to
the far right side of the book.
Add a drop
shadow.
Add your
name.
Add your
copyright and licensing information.
Crop and
save.


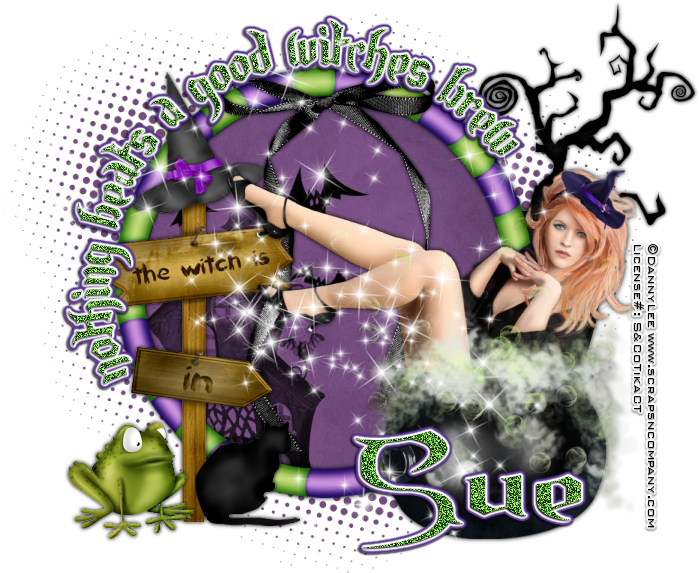
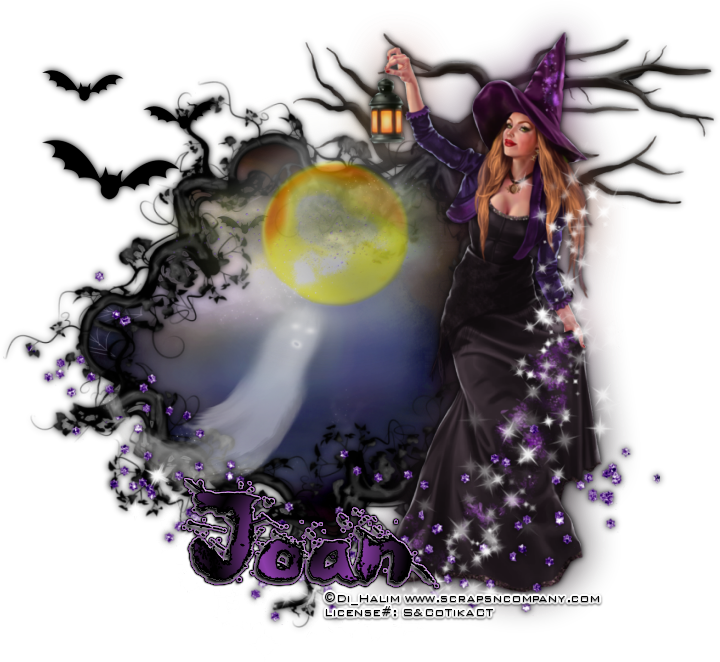
Witches Brew

Witches
Brew
written
10/10/2014
Supplies
Needed:
Tube is by
Danny Lee. You can get it at
http://scrapsncompany.com/index.php?main_page=product_info&cPath=161&products_id=6029
Scrap kit
is by Designz By Sue. You can get it at
http://scrapsncompany.com/index.php?main_page=product_info&products_id=6028
Font of
your choice. I am using Endor which you can get at
http://www.dafont.com/endor.font
Plugins:
Eye Candy
gradient glow (optional)
Lets
Begin:
Open
element 29 and shift+D to duplicate.
Close the
original.
Re-size if
you wish.
This is
going to be the base for your tag.
Make your
canvas large enough to work with.
Open
element 5 and copy and paste as a new layer.
Re-size to
fit within the center of your background.
Using your
magic wand select the inside of the frame and go to selections modify
and expand by 4.
Layers new
raster layer and drag under the frame.
Open paper
6 and edit copy and paste into selection.
Selections
select none.
Add a drop
shadow to your frame.
Open your
tube and copy and paste as a new layer.
Re-size
and move to the far right side of the frame.
Add a drop
shadow.
Set your
foreground color to any color and turn off your background color.
Using your
elipse preset shape tool draw out a circle around the outside edges
of the frame.
Leave this
as a vector layer as we are going to add some text on a path.
Ok to add
text on a path select the color or colors for your text.
Select the
font you want to use and set the size.
Change the
create as: to floating.
Move your
mouse over to your tag until you see the T with the line under it.
Once you
see that go ahead and click and type out your text.
You may
have to undo it a couple of times to get it right and to sit where
you want around the frame.
Once you
are done promote your selection to a layer.
Selections
select none.
Delete the
circle layer you created.
Adjust
add/remove noise and add noise to the text at 100% monochrome and
uniform.
Add a
gradient glow if you wish to help it stand out.
Add a drop
shadow.
Open
element 56 and copy and paste as a new layer and place in the center
top of your frame.
Add a drop
shadow.
Open
element 45 and re-size by 75%.
Copy and
paste as a new layer and drag down under your paper layer.
Position
behind and to the top right of your tube.
Add a drop
shadow.
Open
element 40 and re-size by 75%.
Copy and
paste as a new layer and place in front of your frame but to the left
a little bit.
Add a drop
shadow.
Open
element 18 and re-size by 50%.
Copy and
paste as a new layer and place on the lower left of the sign.
Add a drop
shadow.
Open
element 55 and re-size so its just slightly smaller than your tag.
Copy and
paste as a new layer at the top.
Add your
name.
Add your
copyright and licensing information.
Crop and
save.

Monday, October 6, 2014
Trust In A Witch

Trust In A
Witch
written
10/6/2014
Supplies
Needed:
Tube by Di
Halim. You can get it at
http://scrapsncompany.com/index.php?main_page=product_info&cPath=161&products_id=5786
Scrap Kit
is by Design By Joan. You can get it at
http://scrapsncompany.com/index.php?main_page=product_info&products_id=5787
Font of
your choice. I am using Oh No which you can get at
http://www.dafont.com/oh-no.font
Lets
Begin:
Open
element 60 and shift+d to duplicate.
Close the
original.
Image
re-size by 85%.
Make your
canvas large enough to work with.
Using your
freehand selection tool set to freehand draw around the edge of the
frame using the main branch as a guide.
You could
select with your magic wand but there are so many little bits and
holes its pretty hard to get it all and you want the branches and
leaves on the inside.
Layers new
raster layer.
Drag to
the bottom.
Open paper
2 and edit copy and paste into selection.
Selections
select none.
Add a nice
drop shadow to the frame.
Decide
which tube layer you are going to use and edit copy and paste as a
new layer.
Re-size so
she will fit nicely along side of the frame.
You want
her to just be slightly bigger than the frame.
Place on
the far right side.
Duplicate
your tube layer.
On the
bottom copy go to adjust blur gnaussian blur at 20.
Add a drop
shadow to the top copy.
Open
element 71 and re-size to fit behind your tube.
Copy and
paste as a new layer and drag to the bottom.
Place
behind your tube peeking out around her head.
Open
element 70 and re-size by 60%.
Copy and
paste as a new layer and place on top and move to the lower left
slightly so you can see it within the frame.
Open
element 40 and re-size by 50%.
Image flip
horizontal.
Copy and
paste as a new layer and move to the top left of the frame with the
majority of the bats outside of the frame.
Add a drop
shadow.
Open
element 3 and re-size by 50%.
Copy and
paste as a new layer at the top and place about in the center of your
frame at the top.
Open
element 32 and re-size by 80%.
Copy and
paste as a new layer and place along the bottom of the tag.
Add a drop
shadow.
Open
element 77 and re-size by 80%.
Image flip
horizontal.
Copy and
paste as a new layer and move so the larger side is over the top
right of your tube.
Add your
name and copyright/licensing information.
Crop and
save.

Subscribe to:
Posts (Atom)