
Muted
Summer – 3 piece forum set
written
5/27/2015
Supplies
Needed:
Tube by
Danny Lee. You can get the tube at
http://scrapsncompany.com/index.php?main_page=product_info&cPath=113_132_219&products_id=10921
Scrap Kit
by Bibi's Collection. You can get the kit at
http://scrapsncompany.com/index.php?main_page=product_info&products_id=10922
Mask of
your choice. I am using one by Rachel Designs. You can get it at
https://racheldesignsblog.wordpress.com/2015/05/25/mask-set-70/
Font of
your choice. I am using Quiglet. You can get it at
http://www.dafont.com/search.php?q=quiglet&text=Saturday+Night+Zing
Plugins:
NONE
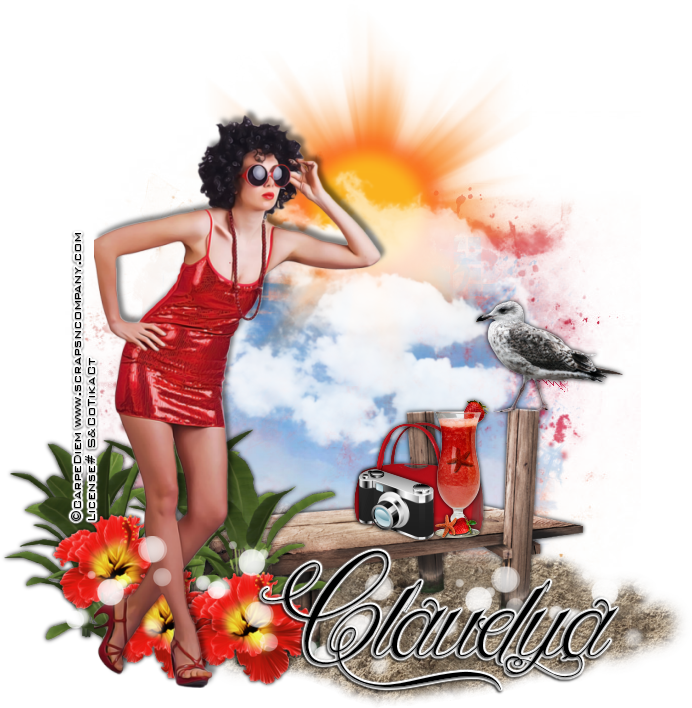
Let's
Begin:
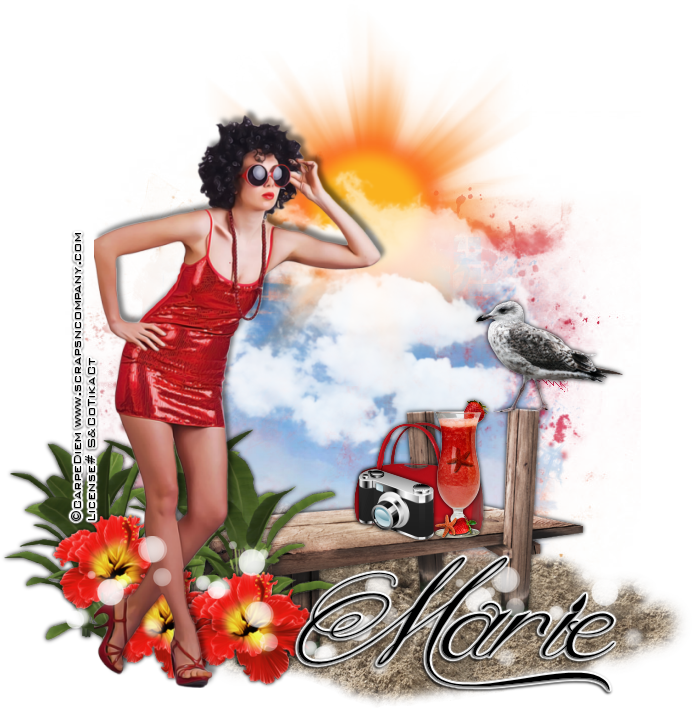
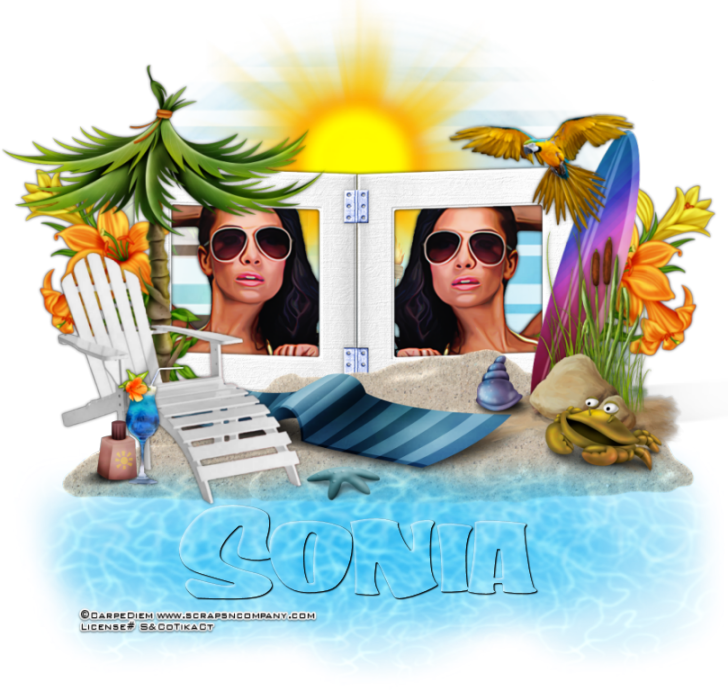
We are
going to work on the main tag first then the banner tag and then
finally the avatar.
Open paper
7 and shift+D to duplicate.
Close the
original.
Promote
your background layer to a raster layer.
Re-size
the paper layer by 85%.
Un-check
the re-size all layers so that just the paper re-sizes.
Apply your
mask and delete the mask layer and merge the group.
Open paper
6 and copy and paste as a new layer.
Re-size by
85%.
Apply the
mask again and delete the mask layer and merge the group.
Your top
mask layer should be just smaller than the first.
Open your
full tube and copy and paste as a new layer.
Re-size if
needed and position where you would like her.
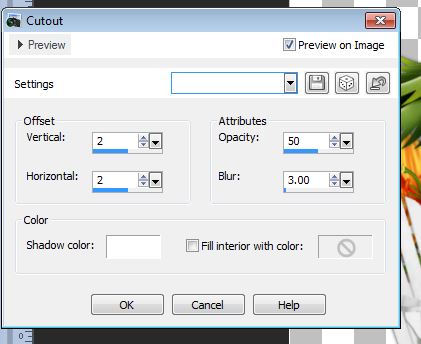
Add a drop
shadow.
Open
element 76 and re-size by 85%.
Copy and
paste as a new layer and drag under your tube.
Place
along the bottom of the tag so she is standing on it.
Open
element 75 and image flip horizontal.
Copy and
paste as a new layer and place in the top corner opposite your tube.
Add a drop
shadow.
Open
element 72 and re-size by 50%.
Copy and
paste as a new layer and place in the sand.
Add a drop
shadow.
Open
element 71 and re-size by 50% and then again by 60%.
Copy and
paste as a new layer and place in front of the first shell.
Add a drop
shadow.
Open
element 68 and re-size by 50% 2x.
Copy and
paste as a new layer and drag down under the sand.
Place
opposite your tube.
Add a drop
shadow.
Open
element 52 and re-size by 50%.
Copy and
paste as a new layer.
Place in
front of the barrel.
Add a drop
shadow.
Open
element 20 and re-size by 50% and copy and paste as a new layer.
Move down
under the sand.
Place to
the left of your barrel.
Duplicate
and image flip horizontal.
Move
behind your barrel and to the right side of it.
Open
element 24 and re-size by 50% and then again by 65%.
Copy and
paste as a new layer and place near the flip flops in the sand.
Open
element 32 and re-size by 75% and until it is just smaller than your
tube.
Copy and
paste as a new layer and drag under your tube.
Place
behind her but so you can see it also. Use my tag for reference.
Open
element 61 and copy and paste as a new layer.
Drag down
to just above your mask layer.
Re-size by
75% until it is the same size and fits nicely on top of your masks.
Add your
name and copyright/licensing information.
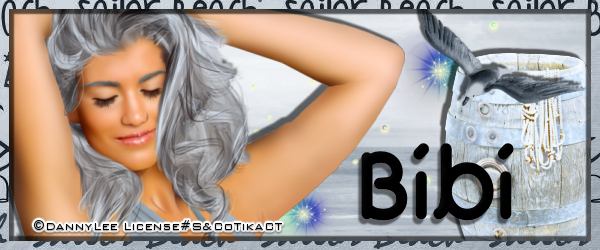
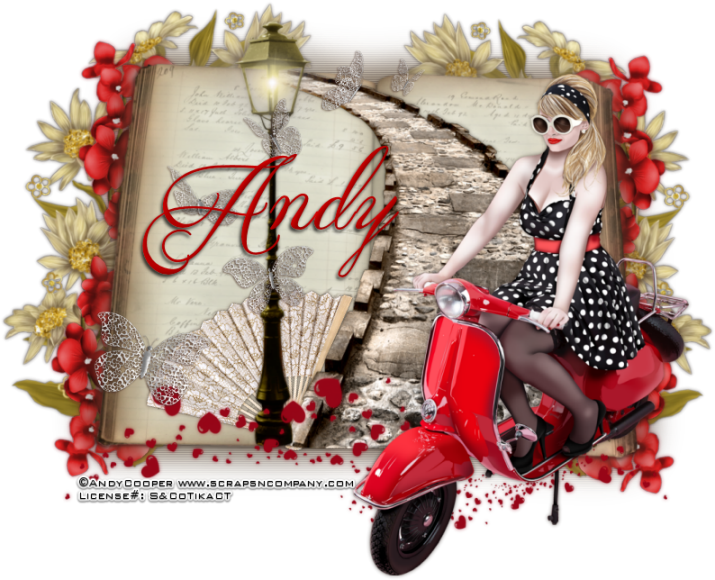
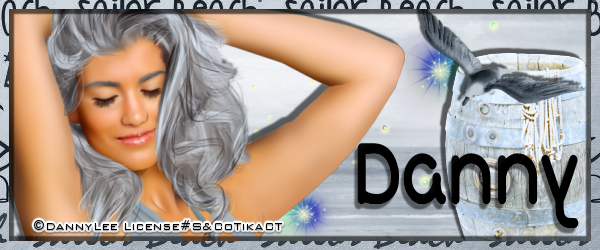
Now lets
work on the banner tag:
Open a new
blank canvas that is 600x250
Selections
select all.
Open paper
6 and copy and paste into selection.
Selections
modify and contract by 9.
Selections
invert.
Open paper
7 and and copy and paste as a new layer.
Selections
invert again and hit delete.
Selections
select none.
Add a drop
shadow to this new frame layer.
Open your
half cut tube and copy and paste as a new layer.
Move to
the far left and add a drop shadow.
Open
element 75 and re-size by 65%.
Copy and
paste as a new layer and place in the top right hand corner.
Add a drop
shadow.
Open
element 68 and re-size by 50% 3x.
Copy and
paste as a new layer and move to far right side.
Add a drop
shadow.
Open
element 61 and re-size by 50%. Drag down to just above the background
layer.
Add your
name.
Add your
copyright and licensing information.
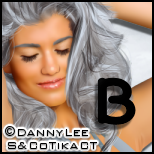
Now lets
make the avatar:
Open a new
blank canvas that is 150x150.
Selections
select all.
Open paper
6 and copy and paste into selection.
Selections
select none.
Open your
cut off tube and copy and paste as a new layer.
Re-size
until it fits nicely within the canvas.
Add a
border of 2 in black
Add your
initial.
Add your
copyright and licensing information.