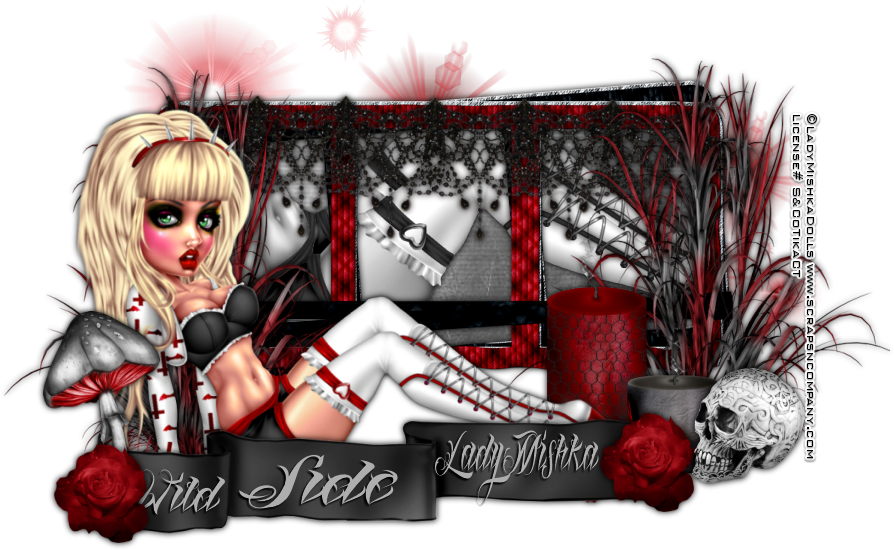
Thursday, March 31, 2016

My Emo Dream


My Emo Dream
written 3/31/2016

This tutorial is meant purely as a guide. Feel free to make your tag unique by using your own choice of tube and scrap kit. If you want your tag to look just like mine then use the same supplies that I have used. This tutorial assumes you have a knowledge of paint shop pro. Any resemblance to any other tutorial or tag is purely coincidental.

Supplies Used:

Tube is an exclusive commission by Lady Mishka. You can purchase her at http://scrapsncompany.com/index.php?main_page=product_info&cPath=490_554&products_id=18667

Lovely matching scrap kit by Bibi's Collection. You can purchase it at http://scrapsncompany.com/index.php?main_page=product_info&products_id=18663

Font of your choice. I am using Pocket Monk. You can download it at http://www.fontspace.com/chequered-ink/pocket-monk

Plugins:
Penta Dot and Cross

Drop shadow used throughout:
2 -2 100 2.00 black

Let's Begin:
Open element 51 and shift+D to duplicate.
Close the original.
Re-size by 75%.
Make your canvas large enough to work with.
Using your magic wand select the inside of the frame.
Selections modify and expand by 10.
Open paper 4 and copy and paste as a new layer.
Drag under the frame.
Selections invert and hit delete.
Selections invert again.
Open your tube and copy and paste as a new layer.
Position her face within the frame.
Selections invert and hit delete.
Selections select none.
Change the properties of the layer to luminance legacy.
Apply the Penta Dot and Cross plugin .. change the amount to 70.
Leave the other settings as default.
Add a drop shadow to both the tube and the frame.
Open element 48.
Copy and paste as a new layer.
Drag to the bottom.
Place in the bottom right corner.
Add a drop shadow.
Duplicate a few times and place all around the frame.
Open element 58 and re-size by 50% and then again by 75%.
Copy and paste as a new layer.
Drag down to just above the blue flowers.
Place around the frame.
Duplicate several times and scatter them all around.
Add a drop shadow to all of them.
Open your tube again and copy and paste as a new layer.
Re-size so she is appropriately sized for your tag.
Add a drop shadow.
Open element 92 and copy and paste as a new layer.
Re-size by 75% 2x.
Move to the bottom center of the tag.
Add a drop shadow.
Open element 97 and re-size by 50%.
Copy and paste as a new layer.
Drag down to just above the frame.
Place on the right side.
Add a drop shadow.
Open element 96 and re-size by 50% 2x.
Copy and paste as a new layer at the top.
Place on the far right of the wordart.
Add a drop shadow.
Open element 40 and re-size by 75% 2x.
Drag under your tube.
Move to the bottom so it looks like the tube is leaning against the pillows.
Add a drop shadow.
Add your name.
Add your copyright and licensing information.
Crop and save.


Wild Side


Wild Side
written 3/31/2016

This tutorial is meant purely as a guide. Feel free to make your tag unique by using your own choice of tube and scrap kit. If you want your tag to look just like mine then use the same supplies I have used. This tutorial assumes you have a knowledge of paint shop pro. Any resemblance to any other tutorial or tag is purely coincidental.

Supplies Used:

Exclusive Tube Commission for Scraps N Company by Lady Mishka. She is called Punk Girl 2. You can purchase her at http://scrapsncompany.com/index.php?main_page=product_info&cPath=490_554&products_id=18582

Matching scrap kit by Scrappin With Lil Ole Me. It is also called Punk Girl 2. You can purchase it at http://scrapsncompany.com/index.php?main_page=product_info&products_id=18724

Font of your choice. I am using Lina Script Demo. You can download it at http://www.fontspace.com/m%C3%A5ns-greb%C3%A4ck/lina-script-demo

Plugins:
NONE

Drop shadow used throughout:
0 0 100 9.50 black

Let's Begin:
Open element 69 and shift+D to duplicate.
Close the original.
Make your canvas large enough to work with.
Move this frame up closer to the top center.
Using your magic wand select the inside parts of the frame.
Make sure you get them all.
Selections modify and expand by 4.
Open paper 24 and copy and paste as a new layer.
Drag under the frame.
Selections invert and hit delete.
Selections invert again.
Open your tube and copy and paste as a new layer.
Position the parts you want within the frame.
Selections invert and hit delete.
Selections select none.
Change the properties of this layer to luminance legacy.
Add a drop shadow to both the tube and the frame.
Merge these 3 layers together.
Copy and paste your tube again as a new layer at the top.
Re-size as needed.
Place to the far left of the frame.
Add a drop shadow.
Open element 113 and copy and paste as a new layer.
Drag to the bottom.
Place so it is peeking out around the frame and your tube.
Duplicate a few times and move them around.
Open element 72 and re-size by 75% and then again by 90%.
This will make it the same size as your frame.
Copy and paste as a new layer and drag to just above your frame.
Place along the top of the frame.
Add a drop shadow.
Open element 21 and re-size by 75%.
Copy and paste as a new layer.
Move to the far left behind your tube.
Add a drop shadow.
Duplicate and move this copy to the far right side of the frame.
Open element 104 and re-size by 50%.
Copy and paste as a new layer and drag behind your tube.
Move to the right so its behind the tube but also in front of the grass.
Add a drop shadow.
Open element 119 and re-size by 50% 2x.
Copy and paste as a new layer and move to the far right in front of the candles and the grass.
Add a drop shadow.
Open element 57 and re-size by 75%.
Copy and paste as a new layer at the top.
Move to the bottom in front of everything.
Add a drop shadow.
Open element 6 and re-size by 50% 2x and then again by 75%.
Copy and paste as a new layer and place at the far left of the ribbon to cover the end.
Add a drop shadow.
Duplicate and move the copy to the far right side of the ribbon to cover the end.
Open element 27 and re-size by 50% and then again by 75%.
Image flip horizontal.
Move to the far left and drag under the rose.
Add a drop shadow.
Using your font add some text to the first 2 folds of the ribbon.
Add your name to the final fold.
Add your copyright and licensing information.
Crop and save.


Monday, March 28, 2016

Skater4Life


Skater4Life
written 3/28/2016

This tutorial is meant purely as a guide. Feel free to make your tag unique by using your own choice of tube and scrap kit. If you want your tag to look just like mine then use the same supplies I have used. This tutorial assumes you have a knowledge of paint shop pro. Any resemblance to any other tag or tutorial is purely coincidental.

Supplies Used:


Matching scrap kit by Kizzed by Kelz. You can purchase it at http://scrapsncompany.com/index.php?main_page=product_info&products_id=18124

Tag template #1 by Me. You can download this template at http://tagsbytika.blogspot.com/2014/06/some-old-templates.html

Mask of your choice. I am using a mask by me. It is my first big mask. You can download it at http://tagsbytika.blogspot.com/2014/06/1st-big-mask.html

Font of your choice. I am using The Sound Of Truth. You can download it at http://www.fontspace.com/lj-design-studios/the-sound-of-truth

Plugins:
Xero Porcelain(optional)

Drop shadow used throughout:
0 0 100 10.00 black

Let's Begin:
Open your tag template and shift+D to duplicate. Close the original.
Make your canvas large enough to work with.
Delete the following layers:
Raster 5 and Raster 1.
Make raster 2 layer active and selections select all float and defloat.
Selections modify and contract by 3.
Layers new raster layer.
Open paper 10 and copy and paste into selection.
KEEP SELECTED!
Open the close up of your tube and copy and paste as a new layer.
Position within the selected area.
Selections select none.
Make the bottom black layer raster 2 active and go to adjust add/remove noise and add noise at 100 uniform and monochrome checked.
Make the closeup tube layer active and go to adjust hue and saturation and colorize then set both values to 0.
Apply the Xero Porcelain filter with the default settings.
Change the properties of this layer to Hard Light.
Merge these 3 layers together : raster 2 the paper layer and the closeup tube layer.
Add a drop shadow.
Make raster 3 layer active and add a drop shadow.
Make Raster 4 layer active and selections select all float and defloat.
Open paper 16.
Copy and paste as a new layer.
Selections invert and hit delete.
Selections select none.
Delete the original layer 4.
Adjust add/remove noise at 50%.
Add a drop shadow.
Open paper 20 and copy and paste as a new layer and drag to the bottom.
Apply your mask.
Delete the mask layer and merge the group.
Add a drop shadow to the mask.
Open your full size tube and copy and paste as a new layer.
Re-size as needed.
Move to the far right of the tag.
Add a drop shadow.
Now lets dress this tag up with some of the great elements from this awesome kit.
I will list the elements I used and placement is entirely up to you.
If you want your tag to look just like mine then use my tag for reference.
If you want to use other elements I didn't use then that is up to you too.
That is what makes each tag unique.
Elements I used:
19
22
39
41
42
72
78
91
99
102
122
Add your name.
Add your copyright and licensing information.
Crop and save.


Tuesday, March 22, 2016

Hippity Hop


Hippity Hop
written 3/22/2016

This tutorial is meant purely as a guide. Feel free to make your tag unique by using your own choice of tube and scrap kit. If you want your tag to look just like mine then use the same supplies I have used. This tutorial assumes you have a knowledge of paint shop pro. Any resemblance to any other tag or tutorial is purely coincidental.

Supplies Used:

Tube is an exclusive by Lady Mishka. It is called Bunny 1 and you can purchase her at http://scrapsncompany.com/index.php?main_page=product_info&cPath=490_554&products_id=18209

The matching scrap kit is by Kizzed By Kelz. It is also called Bunny 1 and you can purchase it at http://scrapsncompany.com/index.php?main_page=product_info&products_id=18220

Mask of your choice. I am using mask #350 by Weescotslass Creations. You can get her awesome masks at http://weescotslasscreations.blogspot.com/2009/04/masks.html

Font of your choice. I am using 2 Peas Evergreen.

Plugins:
NONE

Drop Shadow used throughout:
0 0 75 5.00 black

Let's Begin:
Open element 59 and shift+D to duplicate.
Close the original.
Make your canvas large enough to work with.
Using your magic wand select inside the frame.
Selections modify and expand by 5.
Layers new raster layer and drag under the frame.
Open paper 6 and copy and paste into selection.
Selections select none.
Copy and paste your paper again as a new layer.
Drag to the bottom.
Apply your mask.
Delete the mask layer and merge the group.
Add a drop shadow to the frame.
Open your tube and copy and paste as a new layer.
Re-size as needed.
Place on the far right side of the frame.
Add a drop shadow.
Now lets dress this tag up with some of the great elements from the kit.
I will list the elements I used .. you can use the same elements or choose others that suit you and your tag.
If you want your tag to look just like mine then use my tag as a reference for placement of the elements.
Elements I used:
6
18(duplicated and used a few of them)
24
41
45
63(duplicated and used a few of them)
65
72
110
Using your font add some text to both the bottom and middle boards of the sign.
I chose to make mine look like they were carved in and this is how you do that .
This is the way I do it and others may do it another way so however you accomplish it is what matters in the end.
Type out your text and then convert it to a raster layer.
Selections select all float and defloat.
Hit delete.
Now go to effects 3D effects cut out with the following settings:
Offset – V 0 H 0
Attributes – Opacity 80 Blur 100
Shadow color Black
DO NOT CHECK FILL INTERIOR
Add your name to the top board of the sign.
Add your copyright and licensing information.
Crop and save.


Monday, March 21, 2016

Secret Spring


Secret Spring
written 3/21/2016

This tutorial is meant purely as a guide. Feel free to make your tag unique by using your own choice of tube and scrap kit. If you want your tag to look just like mine then use the same supplies I have used. This tutorial assumes you have knowledge of paint shop pro. Any resemblance to any other tag or tutorial is purely coincidental.

Supplies Used:

Tube of your choice. I am using the work of Lightartist_xxx. You can purchase this tube at http://picsfordesign.com

The beautiful scrap kit is by Purple Dreams Scraps. It is called Secret Spring and you can also purchase it at http://picsfordesign.com

Mask of your choice. I am using

Font of your choice. I am using Autumn Flower.

Plugins:
Dreamsuite Dreamy Photo (optional)

Drop shadow used throughout
0 0 85 5.00 black

Let's Begin:
Open element 43 and shift+D to duplicate.
Close the original.
Make your canvas large enough to work with.
Open element 44 and copy and paste as a new layer and drag under the frame.
This just adds more leaves and makes it look fuller.
Add a drop shadow to both layers
Open element 48 and copy and paste as a new layer.
Drag to where it is under the 2 leaf frames.
Add a drop shadow.
Open paper 1 and copy and paste as a new layer and drag to the bottom.
Apply your mask.
Delete the mask layer and merge the group.
Open your tube and copy and paste as a new layer.
Re-size as needed.
Place on the far right side of the frame.
Add a drop shadow.
Now lets dress this up with some of the elements from this great kit.
I will list the elements I used.
Placement is completely up to you.
If you want your tag to look just like mine then use my tag for reference.
Elements I used:
1
2
4
5
16
24
33
34
41
49
55
Add your name.
Add your copyright and licensing information.
When I was done I applied Dream Suite Dreamy Photo to my tag because I like the look of it but that's up to you.
Crop and save.


Saturday, March 19, 2016

Countryside Cutie


Countryside Cutie
written 3/19/2016

This tutorial is meant purely as a guide. Feel free to make your tag unique by using your own choice of tube and scrap kit. If you want your tag to look just like mine then use the same supplies that I have used. This tutorial assumes you have a knowledge of paint shop pro. Any resemblance to any other tag or tutorial is purely coincidental.

Supplies Used:


Beautiful matching scrap kit by Bibi's Collection. You can purchase it at http://scrapsncompany.com/index.php?main_page=product_info&products_id=18361

Font of your choice. I am using Swistblnk Duwhoers Brush.

Plugins:
NONE

Drop shadow used throughout
1 -1 75 5.00 black

Let's Begin:
Open element 8 and shift+D to duplicate.
Close the original.
Make your canvas large enough to work with.
Re-size this element if you wish but this will be the focal point of your tag.
Move the window element up to the top portion of your tag.
Using your magic wand select the inside of the window areas.
Selections modify and expand by 5.
Layers new raster layer and drag under the window.
Open paper 17 and copy and paste into selection.
Selections select none.
Add a drop shadow to the window.
Open element 42 and copy and paste as a new layer.
Drag under the window and then re-size so it will fit within the framed window area.
Add a drop shadow.
Open your tube and copy and paste as a new layer.
Place on the far right side of the window.
Re-size so she is just larger than the window.
Add a drop shadow.
Open element 133 and copy and paste as a new layer.
I chose to flip mine horizontal so the larger area was covering her cut off legs but this is completely up to you.
Re-size as needed.
Place along the bottom of the tag.
Open element 90 and copy and paste as a new layer.
Re-size as needed.
Move to the far left side of the tag at the bottom.
Add a drop shadow.
Open element 51 and copy and paste as a new layer.
Re-size as needed.
Place along the bottom of your tag in the grassy area.
Duplicate and place several there to fill in areas and make it look nice.
Add a drop shadow to each one when done.
Open element 84 and copy and paste as a new layer.
Re-size as needed.
Place along the bottom of your tag.
Duplicate a few times and place around.
Add a drop shadow to each when you are done.
Open element 18 and copy and paste as a new layer.
Drag to the bottom.
Place along the top so it is peeking out from behind the window.
Re-size as needed.
I duplicated and placed 2 up there.
Add a drop shadow.
Open element 21 and copy and paste as a new layer.
Re-size as needed and place along the bottom of the tag.
Duplicate if you wish.
Add a drop shadow.
Open element 50 and copy and paste as a new layer.
Re-size as needed.
Place so it is sitting on the edge of the water trough.
Add a drop shadow.
Add your name.
Add your copyright and licensing information.


Friday, March 18, 2016

Easter Love


Easter Love
written 3/18/2016

This tutorial is meant purely as a guide. Feel free to make your tag unique by using your own choice of tube and scrap kit. If you want your tag to look just like mine then use the same supplies I have used. This tutorial assumes you have a knowledge of paint shop pro. Any resemblance to any other tag or tutorial is purely coincidental.

Supplies Used:


Scrap kit by Rieneke Designs. You can purchase it at http://scrapsncompany.com/index.php?main_page=product_info&products_id=18392

Font of your choice. I am using Bromello.

Plugins:
NONE

Drop shadow used throughout
0 0 75 9.50 black

Let's Begin:
Open element 41 and shift+D to duplicate.
Close the original.
Make your canvas large enough to work with.
Move the frame up and to the right a bit.
Using your magic wand select the inside of the frame and selections modify and expand by 3.
Layers new raster layer and drag under the frame.
Open paper 3 and copy and paste into selection.
Leave selected.
Open your tube and copy and paste as a new layer.
Position her face within the framed area.
Selections invert and hit delete.
Selections select none.
Duplicate the tube layer.
On the bottom layer change the property to luminance legacy.
On the top layer adjust blur gaussian blur with 4.00
Change the property of this layer to screen.
Add a drop shadow to the bottom layer and the frame.
You can now merge these layers together.
Copy and paste your tube again and place her in front of the frame.
Add a drop shadow.
Open element 3.
Re-size by 60%.
Copy and paste as a new layer and drag under the frame.
Duplicate many times and place all around the frame.
Add a drop shadow to all and merge these layers together.
Open element 4 and re-size by 60% 2x.
Copy and paste as a new layer and drag under your tube and place behind her legs.
Add a drop shadow.
Open element 5 and re-size by 60% and then again by 75%.
Copy and paste as a new layer and place in the upper left behind her head and then duplicate and move this copy to the lower right.
Add a drop shadow to both.
Open element 8 and re-size by 60% 3x and then move to the lower right behind the one flower but in front of the group of flowers.
Open element 14 and copy and paste as a new layer.
Drag down to the bottom and place in the lower left so it appears your tube is sitting on it.
Add a drop shadow.
Open element 19 and re-size by 65% copy and paste as a new layer and drag down to just above the frame.
Place on the right side and add a drop shadow.
Open element 20 and re-size by 50% and then again by 65%.
Copy and paste as a new layer and place in front of the basket. Add a drop shadow.
Repeat with element 21.
Open element 22 and re-size by 50%.
Copy and paste as a new layer.
Drag under your tube and move to the far right behind her feet.
Add a drop shadow.
Open element 32 and re-size by 75%.
Copy and paste as a new layer.
Drag down to just above the frame.
Place in the top left corner.
Add a drop shadow.
Duplicate and move this copy to the lower far right.
Open element 44 and re-size by 50% and then again by 65%.
Copy and paste as a new layer and move to the lower far right so it appears to be sitting on the shoe of your tube.
Add a drop shadow.
Add your name.
Add your copyright and licensing information.
Crop and save.


Thursday, March 17, 2016

Beach Me


Beach Me
written 3/17/2016

This tutorial is meant purely as a guide. Feel free to make your tag unique by using your own choice of tube and scrap kit. If you want your tag to look just like mine then use the same supplies that I have used. This tutorial assumes you have a knowledge of paint shop pro. Any resemblance to any other tag or tutorial is purely coincidental.

Supplies Used:

Tube by Andy Cooper. This tube is part of the “Pretty Colors” collab which can be purchased at http://scrapsncompany.com/index.php?main_page=product_info&cPath=587_144&products_id=18282&zenid=4k6tc72d27p8uequ28ot4kips2

Scrap Kit by Lil Mz Brainstorm. This kit is also part of the collab above.
All you need to do is spend $11.00 at Scraps N Company and you can get the entire collab for free which contains some awesome goodies.

Mask of your choice. I am using mask #451 by Vix. You can get her awesome masks at http://www.freewebs.com/vixpsp/

Font of your choice. I am using Fruitella.

Drop shadow used throughout
0 0 70 7.50 black

Plugins:
NONE

Let's Begin:
Open element 11 and shift+D to duplicate. Close the original.
Re-size so it is a medium to large size.
Make your canvas large enough to work with.
Using your selection tool set on freehand draw around the frame.
Open paper 3 and copy and paste as a new layer and drag under the frame.
Selections invert and hit delete.
Selections invert again.
Open your tube or the close up if your tube if it has one.
Copy and paste as a new layer.
Drag under the frame.
Position the face within the framed area.
Selections invert and hit delete.
Selections select none.
Duplicate the tube layer.
On the bottom copy change the layer properties to luminance legacy.
On the top copy go to adjust blur gaussian blur and blur at 4.00
Change the property of this layer to screen.
Add a drop shadow to the bottom layer and the frame.
Merge these layers together.
Move this frame to the upper left corner of your tagging area.
Open paper 5 and copy and paste as a new layer and drag under the framed image.
Apply your mask.
Delete the mask layer and merge the group.
Open your full sized tube and copy and paste as a new layer. \
Re-size as needed.
Place to the right of your tagging area.
Add a drop shadow.
Now lets dress this beauty up with some elements from this wonderful kit.
I will list the elements I used and if you choose to use the same ones thats great.
If not feel free to use whatever elements you wish.
Placement is entirely up to you however if you want your tag to look just like mine then use my tag for reference.
Elements I used:
5
6
10
12
13
15
20
25
26
Add your name.
Add your copyright and licensing information.
Crop and save.


Wednesday, March 16, 2016

My Way


My Way
written 3/16/16

This tutorial is meant purely as a guide. Feel free to make your tag unique by using your own choice of tube and scrap kit. If you want your tag to look just like mine then use the same supplies that I have used. This tutorial assumes you have a knowledge of paint shop pro. Any resemblance to any other tag or tutorial is purely coincidental.

Supplies Used:
Tube of your choice. The tube I am using is called Tanya by Alex Prihodoko. You can purchase it at http://picsfordesign.com

Scrap kit is called Fuck U by Purple Dreams Scraps which you can also purchase at http://picsfordesign.com

2 masks of your choice. I am using MPM_mask31 by Millies PSP Madness and you can download her masks at http://milliespspmadness.blogspot.com/search/label/Masks the second mask is Vix Mask #401 and you can get her masks at http://www.freewebs.com/vixpsp/

Font of your choice. I am using Anchor Steam NF. You can download it at http://www.fontspace.com/nicks-fonts/anchor-steam-nf

Wordart by me which can be downloaded at https://app.box.com/s/4k9dtbfxts0ly4lrswkaaubaua6ehgy5

Plugins:
Eye Candy 4000 Gradient Glow (optional)


Drop shadow I used throughout
0 0 100 6.00 black
unless otherwise noted

Let's Begin:
Open paper 1 and shift+D to duplicate.
Close the original.
Promote the background layer to a raster layer.
Re-size by 85% and then make your canvas large enough to work with.
Apply your first mask. I used the mask MPM_mask31 to this layer.
Open paper 02 and copy and paste as a new layer.
Re-size by 85%.
Apply your second mask. This is where I used the mask by Vix.
Delete the mask layer and merge the group.
Adjust add/remove noise. Add noise at 70% uniform and monochrome checked.
Add a drop shadow of 2 -2 100 2.00 black to this layer.
Open element 40 and copy and paste as a new layer.
Drag between the 2 mask layers.
Open your tube and copy and paste as a new layer.
Re-size as needed.
Move to the far right side of the tagging area.
Add a drop shadow.
Open element 24 and shift + D to duplicate.
Close the original.
Image rotate to the right.
Using your magic wand select the inside of the frame.
Selections modify and expand by 3.
Open paper 12 and copy and paste as a new layer.
Drag under the frame.
Selections invert and hit delete.
Selections select none.
Open your tube again and copy and paste as a new layer into this frame.
Position her face within the frame.
Selections invert and hit delete.
Selections select none.
Duplicate so there are 2 layers.
On the bottom layer adjust hue and saturation colorize and set both values to 0.
On the top copy adjust blur gaussian blur and set to 4.00.
Change the property of this layer to Screen.
Add a drop shadow to the frame.
Merge visible.
Copy this frame and paste as a new layer on your tag.
Drag behind your tube.
Image free rotate to the left 20 degrees.
Adjust sharpen.
Now lets dress it up with some of the elements from this great kit.
I will list the elements I used.
If you choose to use other elements thats completely up to you.
Placement of the elements is also completely up to you.
If you want your tag to look just like mine then use my tag as a reference.
Elements I used:
08
10
14
28
32
34
42
44
45
47
48
Open the wordart and copy and paste as a new layer.
Drag down to just above your tube.
Move to the right side.
Add a drop shadow.
I also added a white gradient glow to help it stand out a bit but thats completely up to you.
Add your name.
Add your copyright and licensing information.
Crop and save.