
Showing posts with label Digi Divas. Show all posts

Friday, May 20, 2016

Love Remembered


Love Remembered
Written 5/20/2016
This tutorial is meant purely as a guide. Feel free to make your tag unique by using your own choice of tube and scrap kit. If you want your tag to look just like mine then use the same supplies I have used. This tutorial assumes you have a knowledge of paint shop pro. Any resemblance to any other tag or tutorial is purely coincidental.
Supplies Used:
The tube is called Callie by Chris Pastel You can purchase this tube at http://digidivas.co.uk/shop/
Scrap kit is called Dark Love by Amy Marie and you can purchase this kit at http://amymarieskits.com/store/
Tag template by Rachel Designs. I am using tag template #9 and you can download it at https://racheldesignsblog.wordpress.com/2016/05/14/tag-template-9/
Brushes of your choice or sparkles of your choice. You can get some awesome brushes at http://deviantart.com
Font of your choice I am using Lustinmal . This is a PTU font.
Plugins:
DSB Flux Linear Transmission

Drop shadow used throughout:
0 0 80 15.00 black
Let’s Begin:
Open the tag template and shift+D to duplicate. Close the original.
Remove the following layers:
Background, Raster 1
Merge the layers that have 2 of the same shape together into 1 layer each so for example merge together layers 1 & 2 and so on until you are done. This will help minimize the number of layers you are working with. Once you are done merging then fill each layer with a paper from the kit. The choice of papers you use is completely up to you. Delete all of the original layers as you wont need them any longer.
Flood fill the center circle layer with solid black. Add some sparkles or sparkle brushes of your choice.
Open your tube and copy and paste as a new layer and position with the framed circle area. Using your eraser tool erase any bits hanging out of the frame that you do not want.
Add a drop shadow to all layers.
On the layer 10 colorize to match your tube. Duplicate. On the bottom copy go to adjust blur Gaussian blur at 10.00. Apply the DSB Flux Linear Transmission with the following settings: 
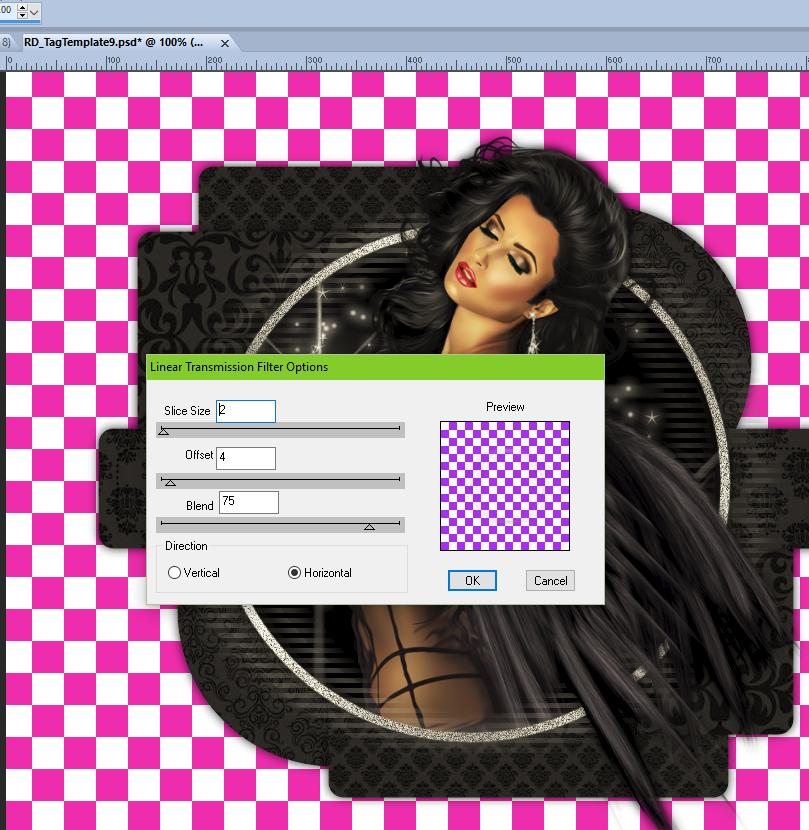
Now lets dress it up with some of the elements from the kit. Feel free to use elements I didn’t use to make your tag unique. Placement of the elements is completely up to you. If you want your tag to look just like mine then use my tag for reference on the placement.
Elements I used:
2
3
19
22
26
30
50
58
60
108
114
Add a drop shadow to all elements.
Add your name.
Add your copyright and licensing information.
Crop and save. 

Wednesday, May 18, 2016

Summer Splash


Summer Splash
Written 5/18/2016
This tutorial is meant purely as a guide. Feel free to use your own choice of tube and scrap kit to make your tag unique. If you want your tag to look just like mine then use the same supplies that I have used. This tutorial assumes you have a knowledge of paint shop pro. Any resemblance to any other tag or tutorial is completely coincidental.
Supplies Used:
Tube of choice. I am using the tube Laura by Chris Pastel. You can purchase this tube at http://digidivas.co.uk/shop/
Scrap Kit is by Amy Marie. It is called Lilac Waves. You can purchase the kit at http://amymarieskits.com/store/
Font of your choice. I am using Autumn Flower. This is a PTU font.
Plugins:
NONE
Drop shadow used throughout:
0 0 70 16.00 black

Let’s Begin:
Open element 82 and shift+D to duplicate. Close the original. Make your canvas large enough to work with. Using your  magic wand select the inside of the frame and go to selections modify and expand by 3. Layers new raster layer and drag under the frame. Open paper 11 and copy and paste into selection.
LEAVE SELECTED!!!
Open element 91 and copy and paste as a new layer. Position within the selected framed area down in the lower left corner area. Selections invert and hit delete. Selections select none.
Add a drop shadow to the dock and the frame.
Open element 33. Re-size by 75%. Copy and paste as a new layer, Place at the top of the frame. Drag to the bottom and position so the little circles are peeking out from the top behind the frame. Duplicate. Image flip vertical. Move this down to the bottom. Duplicate again and image rotate to the right 90 degrees and move to the right side. Duplicate and image flip horizontal and move to the left side. Add a drop shadow to each one and then merge the 4 together.
Open element 90 and re-size by 110% 2x. Drag to the bottom. Add a drop shadow.
Open element 108 and copy and paste as a new layer. Place in the top left corner. Add a slight drop shadow.
Open element 107 and re-size by 75%. Copy and paste as a new layer and place in front of the sun. Add a drop shadow.
Open element 18 and re-size by 60%. Copy and paste as a new layer. Drag down to on top of the frame. Place anywhere on the frame. Duplicate and move to somewhere else on the frame. Add a drop shadow to both.
Open element 22 and re-size so it will fit nicely on the frame. Copy and paste as a new layer and place near the bottom of your tube. Duplicate and image flip horizontal and move to somewhere else on the frame. Add a drop shadow to both.
Open element 2 and copy and paste as a new layer and place near the bottom of your tube and in front of the tube. Add a drop shadow.
Open element 36 and re-size by 75%. Image flip horizontal. Copy and paste as a new layer. Drag under the tube and move to the far right of the tube at the bottom of the tube. Add a drop shadow.
Open element 77 and re-size by 75%. Image flip horizontal and copy and paste as a new layer. Move to the far left of the frame. Add a drop shadow.
Open element 100 and copy and paste as a new layer. Place on the far left to fill in some of the gap. Add a drop shadow.
Open element 85 and re-size. Copy and paste as a new layer. Place at the bottom of the frame. Add a drop shadow.
Open element 59 and re-size by 50%. Copy and paste as a new layer and place within the frame area.
Open element 12. Copy and paste as a new layer and place at the bottom of the tag. Add a drop shadow.
Add your name.
Add your copyright and licensing information.
Crop and save.