Showing posts with label Ginnibug Designz. Show all posts

Thursday, March 12, 2015

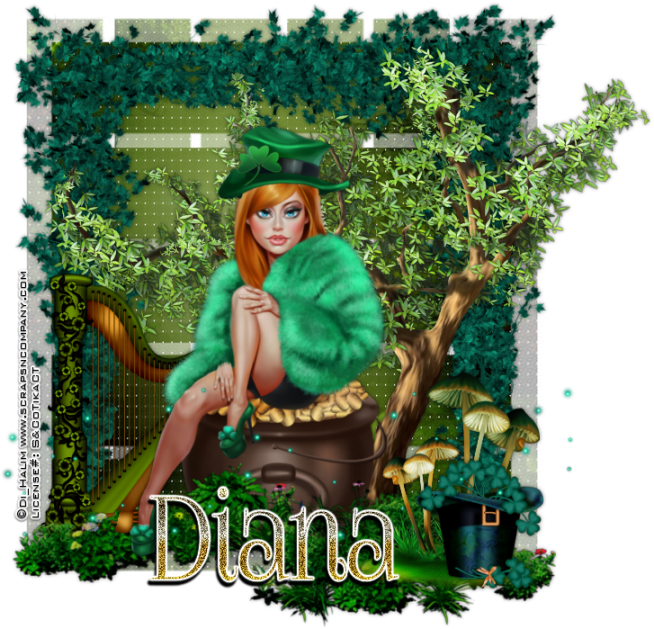
Pot O' Gold


Pot O' Gold
written 3/12/2015

Supplies Needed:


Scrap Kit by Ginnibug Designz. You can get it at http://scrapsncompany.com/index.php?main_page=product_info&products_id=8416

Mask of your choice. I am using mask #250 by Vix. You can get it at http://www.freewebs.com/vixpsp/

Font of your choice. I am using Foglihten No07 and you can get it at http://fontspace.com/gluk/foglihtenno07

Drop shadow used:
0 0 50 6.00 black

Plugins:


Let's Begin:
Open a new blank canvas that gives you plenty of room to work with.
Open paper 5 and copy and paste as a new layer.
Apply your mask.
Delete the mask layer and merge the group.
Open your tube and re-size if needed.
Copy and paste as a new layer and place in the center bottom of your mask area.
Add a drop shadow.
Open element 94 and re-size so it will fit nicely along the bottom of the tag.
Copy and paste as a new layer and move into position on the bottom.
I erased bits so her foot was in front of it. This is completely up to you.
Add a drop shadow.
Open element 63 and re-size so it will fit nicely along side of your masked area.
Copy and paste as a new layer and move to the far left side.
Add a drop shadow.
Duplicate and move this copy to the far right side.
Duplicate again and go to image rotate and rotate to the right 90 degrees.
Move this copy to the top and drag under the first 2.
If you have any bits of stem poking out erase it.
Open element 46 and copy and paste as a new layer.
Move to the right side behind your tube.
Add a drop shadow.
Open element 10 and re-size by 50% and then again by 60%.
Copy and paste as a new layer at the top.
Move to the bottom right corner of your tag.
Add a drop shadow.
Open element 6 and re-size by 50%.
Copy and paste as a new layer.
Drag under the hat and move to the bottom right behind the hat.
Add a drop shadow.
Open element 36 and re-size by 50%.
Copy and paste as a new layer.
Drag under your tube.
Place to the far left of the tag.
Add a drop shadow.
Open element 65 and re-size so it will fit nicely across your tag.
Copy and paste as a new layer and move to the bottom.
Add your name.
Add your copyright and licensing information.
Crop and re-size if you wish.
Save.


Saturday, February 28, 2015

Very Bad


Very Bad
written 2/28/2015

Supplies Needed:


Brushes of your choice. I used grungy type brushes. You can get some good brushes at http://deviantart.com

Font of your choice. I am using Impact and Robusta Light.

Plugins:

Let's Begin:
Open v39 and shift+D to duplicate.
Close the original.
Re-size to a size you want for you tag. This will be the frame/base.
Layers new raster layer and drag under the frame.
Using your magic wand select the inside of the frame.
Selections modify and expand by 10.
Open vp5 and copy and paste into selection.
Selections select none.
Layers new raster layer and drag to the bottom.
Apply the brushes of your choice all around the frame.
Add a drop shadow to the frame.
Open your tube and copy and paste as a new layer.
Position so she is sitting on the bottom inside of the frame.
Add a drop shadow.
Now add elements all around her inside and outside the frame.
The elements I used were:
v3
v4
v5
v16
v19
v41
v49
v51
v54
Using your impact font write out “VERY BAD” along the bottom and make it rather large.
I erased bits to make it appear as one leg was in front but that is up to you.
Add your name
Add your copyright and licensing information.
Crop and save.


Saturday, July 26, 2014

Fall Whimsy


Fall Whimsy
written 7/26/2014

Supplies Needed :


Scrap Kit by Ginnibug Designz. You can get it at http://scrapsncompany.com/index.php?main_page=product_info&products_id=4886

Font of your choice. I am using Cygnet Round and Cursivessca Kursive Kursive.

Lets Begin:
Open af60 from the kit.
Shift+d to duplicate.
Close the original.
Resize by 85%.
Make your canvas large enough to work with.
Center the frame in the canvas.
Using your magic wand select the inside of the frame.
Selections modify and expand by 2.
Layers new raster layer and drag under the frame.
Open afp1 and copy and paste into selection.
Selections select none.
Open your tube and resize and copy and paste as a new layer and move to the far right of the frame.
Add a slight drop shadow.
Open af11 and copy and paste as a new layer.
Move over to the far left so it is peeking out from behind the frame.
Duplicate and image flip horizontal.
Move the duplicate to the right side.
Merge these 2 layers together and add a drop shadow.
Open af12 and resize by 50% 2x.
Copy and paste as a new layer into the frame above your paper but under the frame.
Place along the bottom and duplicate a few times and just place them randomly.
Open af62 and resize by 60%.
Copy and paste as a new layer and move to the far left side. I made it look like it was coming out of the frame.
Open af96 and copy and paste as a new layer.
Resize and move over to the top left.
Add a drop shadow.
Open af100 and copy and paste as a new layer and move over to the far left.
Drag to the very bottom.
Duplicate and move this layer to the far right.
Open af95 and resize so they fit nicely in the frame near the top.
Open af84 and resize so it fits nicely along the bottom of the frame and goes up the left side.
If you want to add some text to the center like I did that is up to you.
Add your name.
Add your copyright and licensing information.
Crop and save.