


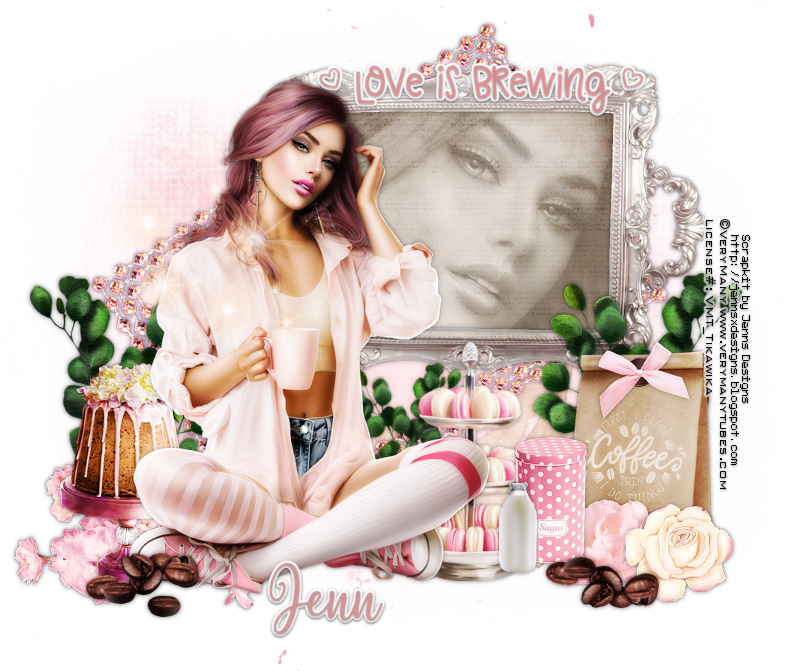
Cream and Coffee
Written on 6/22/2022
This tutorial is meant purely as a
guide. Feel free to use your own choice of tube or scrap kit to make your tag
unique.
If you want your tag to look just
like mine, then use the same supplies I have used. This tutorial assumes you
have a knowledge
of paint shop pro. Any resemblance to
any other tag or tutorial is completely coincidental.
Supplies Used:
Tube of your choice; preferably one
with a close up. I am using a tube called Cup of tea 8 by VeryMany. You can purchase
this tube at www.verymanytubes.com
Scrap kit is called Cream and Coffee
by Jenns Designs. You can purchase this kit at www.jennsxdesigns.com
Mask of your choice. I am using Mask
#27 by Rachey. You can get her masks at http://scrapsofenchantment.blogspot.com
Font of your choice. I am using Beauty
Boutique.
Plugins: (plugins are most generally
optional)
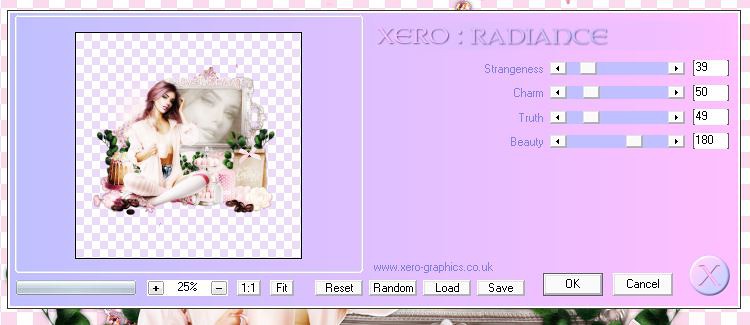
Xero Radiance
Let's Begin:
Open paper 3. Shift+D to duplicate.
Close the original. Promote the background layer to a raster layer. Make your
canvas large enough to give you plenty of room to work with. Apply the mask of
your choice. Delete the mask layer and merge the group.
Open element 50. Copy and paste as a
new layer. Resize by 80%. Adjust sharpen. Move to the top right of your tag.
Using your magic wand select the inside of the frame and selections modify and
expand by 5. Layers new raster layer. Drag under the frame. Open paper 6 and
copy and paste into selection.
LEAVE SELECTED.
Open the close up of your tube and
copy and paste as a new layer. Resize as needed and move to where the face is
inside of the frame. Selections invert delete then selections select none. Change
the properties of this layer to luminance legacy and lower the opacity to 40. Merge
the tube down to the paper. Add a drop shadow to the frame and merge the frame
down to the tube/paper layer.
Open your main tube. Copy and paste
as a new layer. Resize as needed. Place to the left of the framed image. Add a
drop shadow.
Now let’s dress the tag up with
elements from the kit. I will list the elements I used. Feel free to use other
elements to make your tag unique. Placement of the elements is completely up to
you. If you want your tag to look just like mine, then use my tag for
reference.
Elements I used:
1
6
8
31
38
41
42
60
74
84
85
103
118
122
Merge visible.
Apply the Xero Radiance filter using the
following settings::
Add your name.
Add your copyright and licensing
information.
You can make a 3 piece set like I
have by simply using elements from your tag and creating an avatar.
Thank you for trying my tutorial.
XoXoXo
No comments:
Post a Comment