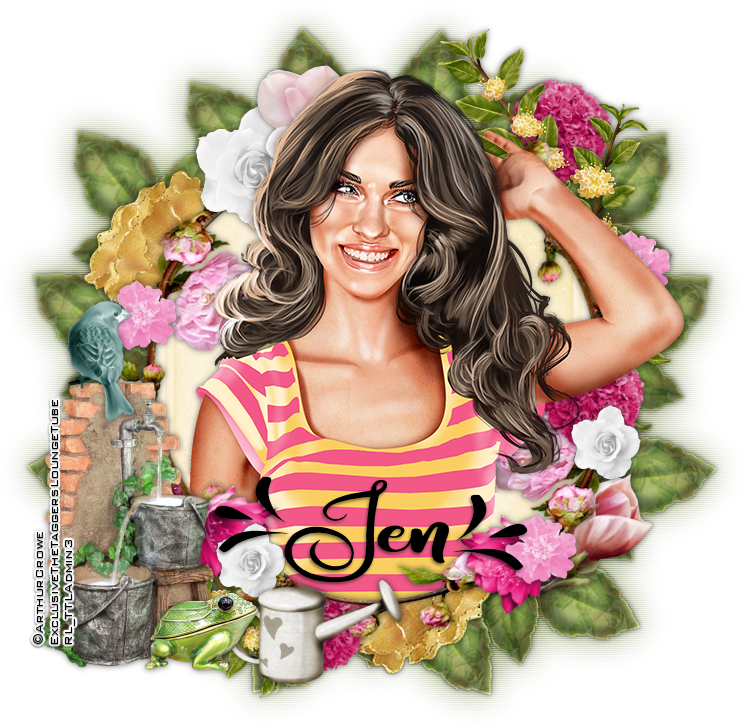
Beaute Florale
(Floral Beauty)
Written 8/19/2017
This tutorial is meant purely as a guide. Feel free to
use your own choice of tube or scrap kit to make your tag unique. If you want
your tag to look just like mine then use the same supplies I have used. This
tutorial assumes you have a knowledge of paint shop pro. Any resemblance to any
other tag or tutorial is completely coincidental.
Supplies Used:
Tube of your choice. I am using an exclusive tube that
was created by Arthur Crowe. This tube is exclusive to The Taggers Lounge psp
forum. You can get this tube simply by participating at the forum. You can find
the forum at http://thetaggerslounge.forumotion.com/
You must have a TTL license to use this image. You can find Arthur’s awesome
tubes at https://arthurcrowesfactory.com/store/
Scrap kit is another exclusive made for The Taggers
Lounge forum. This kit was made by Jens Sweet Temptations. You can also get
this kit by participating at the forum. You can find other goodies by Jen at http://jenssweettemptations.blogspot.ca/
Font of your choice. I am using Amastery(I also used
some of the extra swashes)
Plugins: (plugins are most generally optional)
NONE
Let's Begin:
Open element 29 and shift+D to duplicate. Close the
original. Make your canvas large enough to work with. Resize the frame by 120%.
Using your freehand selection tool set on point to
point carefully go around the outside edge of the frame and select it. Be
really careful that you do not go outside of the frame.
Layers new raster layer. Drag under the frame.
Open paper 5 and copy and paste into selection.
LEAVE SELECTED
Open your tube and copy and paste as a new layer.
Position so that her top half is within the framed area but also some poking
out around if you wish. Erase any bits you do not want. Selections select none.
Add a drop shadow to both your tube and the frame.
Open element 44. Copy and paste as a new layer and
drag to the very bottom. Place at the top right side near your tubes head. Now
here is where it is going to take some work from you but it’s so worth it in
the end. You are going to duplicate this leaf element several times and rotate
it so that you can place it around the frame from the top right to the bottom
right. I rotated mine by 15 and 30 degrees. Make sure you sharpen every time
you rotate. Once you get them built up the way you want then merge them all
together and duplicate that merged layer and image flip horizontal and move to
the left side. You should have a complete ring of leaves all the way around the
frame. Once you are happy then merge both layers together. Duplicate. On the
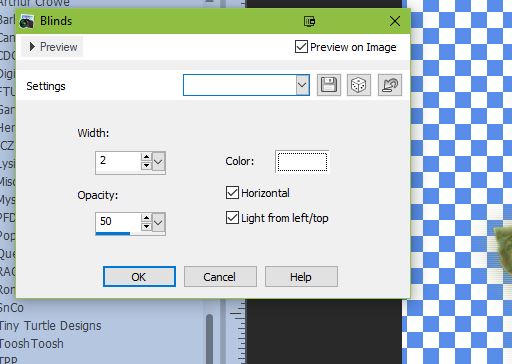
bottom copy Adjust Blur Guassian Blur at 15. On this blurred layer go to
effects texture effects Blinds with the following settings:
Add a drop shadow to the top copy of the leaves layer.
Now here is where some freedom of expression can come
in. Let’s begin building up the flowers all around the frame. You can use any
flowers of your choice from the kit. Use as little or as much as you want. I
placed some under the frame and peeking out. I placed some on top. Re-size them
as you need to. Add a drop shadow to each one.
Once you get all of your flowers on let’s add some
other elements.
Open element GElement. And copy and paste as a new
layer. Re-size by 75%. Move to the bottom left corner of the frame. Add a drop
shadow.
Open element 33. Copy and paste as a new layer.
Re-size by 50% 2x. Move to the bottom left in front of the water buckets
element. Add a drop shadow.
Open element 9 and copy and paste as a new layer.
Re-size by 50% and then again by 70%. Drag under the frog layer. Place at the
bottom on the right side of the frog. Add a drop shadow.
Open element 6 and copy and paste as a new layer.
Re-size by 50% 2x and image flip horizontal. Place on top of the water buckets
element. Add a drop shadow.
You can of course at this time add any other elements
if you wish and make the tag uniquely yours. I chose to stop here.
Add your name.
Add your copyright and licensing information.
Crop
and save.


No comments:
Post a Comment