Showing posts with label Pirate. Show all posts

Saturday, September 10, 2022

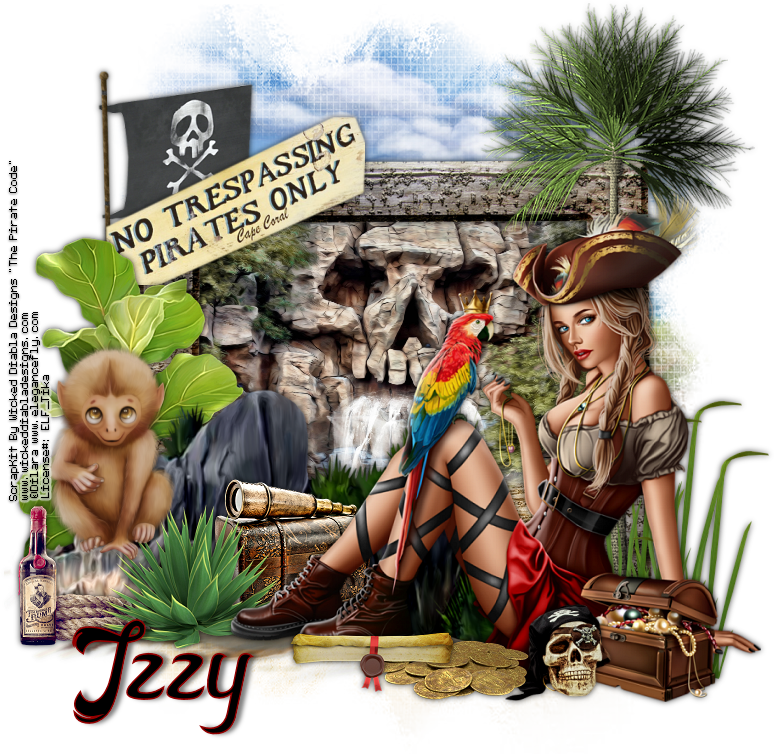
The Pirate Code Set


The Pirate Code

Written on 9/9/2022

This tutorial is meant purely as a guide. Feel free to use your own choice of tube or scrap kit to make your tag unique.

If you want your tag to look just like mine, then use the same supplies I have used. This tutorial assumes you have a knowledge

of paint shop pro. Any resemblance to any other tag or tutorial is completely coincidental.


Supplies Used:

Tube of your choice. I am using the work of Dilara. This tube is called Cassandra and can be purchased at www.elegancefly.com

The scrap kit is by Wicked Diabla Designs and is called The Pirate Code. You can purchase this kit at www.wickeddiabladesigns.com

Font of your choice. I am using Horstail.

Mask of your choice. I am using a mask by Vix. This is Big Mask 018.

Plugins: (plugins are most generally optional)


Let's Begin:

Open element 85 from the kit and resize as you wish. Make sure it is centered in the canvas. Make your canvas large enough to work with. You can always crop and resize when you are done. I prefer larger tags and that is why I say resize things to your liking as not everyone makes or likes the larger tags.

Using your magic wand select the inside of the frame. Selections modify and expand by 8.

Layers new raster layer. Drag this new layer under the frame layer.

Open paper 3 and copy and paste into selection on the new raster layer. Selections select none.

Add a drop shadow of your choice to the frame.

Open paper 11 and copy and paste as a new layer. Drag to the bottom and resize as you wish.

Apply your mask to this layer. Delete the mask layer and merge the group.

Open your tube and copy and paste as a new layer. Resize as needed. Don’t forget to sharpen after resizing so you don’t lose any of the details. Place to the right side of the frame. Add the drop shadow of your choice.


Now let’s dress the tag up with elements from the kit. I will list the elements I used. Feel free to use other elements to make your tag unique. Placement of the elements is completely up to you. If you want your tag to look just like mine, then use my tag for reference.

Elements I used:

1

30

31

37

50

51

54

64

65

72

74

95

Add any additional elements that you wish.

Add your name.

Add your copyright and license information.

Crop and resize if you wish.

Save your tag.

If you would like to make yours into a 3 piece set as I have simply create an avatar using papers from the kit and the tube.

For the banner piece I simply took elements from the tag. Resized them and arranged similar to how they were in the tag.

Thanks for trying my tutorial.

♥♥♥


Friday, July 22, 2016

Beware Of Pirates


Beware Of Pirates
Written 7/22/2016
This tutorial is meant purely as a guide. Feel free to use your own choice of tube or scrap kit to make your tag unique. If you want your tag to look just like mine them use the same supplies I have used. This tutorial assumes you have a knowledge of paint shop pro. Any resemblance to any other tag or tutorial is completely coincidental.

Supplies Used:
Tube of your choice. I am using one by Very Many Tubes. You can purchase this tube at http://verymanytubes.com/
The awesome scrap kit is by Amy Marie’s Kits. You can purchase it athttp://amymarieskits.com/store/
Font of your choice. I am using Anchor Steam NF. You can download it at http://www.fontspace.com/nicks-fonts/anchor-steam-nf
Plugins:
NONE
Drop shadow used throughout:
0 0 60 6.50 black

Let's Begin:
Open a new blank canvas that is going to give you plenty of room to work with. You can always crop and re-size when we are done.
Open paper 4 and set it as your background color. Turn off your foreground color.  Using your preset elipse shape tool draw out a fairly large oval in the center of your canvas. Once you are happy convert to a raster layer.
Selection select all float and defloat. Open the close up of your tube or if your tube does not have a close up just your tube will do and copy and paste as a new layer. Position her face within the selected area. Once happy selections invert and hit delete. Leave selected.
Layers new raster layer and drag under the background shape layer. Selections invert again. Selections modify and expand by 5. Flood fill your layer with a color or gradient of your choice. Adjust add remove noise and add noise at 100. Selections select none. Make the tube layer active and go to adjust hue and saturation colorize and set both values to 0. Lower the opacity of this layer to 40. Merge down to the background layer. Add a drop shadow to the bottom noise layer. Merge all layers together.
Open your tube and copy and paste as a new layer and move to the far right side. Add a drop shadow.
Now let’s dress the tag up with elements from the kit. I will list the elements I used. Feel free to use other elements to make your tag unique. Placement of the elements is completely up to you. If you want your tag to look just like mine then use my tag for reference.
Elements I used:
12
18
27
38
39
71
72
80
128
Add your name.
Add your copyright and licensing information.
Crop and and save.