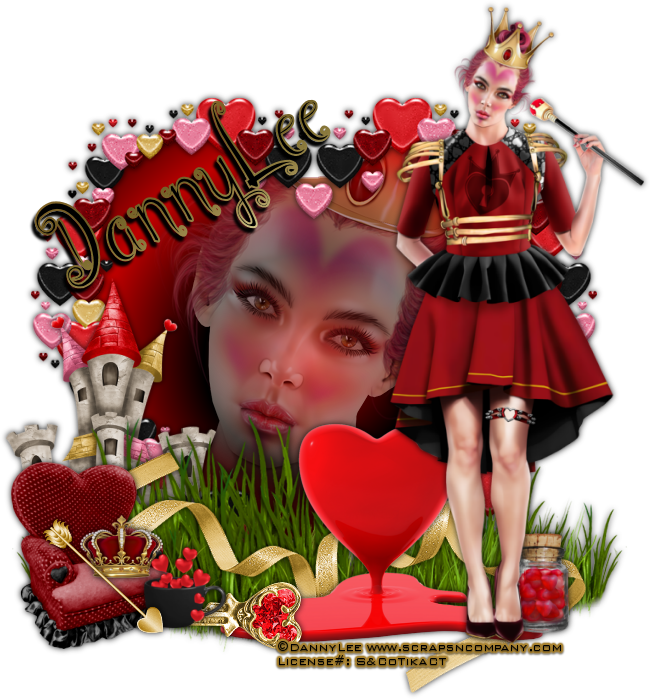
Showing posts with label Danny Lee. Show all posts

Saturday, February 11, 2017

Off With Her Head


Off With Her Head
Written 2/11/2017
This tutorial is meant purely as a guide. Feel free to use your own choice of tube or scrap kit to make your tag unique. If you want your tag to look just like mine then use the same supplies I have used. This tutorial assumes you have a knowledge of paint shop pro. Any resemblance to any other tag or tutorial is completely coincidental.

Supplies Used:
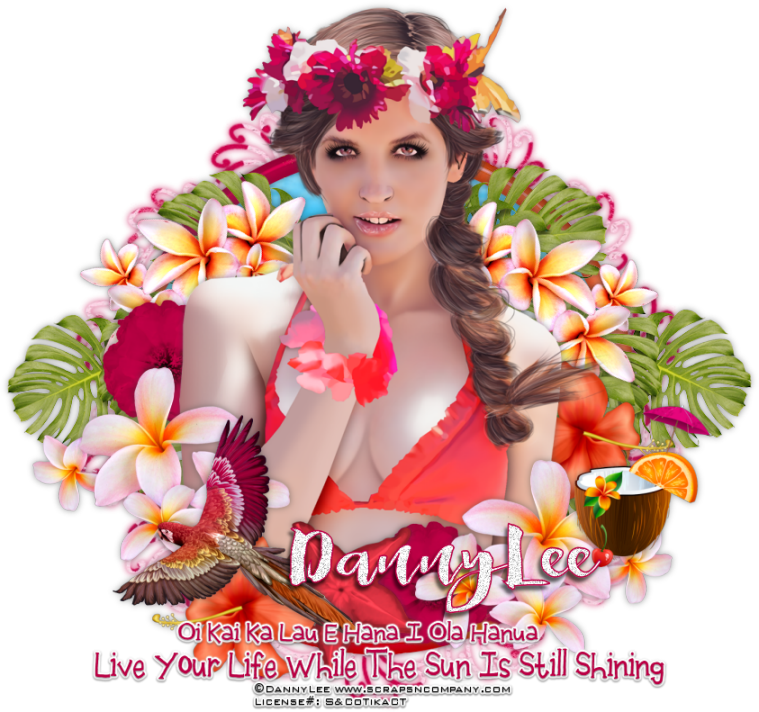
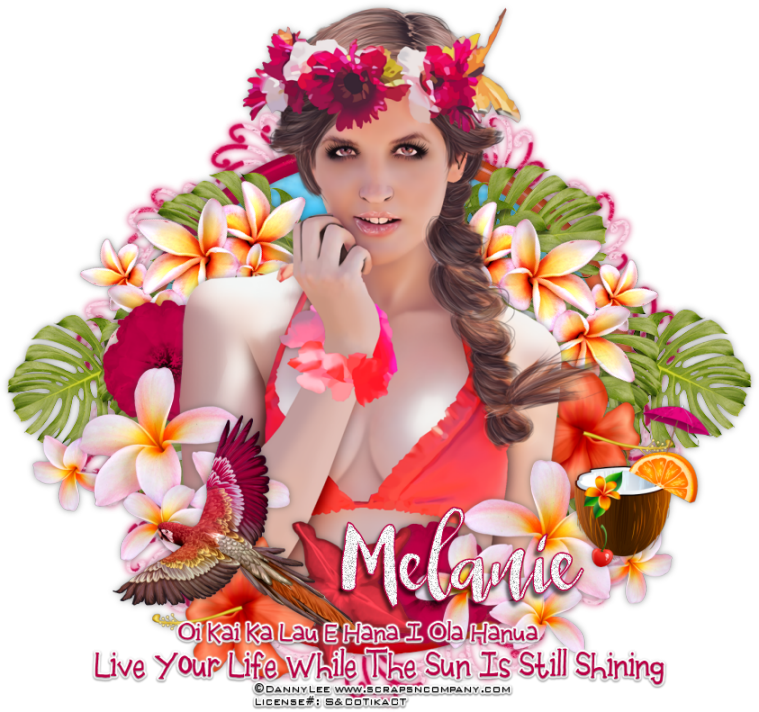
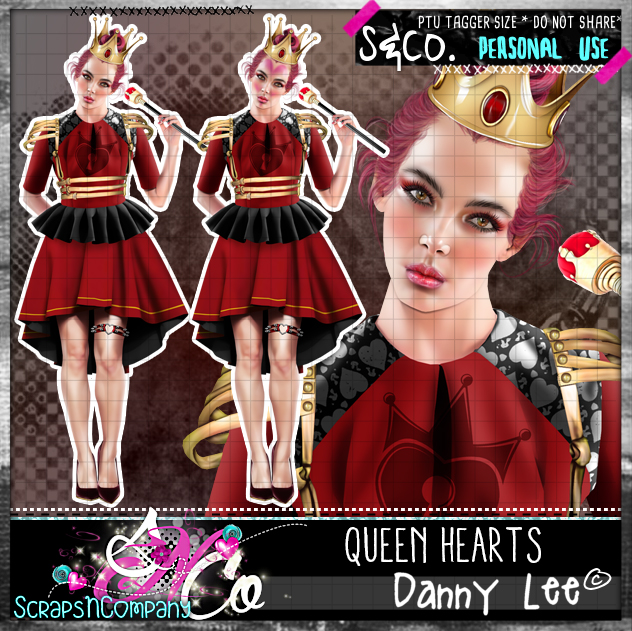
Tube of your choice. I am using a tube by Danny Lee called Queen Hearts. You can purchase her at http://scrapsncompany.com/index.php?main_page=product_info&cPath=113_132_219&products_id=25737

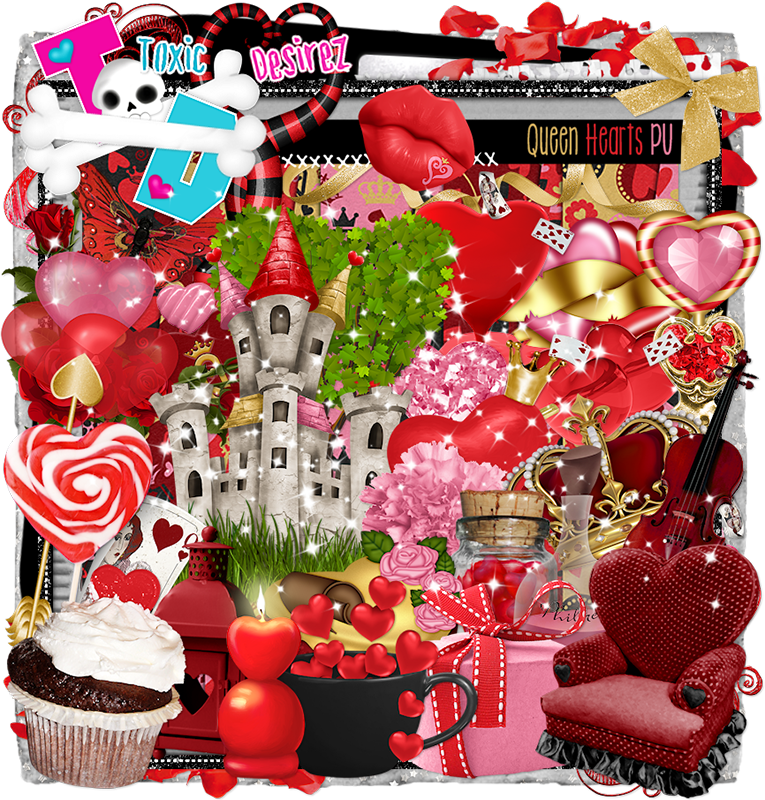
Scrap kit is by Toxic Desirez. It is called Queen Hearts also and can be purchased at http://scrapsncompany.com/index.php?main_page=product_info&products_id=25735

Font of your choice. I am using Amsterday Script. This is a PTU font.

Let's Begin:
Open frame 1 from the kit and shift+D to duplicate. Close the original. Re-size as you wish. Make your canvas large enough to work with.

Using your freehand selection tool set on point to point carefully select around the frame as close to the inside edge that you can get.

Create a foreground background gradient using 2 colors from your tube or the kit. Set the gradient on sunburst with repeats of 2. Layers new raster layer and drag under the frame. Flood fill with your gradient. Layers new raster layer.
Now using your clone tool clone parts of your tube into the selected area on the brand-new layer. Once you are happy selections select none. Lower the opacity of this layer to 50.

Make your gradient layer active and using your soften brush go around the edges and soften the gradient so it doesn’t look so harsh around the edges.

Add a drop shadow to the frame layer.

Open the grass from the kit and copy and paste as a new layer. Re-size so it fits nicely along the bottom of the frame. Add a drop shadow.

Open your tube and copy and paste as a new layer. Re-size so she is just slightly larger than the tag at this point. Place on the far-right side. Add a drop shadow.

Now let’s dress the tag up with elements from the kit. I will list the elements I used. Feel free to use other elements to make your tag unique. Placement of the elements is completely up to you. If you want your tag to look just like mine, then use my tag for reference.

Elements I used:
Arrow
Castle
Chair
Crown
Cup of Hearts
Jar of Hearts
Key
Melting Heart
Ribbon

Add your name.

Add your copyright and licensing information.

Crop and re-size if you wish.

Save your tag.

♥♥♥

Tuesday, May 24, 2016

5th Avenue Darling


5th Avenue Darling
Written on 5/24/2016
This tutorial is meant purely as a guide. Feel free to make your tag unique by using your own choice of tube and scrap kit. If you want your tag to look just like mine then use the same supplies I have used. This tutorial assumes you have a knowledge of paint shop pro. Any resemblance to any other tag or tutorial is purely coincidental.
Supplies Used:
Tube is by Danny Lee and is called Madame Blue Goth. You can purchase her at http://scrapsncompany.com/index.php?main_page=product_info&cPath=113_132_219&products_id=19793
Matching scrap kit is by Lil Mz Brainstorms. It is called Madame Blue. You can purchase it at http://scrapsncompany.com/index.php?main_page=product_info&products_id=19823
Mask of your choice. I am using mask #84 by Weescotslass Creations. You can get her masks at http://weescotslasscreations.blogspot.com/2009/04/masks.html
Font of your choice. I am using Maribelia Evolutions. This is a PTU font.
Plugins:
NONE
Drop shadow used throughout:
0 0 85 11.00
Let’s Begin:
Open paper 5 and shift+D to duplicate. Close the original. Re-size if you wish. Promote the background layer to a raster layer. Make your canvas large enough to work with. Apply the mask of your choice. Delete the mask layer and merge the group.
Open element 12 and re-size so it is proportionate to your mask layer. Copy and paste as a new layer and place in the top right corner kinda overlapping the mask but also outside of it. Duplicate and image flip horizontal and then image flip vertical and move this copy to the bottom left corner. Merge these 2 layers and add a drop shadow.
Open element 51 and copy and paste as a new layer. Re-size so it fits within the mask area. You want to place it more to the left and near the top. Lower the opacity to 40. Add a drop shadow.
Open your tube and copy and paste as a new layer. Re-size so it is proportionate with your tag. Move to the far right side. Add a drop shadow.
Open element 46 and copy and paste as a new layer. Re-size. Move to the bottom left corner and drag under the silver corner elements. Add a drop shadow.
Copy and paste the following elements and re-size to fit on the table:
10, 20, 86, 90
Once you are done add a drop shadow to each layer and if you want merge them all together if you want to help keep your layers tidy.
Open element 88 and re-size and copy and paste as a new layer. Move to the bottom between the table and your tube. Add a drop shadow.
Open element 78 and re-size. Copy and paste as a new layer and place in the bottom left corner in front of the table. Add a drop shadow.
Open element 3 and re-size. Copy and paste as a new layer and place in the bottom right corner behind your tube. Duplicate and move this copy over to the left corner in front of the boxes. Merge together and add a drop shadow.
Open element 21 and re-size. Copy and paste as a new layer and move to the bottom center of your tag. Add a drop shadow.
Add your name.
Add your copyright and licensing information.
Crop and save. 


Tuesday, May 10, 2016

I Will Fight For Her


I Will Fight For Her
Written 5/10/2016
This tutorial is meant purely as a guide. Make your tag unique by using your own choice of tube and scrap kit. If you want your tag to look just like mine then use the same supplies that I have used. This tutorial assumes you have a knowledge of paint shop pro. Any resemblance to any other tag or tutorial is purely coincidental.
Supplies Used:
Tube is called Patriotic Warrior and is by Danny Lee. You can purchase it at http://scrapsncompany.com/index.php?main_page=product_info&cPath=113_132_219&products_id=18883
The matching scrap kit is also called Patriotic Warrior and is by Chili Designz. You can purchase it at http://scrapsncompany.com/index.php?main_page=product_info&products_id=18954
The tag template is by me and can be download at https://app.box.com/s/f0k8lials41ziakd6ii7c9xyea1h5rwi
Font of your choice. I am  using White Larch. You can download it at http://www.fontspace.com/m%C3%A5ns-greb%C3%A4ck/white-larch-personal-use-only
Plugins:
NONE
Drop shadow used throughout:
0 0 70 15.00 black

Let’s Begin:
Open the tag template and delete the creators info layer.
Make your canvas large enough to work with.
Make the black square layer active and go to selections select all float and defloat. Open paper 4 and copy and paste as a new layer. Selections invert and hit delete. Selections select none. Delete the original black square layer.
Make the white pixel words layer active. Add a drop shadow to this layer of 1 -1 100 2.00 black
Make the grey star layer active and selections select all float and defloat. Open paper 13 and copy and paste as a new layer. Selection invert and hit delete. Selections invert again. Open your tube and copy and paste the closeup of the tube as a new layer. Re-size as needed. Place so she is within the selected star area. Selections invert and using your eraser tool erase only the bits of the tube hanging out the bottom of the star. You want her to look like she is popping out of the star so her head and the shield should not be erased. Selections select none. Delete the original grey star layer.
Make the stripes layer active and selections select all float and defloat. Open paper 9 and copy and paste as a new layer. Selections invert and hit delete. Selections select none. Delete the original stripes layer.
Add a drop shadow to all the layers this far except the pixel words as you should have already drop shadowed those.
Open stars4 element from the kit and re-size by 85%. Copy and paste as a new layer and place to the top right of the tag. Drag to the bottom. Add a drop shadow.
Repeat the above steps using the stars3 element but re-size this one by 75% and place so it can be seen between the blue stars.
Open the statue element and re-size by 75%. Image flip horizontal. Copy and paste as a new layer and place on the bottom left in front of the stripes layers. Add a drop shadow.
Open ribbon and re-size by 75%. Copy and paste as a new layer along the bottom of the tag. Add a drop shadow.
Repeat with ribbon2.
Open fireworks and re-size by 75% 2x. Copy and paste as a new layer and drag under the head of the statue.
Open the wordart and re-size by 50%. Copy and paste as a new layer and place in the bottom left corner. Add a drop shadow.
Add your name.
Add your copyright and licensing information.
Crop and save.

Wednesday, April 27, 2016

If She Works On Cars


If She Works On Cars
written 4/26/2016

This tutorial is meant purely as a guide. Feel free to make your tag unique by using your own choice of tube and scrap kit. If you want your tag to look just like mine then use the same supplies that I have used. This tutorial assumes you have knowledge of paint shop pro. Any resemblance to any other tag or tutorial is purely coincidental.

Supplies Used:

Tube is called Sexy Mechanic and she is by Danny Lee. You can purchase her at http://scrapsncompany.com/index.php?main_page=product_info&cPath=113_132_219&products_id=19074

Fun matching scrap kit also called Sexy Mechanic is by Blissful Designs. You can purchase this kit at http://scrapsncompany.com/index.php?main_page=product_info&products_id=19084

Tag Template by me. You can download this template at https://app.box.com/s/zgomi6cuqgzroid7916be204ggm9gb1b

Font of your choice. I am using Two and Two. It is a PTU font.

Plugins:
NONE

Drop shadow used throughout:
0 0 85 12.00 black

Let's Begin:
Open the tag template and shift+D to duplicate.
Close the original.
Delete the credits layer.
Make your canvas large enough to work with.
Make the black circle layer active.
Selections select all float and defloat.
Selections modify and contract by 10.
Layers new raster layer.
Open paper 2 and copy and paste into selection.
LEAVE SELECTED.
Open element 26 and copy and paste as a new layer.
Drag above the stripes layer.
Move to the bottom center of the selected circle.
Once in position selections invert and hit delete.
Selections select none.
Make the stripes layer active and selections select all float and defloat.
Open paper 4 and copy and paste as a new layer.
Selections invert and hit delete.
Selections select none.
Delete the original stripes layer.
Make the grey circle layer active and selections select all float and defloat.
Open paper 3 and copy and paste as a new layer.
Selections invert and hit delete.
LEAVE SELECTED.
Selections invert again.
Selections modify and contract by 10.
Hit delete.
Open your tube and copy and paste as a new layer.
Position so her face is within the framed area.
Selections invert and hit delete.
Selections select none.
Adjust hue and saturation colorize and change both values to 0.
Make the top wordart layer active and selections select all float and defloat.
Open paper 4 again and copy and paste as a new layer.
Selections select none.
Delete the original layer.
Add a drop shadow to all of the layers this far.
Open your tube and copy and paste as a new layer.
Re-size until just slightly larger than the large circle.
Drag down under the wordart layers.
Move to the far right side and add a drop shadow.
Now lets dress this up with some of the elements from the kit.
I will list the elements I used and placement is completely up to you.
If you want your tag to look just like mine then use the same elements I have and use my tag for reference.
Feel free to use any other elements to make your tag unique.
Elements I used:
16
21
22
24
64
66
Add your name.
Add your copyright and licensing information.
Crop and re-size.
Save.


Wednesday, April 20, 2016

Oi Kai Ka Lau E Hana I Ola Hanua


Oi Kai Ka Lau E Hana I Ola Honua
Live your life while the sun is still shining
written 4/20/2016

This tutorial is meant purely as a guide. Feel free to make your tag unique by using your own choice of tube and scrap kit. If you want your tag to look just like mine then use the same supplies that I have used. This tutorial assumes you have a knowledge of paint shop pro. Any resemblance to any other tag or tutorial is purely coincidental.

Supplies Used:

Tube of your choice. Preferably one with a close up. I am using a tube by Danny Lee called Hawaiian Flowers. You can purchase her at http://scrapsncompany.com/index.php?main_page=product_info&cPath=113_132_219&products_id=19093

Beautiful matching scrap kit by Blissful Designs. It is also called Hawaiian Flowers. You can purchase it at http://scrapsncompany.com/index.php?main_page=product_info&products_id=19097

Mask of your choice. I am using mask #265 by Vix. You can download her awesome masks at http://www.freewebs.com/vixpsp/

Font of your choice. I am using 2 Peas Tuxedo for the wordart and Queen for the name.

Plugins:
NONE

Drop shadow used throughout:
0 0 55 10.00 medium grey

Let's Begin:
Open element 40 and shift+D to duplicate.
Close the original.
Re-size if you wish.
Make your canvas large enough to work with.
Open paper 6 and copy and paste as a new layer.
Drag under the frame.
Apply the mask of your choice.
Delete the mask layer and merge the group.
Add a drop shadow to the mask layer.
Make your frame layer active.
Using your magic wand select the inside of the frame.
Selections modify and expand by 3.
Layers new raster layer and drag under the frame.
Open paper 7 and copy and paste into selection.
Selections select none.
Open the closeup of your tube and copy and paste as a new layer.
Position within the framed area.
Erase any bits hanging out of the frame that you do not want.
Add a drop shadow to the tube.
Add a drop shadow to the frame.
Open element 29 and copy and paste as a new layer.
Drag behind your tube but in front of the frame.
Place to the far left so it is peeking out from behind your tube.
Duplicate.
Image flip horizontal.
Move this copy to the far right side.
Merge them together and add a drop shadow.
Open element 7 and copy and paste as a new layer.
Re-size.
Place in the lower right corner of the frame at the top.
Add a drop shadow.
Duplicate and image flip horizontal.
Move this one to the left side of the frame and up just a bit.
Open element 21 and copy and paste as a new layer.
Re-size.
Image free rotate to the left by 30 degrees.
Adjust sharpen.
Move to the top left.
Drag under your tube and place so it is peeking out behind her shoulder.
Duplicate and image flip horizontal.
Move this copy to the right shoulder.
Add a drop shadow to both.
Open element 18 and copy and paste as a new layer.
Re-size.
Move to the far left side. Position where you want.
Add a drop shadow.
Duplicate and move this copy to the bottom right side where you want.
Open element 32 and copy and paste as a new layer.
Re-size.
Move to the bottom left corner and add a drop shadow.
Open element 38 and copy and paste as a new layer.
Re-size.
Place in the bottom.
Add a drop shadow.
Duplicate and image flip horizontal.
Move to the far right side.
Open element 59 and copy and paste as a new layer.
Re-size.
Place over to the right side.
Add a drop shadow.
Open element 89 and copy and paste as a new layer.
Re-size.
Place at the bottom of the frame.
Add a drop shadow.
Using the font of your choice add some text/wordart if you choose.
Add your name.
Add your copyright and licensing information.
Crop and re-size if you wish.
Save. 


Saturday, April 2, 2016

SK8 or Die


Sk8 or Die
written 4/2/2016

This tutorial is meant purely as a guide. Feel free to make your tag unique by using your own choice of tube and scrap kit. If you want your tag to look just like mine then use the same supplies that I have used. This tutorial assumes you have a knowledge of paint shop pro. Any resemblance to any other tag or tutorial is purely coincidental.

Supplies Used:

Tube by Danny Lee. She is called Green Silver. You can purchase her at http://scrapsncompany.com/index.php?main_page=product_info&cPath=113_132_219&products_id=17840

Matching scrap kit by Chili Designz. It is called Silver Green. You can purchase it at http://scrapsncompany.com/index.php?main_page=product_info&products_id=18695

Tag Template by Clarez Creationz. It is template #116 and you can download it at http://clarezcreationz.blogspot.com/2016/03/template-116.html

Brushes of your choice. You can find some awesome brushes at http://deviantart.com

Font of your choice. I am using DK Fiebiger Zwei. You can download it at http://www.fontspace.com/david-kerkhoff/dk-fiebiger-zwei

Plugins:
Penta Jeans

Drop shadow used throughout:
3 -3 75 3.00 black

Let's Begin:
Open the template and shift+D to duplicate.
Close the original.
Remove the following layers:
copyright & background.
Make your canvas large enough to work with.
Make the dots layer active and selections select all float and defloat.
Layers new raster layer and flood fill with black.
Selections select none.
Delete the original dots layer.
Add a drop shadow to this layer.
Make the right rectangle layer active and using your magic wand select the black outside frame.
Adjust Add/Remove noise. Add noise with the following settings:
Uniform 100% monochrome
Selections select none.
Repeat the above steps with all of the rectangle layers.
Merge all of the rectangle layers together.
Using your magic wand select the inside of each of the rectangle layers.
Selections modify and expand by 1.
Open paper 3 and copy and paste as a new layer.
Selections invert and hit delete.
Selections invert again.
Open the close up of your tube and copy and paste as a new layer.
Re-size if needed.
Position within the selected frames how you want.
Selections invert and hit delete.
Selections select none.
On the tube layer apply the Penta Jeans plugin change the amount to 40.
Leave the border width at 4
Add a drop shadow to the tube layer.
Merge the tube layer and the paper layer down to the frames layer.
Add a drop shadow to the frames layer.
Make the right rectangle layer active and using your magic wand select the outside of the frame.
Open paper 12 and copy and paste as a new layer.
Selections invert and hit delete.
Selections select none.
Add a drop shadow to this layer.
Make the right rectangle layer active again and using your magic wand select the inside of the frame.
Selections modify and expand by 2.
Open paper 8 and copy and paste into selection.
Selections select none.
Repeat the above steps with the left rectangle layer.
Layers new raster layer and drag to the bottom.
Apply some brushes of your choice.
Open your full size tube and copy and paste as a new layer.
Re-size as needed.
Move to the far right side.
Add a drop shadow.
Now lets use some of the elements from the kit.
I will list the elements I used.
Placement is up to you.
Use my tag for reference if you wish.
Elements I used:
garbage
light2
sign2
phonebox
tires
Using the font of your choice place some text at the top if you wish.
Add your name.
Add your copyright and licensing information.
Crop and save.


Monday, March 28, 2016

Skater4Life


Skater4Life
written 3/28/2016

This tutorial is meant purely as a guide. Feel free to make your tag unique by using your own choice of tube and scrap kit. If you want your tag to look just like mine then use the same supplies I have used. This tutorial assumes you have a knowledge of paint shop pro. Any resemblance to any other tag or tutorial is purely coincidental.

Supplies Used:


Matching scrap kit by Kizzed by Kelz. You can purchase it at http://scrapsncompany.com/index.php?main_page=product_info&products_id=18124

Tag template #1 by Me. You can download this template at http://tagsbytika.blogspot.com/2014/06/some-old-templates.html

Mask of your choice. I am using a mask by me. It is my first big mask. You can download it at http://tagsbytika.blogspot.com/2014/06/1st-big-mask.html

Font of your choice. I am using The Sound Of Truth. You can download it at http://www.fontspace.com/lj-design-studios/the-sound-of-truth

Plugins:
Xero Porcelain(optional)

Drop shadow used throughout:
0 0 100 10.00 black

Let's Begin:
Open your tag template and shift+D to duplicate. Close the original.
Make your canvas large enough to work with.
Delete the following layers:
Raster 5 and Raster 1.
Make raster 2 layer active and selections select all float and defloat.
Selections modify and contract by 3.
Layers new raster layer.
Open paper 10 and copy and paste into selection.
KEEP SELECTED!
Open the close up of your tube and copy and paste as a new layer.
Position within the selected area.
Selections select none.
Make the bottom black layer raster 2 active and go to adjust add/remove noise and add noise at 100 uniform and monochrome checked.
Make the closeup tube layer active and go to adjust hue and saturation and colorize then set both values to 0.
Apply the Xero Porcelain filter with the default settings.
Change the properties of this layer to Hard Light.
Merge these 3 layers together : raster 2 the paper layer and the closeup tube layer.
Add a drop shadow.
Make raster 3 layer active and add a drop shadow.
Make Raster 4 layer active and selections select all float and defloat.
Open paper 16.
Copy and paste as a new layer.
Selections invert and hit delete.
Selections select none.
Delete the original layer 4.
Adjust add/remove noise at 50%.
Add a drop shadow.
Open paper 20 and copy and paste as a new layer and drag to the bottom.
Apply your mask.
Delete the mask layer and merge the group.
Add a drop shadow to the mask.
Open your full size tube and copy and paste as a new layer.
Re-size as needed.
Move to the far right of the tag.
Add a drop shadow.
Now lets dress this tag up with some of the great elements from this awesome kit.
I will list the elements I used and placement is entirely up to you.
If you want your tag to look just like mine then use my tag for reference.
If you want to use other elements I didn't use then that is up to you too.
That is what makes each tag unique.
Elements I used:
19
22
39
41
42
72
78
91
99
102
122
Add your name.
Add your copyright and licensing information.
Crop and save.


Saturday, February 27, 2016

Mermaids Have More Fun


Mermaids Have More Fun
written 2/27/2016

This tutorial is meant purely as a guide. Feel free to make your tag unique by using your own choice of tube and scrap kit. If you want your tag to look just like mine then use the same supplies that I have used. Any resemblance to any other tag or tutorial is purely coincidental.

Supplies Used:

Matching Scrap Kit by Blissful Designs. You can purchase it at http://scrapsncompany.com/index.php?main_page=product_info&products_id=17379

Tag Template by Dangerously Delicious Designz. You can download it at http://dangerouslydeliciousdesignz.blogspot.ca/2015/06/template167mermaid.html

Animation By Love Shack. You can download it at http://loveysshack.blogspot.com.ar/2011/07/animations-for-today_19.html

Font of your choice. I am using Violet Bee. You can purchase it at https://thehungryjpeg.com/product/381-violet-bee-font/

Plugins:
NONE

Let's Begin:
Open the tag template and shift+D to duplicate.
Close the original.
Remove the following layers from the template:
Raster1, font info, mermaid blue, mermaid white, mermaid d/s, be your own kind of white, be your own kind d/s and bg.
Make your canvas large enough to work with.
Starting at the bottom and working up fill each of the layers with papers from the kit.
On the bottom oval layer add another layer underneath it and make it a little large and fill with white and apply noise.
On the waves layer add the same noise as you did to the white layer.
On the inner blue circle and outer blue circle apply the same noise.
Once done add a drop shadow to all layers.
Open your tube and copy and paste as a new layer at the top and re-size if necessary.
Position in the center of the tag template.
Add a drop shadow.
Open element 71 and re-size by 80%.
Copy and paste as a new layer and drag under your tube.
Move to the bottom and set so your mermaid is sitting in the clamshell.
Add a drop shadow.
Open element 67 and copy and paste as a new layer.
Drag under the clamshell.
Move to the far left so it is peeking out from behind the bottom of the clamshell.
Add a drop shadow.
Duplicate and image flip horizontal.
Move this one to the top right of the clamshell.
Open element 59 and re-size by 50% and then again by 60%.
Copy and paste as a new layer drag under the clamshell.
Move to the right side and make it peek out from the side of the shell.
Open element 48 and copy and paste as a new layer.
Re-size as you wish.
I duplicated mine a few times and re-sized each of them and placed them randomly around the tag.
Open element 24 and copy and paste as a new layer.
Drag down to just above the squarish layer.
Move to the far left side so it is peeking out behind the wheel layers.
Add a drop shadow.
Duplicate and image flip horizontal.
Move to the far right.
Add your name.
Add your copyright and licensing information.
Crop.
Now lets get ready to add the animation.
Merge together all layers from the top down to your tube (include your tube in this first set of merged layers.
Hide this new layer.
Merge together the rest of the layers.
Layers new raster layer and drag to the bottom.
Flood fill with white.
Copy merged the white layer and the layer with the clamshell on it.
Open animation shop and right click and paste as a new animation.
Open the animation you are going to use.
I am using the bubble fountain.
Take note of the amount of frames in the animation. For me its 18.
Duplicate your tag layer to match the frames.
Select all frames in both your animation and your tag.
Grab frame 1 of the animation and drag it onto frame 1 of your tag.
Place where you want.
Now back to psp and copy the layer that has your tube on it.
Back to animation shop and paste this as a new animation.
Repeat the same steps as above.
Duplicate and drag onto the tag.
View your animated tag.
Optimize and save.


Thursday, February 4, 2016

Be Mine


Be Mine
written 2/4/2016

This tutorial is meant purely as a guide. Feel free to make your tag unique by using your own choice of tube and scrap kit. If you want your tag to look just like mine then use the same supplies that I have used. This tutorial assumes you have a basic knowledge of paint shop pro. Any resemblance to another tutorial is purely coincidental and unintended.

Supplies Used:

Tube By Danny. Lee. It is called Hearts Valentine. You can get this tube in the awesome collab at Scraps n Company right now.

The scrap kit is by Mariel Designs and is also part of the above collab.

Mask of your choice. I am using one from The Taggers Lounge Blog.

Font of your choice. I am using Honeymoon Midnight. You can purchase it at https://fontbundles.net/valentines-fonts/rel=br8HiE

Plugins:
NONE

Let's Begin:
Open frame 1 from the kit.
Shift+D to duplicate.
Close the original.
Make your canvas large enough to work with.
Open paper 1-1 from the kit and copy and paste as a new layer.
Drag to the bottom.
Apply the mask of your choice.
Delete the mask layer and merge the group.
Make your frame layer active.
Using your magic wand select the inside of the frame.
Selections modify and expand by 5.
Open paper 4 and copy and paste as a new layer.
Drag under the frame.
Selections invert and hit delete.
Selections select none.
Make the frame layer active again and using your magic wand select the inside of the frame and selections modify and expand by 1.
Open your tube and copy and paste as a new layer.
Position within the selected frame area.
Erase any bits you do not want hanging out of the frame.
Selections select none.
Add a drop shadow to both the tube and the frame.
Open element 5 and copy and paste as a new layer.
Drag down to just above your mask.
Move to the far left so it is peeking out from behind the frame.
Duplicate and move this copy to the far right. Merge these 2 layers together.
Open element 17 and copy and paste as a new layer.
Place at the bottom along the bottom of the frame.
Open element 13 and re-size by 50% 2x.
Copy an dpaste as a new layer and move to the bottom of the frame.
Duplicate a few times if you wish and place randomly around the bottom of the frame.
Repeat the above steps with elements 14 & 15.
Add a drop shadow to all when done.
Merge all of them together just to help keep your layer palette clean.
Open element 16 and copy and paste as a new layer.
Drag down under the flowers and move down so it is peeking out from behind at the top.
Add a drop shadow.
Open element 18 and re-size by 50%.
Copy and paste as a new layer.
Image flip vertical.
Move to the far right bottom corner.
Add a drop shadow.
Duplicate and image flip horizontal.
Move to the far left bottom corner.
Open element 11 and re-size by 50% and then again by 85%.
Copy and paste as a new layer and place bottom center.
Add a drop shadow.
Open element 52 and copy and paste as a new layer.
Place at center bottom over the top half of the heart.
I added noise at 70% this is completely up to you.
Add a slight gradient glow to help it stand out.
Add a drop shadow.
Add your name.
Add your copyright and licensing information.
Crop and save.