Beach
Bound
written
4/7/2015
Supplies
Needed:
Tube by
Andy Cooper. You can get it at
http://scrapsncompany.com/index.php?main_page=product_info&cPath=113_304&products_id=9099
Matching
scrap kit by Tammys Welt. You can get it at
http://scrapsncompany.com/index.php?main_page=product_info&cPath=112_287_291&products_id=9084
Font of
your choice. I am using Impact which comes standard with windows and
also Belphebe which you can get at
http://www.dafont.com/belphebe.font
Plugins:
NONE
Let's
Begin:
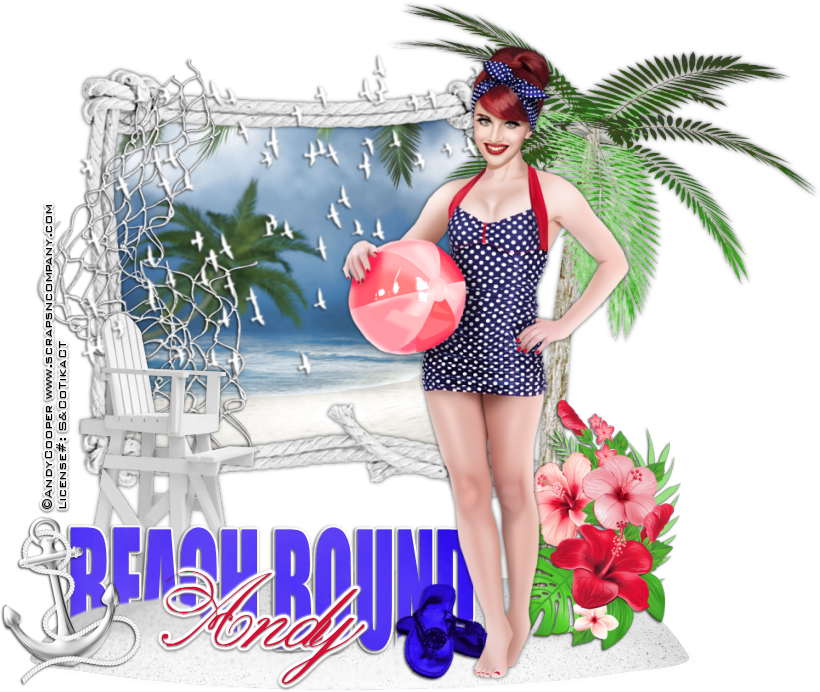
Open
element 57 and shift+D to duplicate.
Close the
original.
Image
re-size by 80%.
Make your
canvas large enough to work with.
Move the
frame to the top left of your tag area.
Using your
magic wand select the inside of the frame.
Layers new
raster layer and drag under the frame.
Open paper
2 and edit copy and paste into selection.
Selections
select none.
Add a
slight drop shadow to the frame.
I used
0 0 70
6.00 black
Open your
full sized tube and copy and paste as a new layer.
Move to
the far right side.
Re-size so
she will fit nicely along the side of the frame.
Add the
same slight drop shadow.
Open
element 58 and copy and paste as a new layer.
Drag under
your tube.
Move to
the bottom so your tube is standing on it.
Open
element 63 and copy and paste as a new layer.
Re-size by
75%.
Move to
the far left of the sand.
Add a
slight drop shadow.
Open
element 19 and copy and paste as a new layer.
Image flip
horizontal.
Image
re-size by 85%.
Move to
the far right behind your tube along side of the frame.
Add a
slight drop shadow.
Using
Paper 6 as your background and the impact font.
Type out
the words “Beach Bound” along the bottom in the sand.
If you
want yours to look kinda buried in the sand here is what I did with
mine.
First add
a drop shadow of 1 -1 70 3.00 black
Then a
slight gradient glow in white and then the drop shadow again.
Duplicate
your sand layer and bring it to the top in front of the text.
Lower the
opacity so you can see the text behind it.
Using your
eraser erase bits of the sand and make it appear to be piled in front
of some of the letters.
Use your
softener tool to smooth the edges when you are done.
Put the
opacity back to 100.
Open
element 12 and re-size by 50% and then again by 70%.
Copy and
paste as a new layer and place on the bottom right of the text.
Add a drop
shadow.
Open
element 40 and re-size 2x by 70%.
Copy and
paste as a new layer and move to the far right behind your tube but
in front of the tree.
Open
element 52 and re-size by 85%.
Copy and
paste as a new layer and drag down to just above your frame.
Move the
far left side of your frame.
Add a drop
shadow.
Open
element 64 and re-size by 50%.
Copy and
paste as a new layer and move to the front bottom left of the sand.
Add a drop
shadow.
Open
element 67 and copy and paste as a new layer and move under your
tube.
Place at
the top going across the framed image.
Add a
slight drop shadow.
Add your
name.
Add your
copyright and licensing information.
Crop and
save.