

Magical Ice
Supplies Used:
Tube is by Arthur Crowe. He is no
longer selling. You must have a license to use his artwork.
Scrap kit is by Catty Creationz. It
is called Under The Starlight and you can find it on her blog https://cattycreationsdezines.blogspot.com/
Font of your choice. I am using Lightshot
Plugins: (plugins are most generally
optional)
Photo Effex Scanlines
Let's Begin:
Open a new canvas that will give you
plenty of room to work with. I usually use 900x900 and then crop and resize
when I am all finished.
Open frame 4 and copy and paste as a
new layer on to your blank canvas. Resize to your liking. This going to be part
of your background base and not an actual frame that is a focal point so you don’t
want it too large.
Using your magic wand select the
inside of the frame and go to selections modify and expand by 10.
Layers new raster layer and drag
under the frame layer.
Open any of the papers of your choice
from the kit and copy and paste into selection. Selections select none.
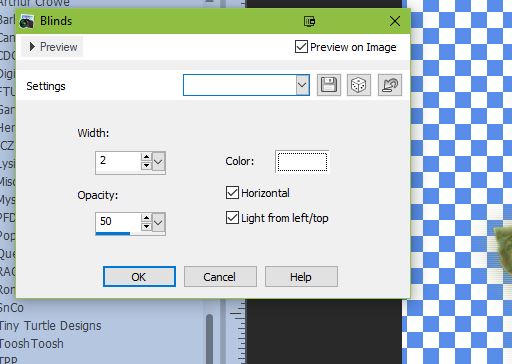
Add a drop shadow of your choice to
your frame and then merge visible.
Image rotate free rotate to the left
20 degrees.
Adjust sharpeness unsharp mask. I use
the following settings:

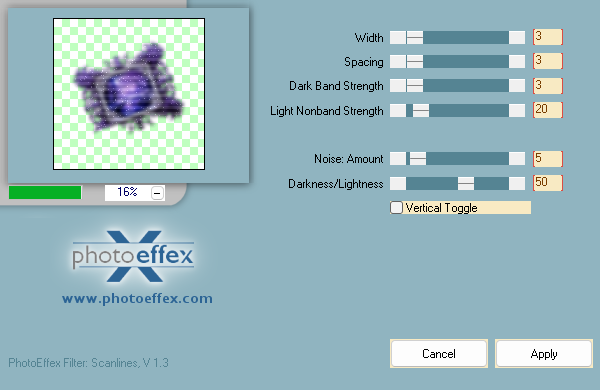
Duplicate. On the bottom original
layer go to adjust blur gaussian blur and blur by 10. Then apply Photo Effex Scanlines
with the following settings:
Now let’s dress the tag up with
elements from the kit. I will list the elements I used. Feel free to use other
elements to make your tag unique. Placement of the elements is completely up to
you. If you want your tag to look just like mine, then use my tag for
reference.
Elements I used: