

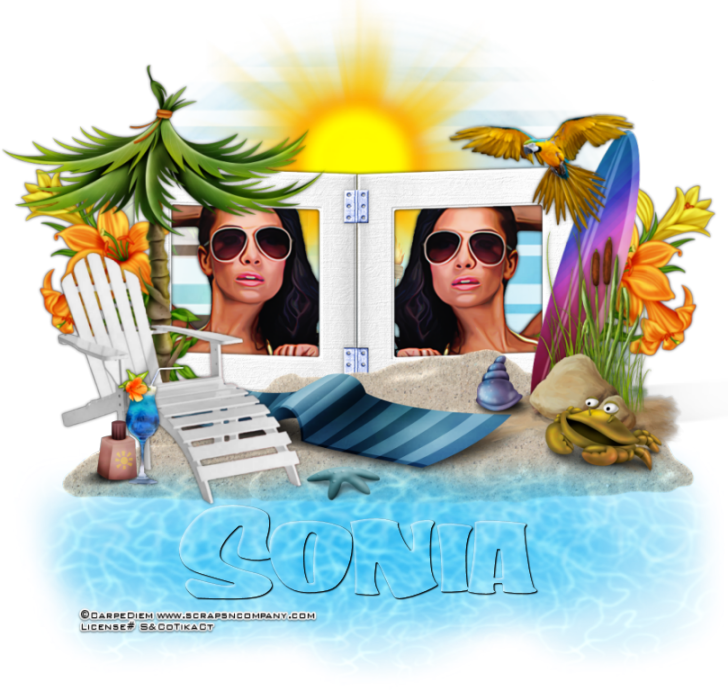
Sun and
Salt Water
written
4/30/2015
Supplies
Needed:
Tube by
Carpe Diem. You can get it at
http://scrapsncompany.com/index.php?main_page=product_info&cPath=113_492_494&products_id=9845
Scrap Kit
by Graphics of Fantasy. You can get it at
http://scrapsncompany.com/index.php?main_page=product_info&cPath=112_511&products_id=9880
Mask of
your choice. I am using mask #298 by insatiable dreams. You can get
her masks at http://insatiabledreams.net
Font of
your choice. I am using A&S California Plug. This is a PTU font.
Plugins:
None
Let's
Begin:
Open frame
7 from the kit.
Shift +D
to duplicate.
Close the
original.
Make your
canvas large enough to work with.
Open paper
4 and copy and paste as a new layer.
Drag under
the frame.
Apply your
mask.
Delete the
mask layer and merge the group.
Center
behind your frame.
Using your
magic wand select the inside of the left side of your frame.
Selections
modify and expand by 1.
Open your
tube and copy and paste as a new layer.
Drag under
the frame and position her face within the frame area.
Selections
invert and delete.
Selections
select none.
Repeat for
the right side but flip your tube horizontal.
Add a drop
shadow to both tubes and merge together.
Add a drop
shadow to the frame.
Now lets
dress up our tag.
My
tutorial is meant to be a guide for you but as always you should make
it your own.
I will
tell you which elements I used and the placement is completely up to
you.
If you
choose to make it just like my tag then use my tag as a reference for
placement.
Elements
used:
4
23
33
44
52
53
60
61
62
63
94
98
100
101
103
Add your
name.
If you
want to do your name like mine so it looks to be part of the water
follow the steps below:
You will
want to type out your name as floating instead of the normal vector.
Go to
selections and save your selection to the alpha channel.
Go to
selections and promote your selection to a layer.
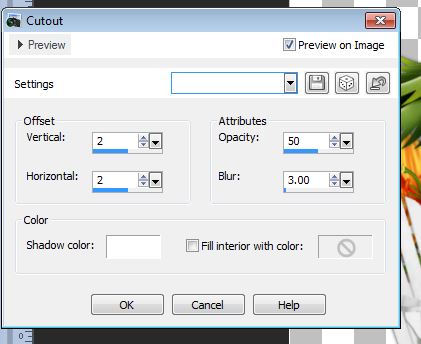
Effects
Cutout using the following settings:
Selections
select none.
Use your
auto proof button if needed and make any adjustments.
Selections
load selection from alpha channel and load the selection you just
saved.
Add a drop
shadow of : 1 1 80 2.00 color black.
Apply the
drop shadow 2x.
Add your
copyright and licensing information.
Crop and
re-size if needed.
Save.

Glad you enjoy to work with Pamela! xx
ReplyDeleteBy Claudya (Carpe Diem)