
written
11/20/2015
This
tutorial is meant purely as a guide. Feel free to make it unique by
using your own choice of tube and scrapkit. If you want your tag to
look just like mine then use the same supplies that I have used.
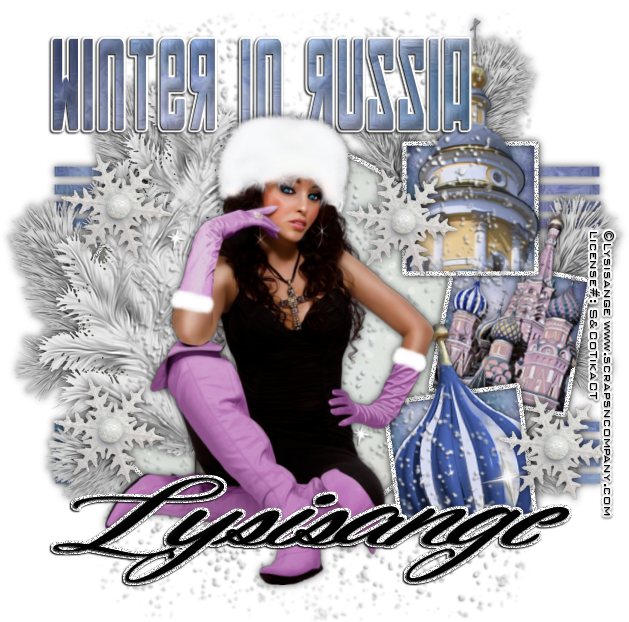
Supplies
Used:
Tube
by Lysisange. It is called Aniela. You can purchase it at
http://scrapsncompany.com/index.php?main_page=product_info&cPath=113_562&products_id=15578
Matching
scrap kit is by Mariel Designs. It is called Winter in Russia. You
can purchase it at
http://scrapsncompany.com/index.php?main_page=product_info&cPath=112_325&products_id=15037
Tag
template by A Creative Space Between. I am using template #22. You
can get it at
http://acreativespacebetween.blogspot.ca/2014/12/ssam-tag-templates-14-45.html
Font
of your choice. I am using Vallerie. This is a PTU font which you can
purchase at
https://creativemarket.com/deadlock/339228-Vallerie-50-Off!!
and also Soviet which you can get at
http://www.dafont.com/soviet.font
Plugins:
NONE
Let's
Begin:
Open
your tag template.
Shift+D
to duplicate. Close the original.
Remove
the following layers:
Raster
1
Scrapity
Scrap
Make
your canvas large enough to give you plenty of room to work with.
You
can crop when you are finished.
Ok
first on all of the “Border” layers go to adjust add/remove noise
at 100% with Gaussian and Monochrome checked.
Merge
your Bottom Thin Slats layer down to the Top Thin Slats layer.
Selections
select all float and defloat.
Open
paper 1 and copy and paste as a new layer.
Selections
invert and hit delete.
Selections
select none.
Delete
the layer that you merged.
Make
your circle layer active and selections select all float and defloat.
Layers
new raster layer.
Open
paper 4 and copy and paste into selections.
Selections
select none.
Delete
the original circle layer.
Repeat
the above with all 3 square layers but fill with paper 1.
Open
your tube and re-size.
Copy
and paste as a new layer.
Place
in the center of the tag.
Add
a drop shadow to all layers.
Open
element 1 and copy and paste as a new layer.
Move
down to the middle frame and image free rotate to the right 17
degrees.
Place
within the framed area and using your eraser tool erase any bits you
don't want hanging out of the frame.
Add
a drop shadow.
Open
element 9 and repeat the above steps placing it in the bottom frame
and rotating it to the left 9 degrees.
Open
element 10 and repeat the above steps but place it in the top frame
area.
No
need to rotate.
Open
element 2 and re-size by 75% 2x.
Copy
and paste as a new layer and drag down to just above the strips.
Place
in the top right corner peeking out around the top picture frame.
Duplicate
and move this copy just down and to the right.
Duplicate
again and image flip horizontal.
Move
to the top left.
Duplicate
and move this one down and to the left a bit.
Merge
all 4 layers together when done.
Add
a slight drop shadow.
Open
element 52 and re-size.
Copy
and paste as a new layer and move behind your tube.
Move
it slightly to the left so it is peeking out from behind the tube.
Add
a slight drop shadow.
Open
element 7 and copy and paste as a new layer.
Re-size
so it is relatively small.
Duplicate
multiple times and place randomly around your tag.
Merge
together and add a drop shadow.
Open
element 14 and re-size.
Copy
and paste as a new layer.
Drag
under your tube.
Add
a slight drop shadow.
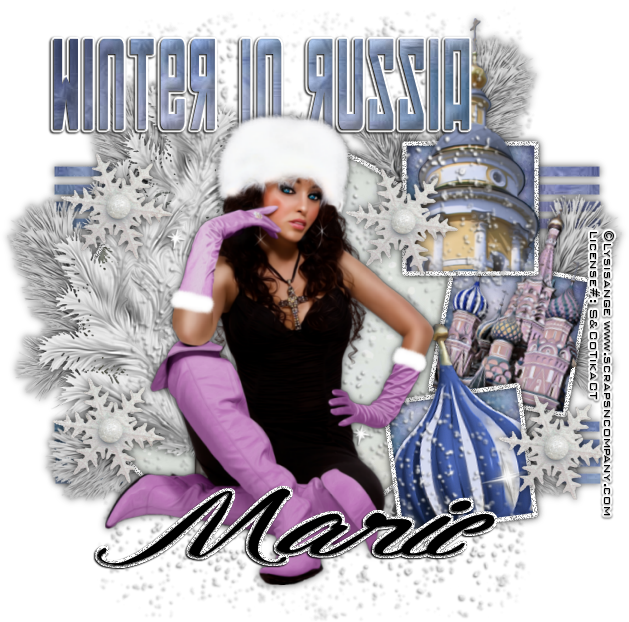
Add
your name.
Add
your copyright and licensing information.
Crop
and save.

No comments:
Post a Comment