
Skater4Life
written
3/28/2016
This
tutorial is meant purely as a guide. Feel free to make your tag
unique by using your own choice of tube and scrap kit. If you want
your tag to look just like mine then use the same supplies I have
used. This tutorial assumes you have a knowledge of paint shop pro.
Any resemblance to any other tag or tutorial is purely coincidental.
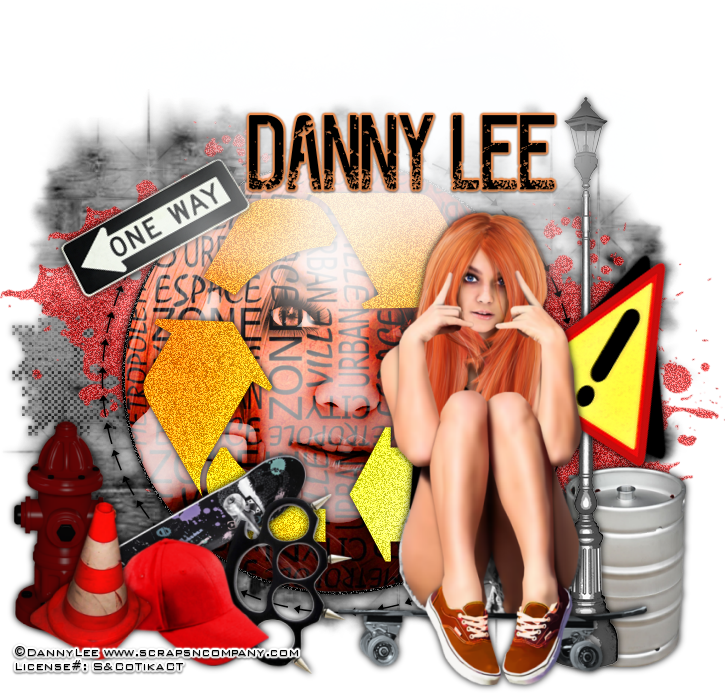
Supplies
Used:
Tube by
Danny Lee. You can purchase her at
http://scrapsncompany.com/index.php?main_page=product_info&cPath=113_132_219&products_id=18056
Matching
scrap kit by Kizzed by Kelz. You can purchase it at
http://scrapsncompany.com/index.php?main_page=product_info&products_id=18124
Tag
template #1 by Me. You can download this template at
http://tagsbytika.blogspot.com/2014/06/some-old-templates.html
Mask of
your choice. I am using a mask by me. It is my first big mask. You
can download it at
http://tagsbytika.blogspot.com/2014/06/1st-big-mask.html
Font of
your choice. I am using The Sound Of Truth. You can download it at
http://www.fontspace.com/lj-design-studios/the-sound-of-truth
Plugins:
Xero
Porcelain(optional)
Drop
shadow used throughout:
0 0 100
10.00 black
Let's
Begin:
Open your
tag template and shift+D to duplicate. Close the original.
Make your
canvas large enough to work with.
Delete the
following layers:
Raster 5
and Raster 1.
Make
raster 2 layer active and selections select all float and defloat.
Selections
modify and contract by 3.
Layers new
raster layer.
Open paper
10 and copy and paste into selection.
KEEP
SELECTED!
Open the
close up of your tube and copy and paste as a new layer.
Position
within the selected area.
Selections
select none.
Make the
bottom black layer raster 2 active and go to adjust add/remove noise
and add noise at 100 uniform and monochrome checked.
Make the
closeup tube layer active and go to adjust hue and saturation and
colorize then set both values to 0.
Apply the
Xero Porcelain filter with the default settings.
Change the
properties of this layer to Hard Light.
Merge
these 3 layers together : raster 2 the paper layer and the closeup
tube layer.
Add a drop
shadow.
Make
raster 3 layer active and add a drop shadow.
Make
Raster 4 layer active and selections select all float and defloat.
Open paper
16.
Copy and
paste as a new layer.
Selections
invert and hit delete.
Selections
select none.
Delete the
original layer 4.
Adjust
add/remove noise at 50%.
Add a drop
shadow.
Open paper
20 and copy and paste as a new layer and drag to the bottom.
Apply your
mask.
Delete the
mask layer and merge the group.
Add a drop
shadow to the mask.
Open your
full size tube and copy and paste as a new layer.
Re-size as
needed.
Move to
the far right of the tag.
Add a drop
shadow.
Now lets
dress this tag up with some of the great elements from this awesome
kit.
I will
list the elements I used and placement is entirely up to you.
If you
want your tag to look just like mine then use my tag for reference.
If you
want to use other elements I didn't use then that is up to you too.
That is
what makes each tag unique.
Elements I
used:
19
22
39
41
42
72
78
91
99
102
122
Add your
name.
Add your
copyright and licensing information.
Crop and
save.

No comments:
Post a Comment