

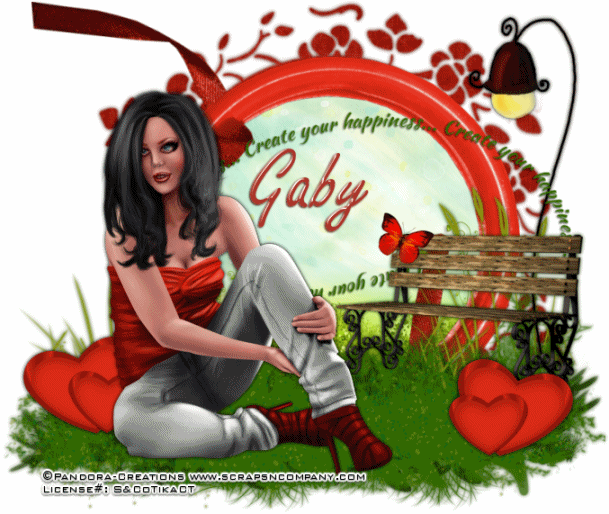
Create
Your Happiness
written
7/23/2014
Supplies
Needed:
Tube by
Pandora Creations. You can get this tube at
http://scrapsncompany.com/index.php?main_page=product_info&cPath=161&products_id=4691
Scrap Kit
by Disturbed Scraps. You can get this kit at
http://scrapsncompany.com/index.php?main_page=product_info&products_id=4689
Mask of
your choice. I am using Doodle Mask 3 by Cat. You can get this mask
at http://insatiabledreams.net
under resources.
Font of
your choice. I am using Playful Print.
Lets
Begin:
Open
element 86. Shift + D to duplicate.
Close the
original.
Resize by
85% 2x.
Center in
your canvas.
Make your
canvas large enough to give you room to work with.
Open paper
3 and copy and paste as a new layer.
Drag under
the frame.
Apply the
mask of your choice.
Delete the
mask layer and merge the group.
Resize if
you need to.
Center
your frame in the mask.
Make your
frame layer active and using your magic wand select the inside of the
frame.
Go to
selections modify and expand by 10.
Layers new
raster layer and drag under the frame.
Open paper
7 and edit copy paste into selection.
Selections
select none.
Open your
tube and resize.
Copy and
paste as a new layer and move to the far left of the frame.
Add a drop
shadow.
Open
element 26 and resize by 90%.
Copy and
paste as a new layer and drag under your tube.
Move down
so your tube is sitting on it.
Add a drop
shadow.
Open
element 70.
Resize and
flip horizontal.
Copy and
paste as a new layer to the right side and so it looks to be coming
out of the frame but sitting on the grass.
Add a drop
shadow.
Open
element 71 and resize and then flip horizontal.
Copy and
paste as a new layer.
Drag under
the bench and position to the right so it looks to be hanging over
the bench.
Add a drop
shadow.
Open
element 91 and resize by 75%.
Copy and
paste as a new layer and place so it appears to be coming behind the
bench but on top of the frame so you can read it.
Add a
slight drop shadow to help it stand out.
Open
element 44 and resize by 50% 2x.
Copy and
paste as a new layer and place in front of the right legs of the
bench.
Duplicate
and flip horizontal.
Move to
the left of your tube.
Add a drop
shadow to both.
Add your
name right in the center of the frame.
Add your
copyright and licensing information.
Crop.
If you are
going to create and add the animation follow the steps below.
Layers new
raster layer and drag to the bottom.
Flood fill
with white.
Hide this
white layer and merge visible all your other layers.
Unhide the
white layer.
Open
element 65 and resize by 50% 2x.
Copy and
paste into animation shop as a new animation.
Go to
effects insert image effect using the following settings:
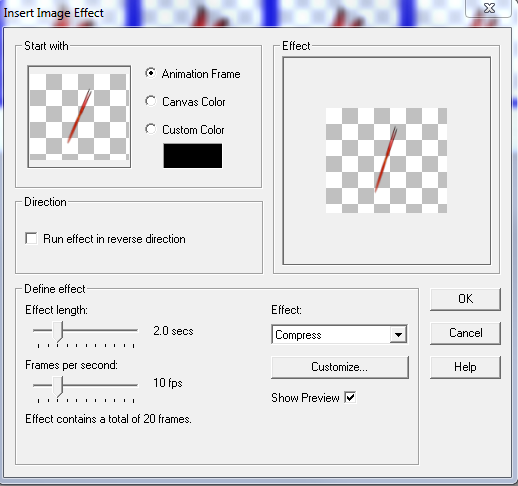
Rotate the
animation 22 degrees to the right.
Back to
your tag in psp and edit copy merged and bring the entire tag into
animation shop and duplicate the frames to match the frames in the
animation you just created.
Mine has
21 frames.
Select all
frames in your animation and your tag.
Grab frame
1 of your animation and drag it onto frame 1 of your tag.
Place so
it is sitting on the bench.
Change the
frame properties of your tag to 5.
Optimize
and save.


No comments:
Post a Comment