

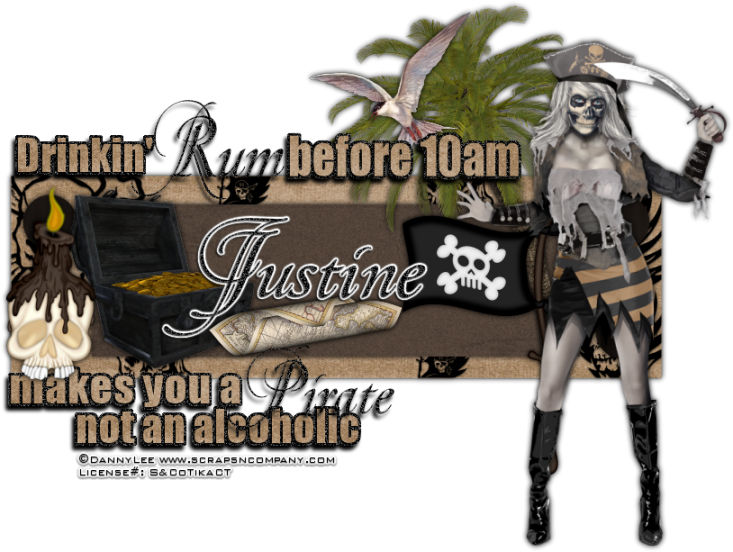
Drinkin'
Rum
written
7/23/2014
Supplies
Needed:
Tube is by
Danny Lee. You can get this tube at
http://scrapsncompany.com/index.php?main_page=product_info&cPath=161&products_id=4839
Scrap Kit
by Made By Justine. You can get this kit at
http://scrapsncompany.com/index.php?main_page=product_info&products_id=4833
Template
is by me. You can get this template at
http://www.4shared.com/photo/DAnK5sIKce/DrinkinRumTemplate_2014tbt.html
Brushes of
your choice. The brushes I got are from FxSanyi and you can get them
at
http://www.deviantart.com/art/Pirate-Skull-Tattoo-Brushes-105310424
Font of
your choice. I am using Pirouette LT Std.
Lets
Begin:
Open the
tag template and shift+D to duplicate so you can use the template
again later.
Close the
original.
Remove the
creators info layer.
Make your
canvas large enough to work with.
You can
crop and resize when you are done.
Make your
black rectangle layer active and go to selections select all float
and defloat.
Open paper
11 and copy and paste as a new layer.
Selections
invert and hit delete.
Selections
invert again.
Layers new
raster layer.
Now apply
the brushes of your choice using black as the color.
When you
are done selections select none.
Delete the
bottom black layer.
Merge your
brush and bottom paper layer together.
Add a drop
shadow.
Make your
grey rectangle layer active and selections select all float and
defloat.
Open paper
12 and paste as a new layer.
Selections
invert and hit delete.
Selections
select none.
Delete the
grey rectangle layer.
Add a drop
shadow to the new paper layer.
Make your
grey circles layer active and selection select all float and defloat.
Open paper
5 and copy and paste as a new layer.
Selections
select none.
Delete the
original grey circles layer.
Add a drop
shadow to the new circles layer.
Make your
Rum layer active and add noise at 100% uniform and monochrome.
Add a drop
shadow.
Repeat the
above steps to your Pirate layer.
Make the
grey word art layer active and go to selections select all float and
defloat.
Layers new
raster layer.
Open paper
11 and edit copy and paste into selection.
Selections
modify and expand by 3.
Layers new
raster layer and drag under the paper layer.
Flood fill
with black.
Add noise
like you did above.
Selections
select none.
Delete the
original grey word art layer.
Add a drop
shadow to both the black noise layer and the paper layer.
Open your
full body tube and resize by 75% 2x.
Copy and
paste as a new layer and move to the far right side of the tag.
Add a drop
shadow.
Open
treasurechest01 and resize by 50%.
Copy and
paste as a new layer and place on the far left of the center
rectangle layer.
Add a drop
shadow.
Open
skullcandle01 and resize by 50% and then again by 75% and copy and
paste as a new layer and move to the far left of the treasure chest.
Add a drop
shadow.
Open map01
and resize by 50% 2x and copy and paste as a new layer and move to
the bottom right of the treasure chest.
Add a drop
shadow.
Open
palmtree01. Resize by 50%. Image flip horizontal.
Place
behind your tube and the word art.
Erase any
bits that show up in between your tubes legs.
Add a drop
shadow.
Open
flag01 and resize by 50%.
Copy and
paste as a new layer behind your tube but coming out the left side.
Add a drop
shadow.
Open
bird01 and resize by 50%.
Copy and
paste as a new layer and move to the top in front of the palm tree.
Add a drop
shadow.
Add your
name.
Add your
copyright and licensing information.
Crop and
resize if you want.
Save!


No comments:
Post a Comment