

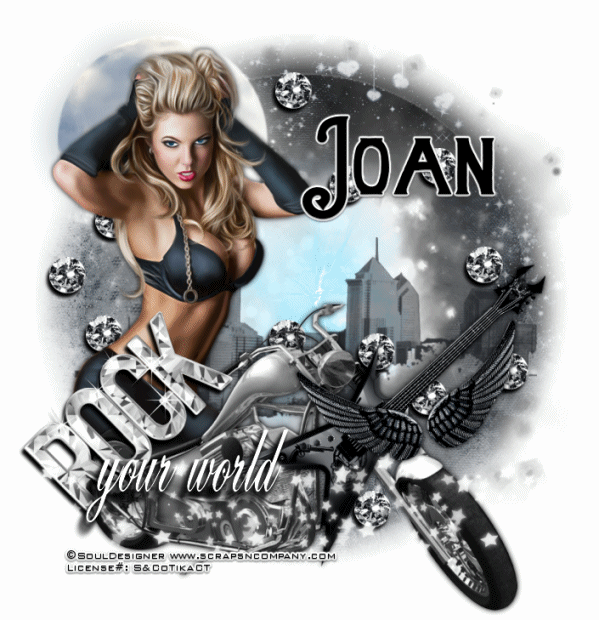
Rock Your
World
written
3/10/2015
Supplies
Needed:
Tube by
Souldesigner. You can get it at
http://scrapsncompany.com/index.php?main_page=product_info&cPath=113_434&products_id=8318
Scrap Kit
by Design By Joan. You can get it at
http://scrapsncompany.com/index.php?main_page=product_info&products_id=8317&zenid=jv0ooed0h89p88q30833ndhbv4
Mask of
your choice. I am using mask #200 by Insatiable Dreams. You can get
her great masks at http://insatiabledreams.net
Font of
your choice. I am using I am using Pipeburn. This is a PTU font.
Animation
by Lovey. You can get it at
http://loveysshack.blogspot.com.ar/2012/01/some-gothy-animations.html
Plugins:
None.
Let's
Begin:
Open a new
blank canvas large enough to work with.
Open paper
11 and copy and paste as a new layer.
Apply your
mask.
Delete the
mask layer and merge the group.
At this
point open your tube and copy and paste as a new layer.
Re-size as
needed so she is just slightly bigger than the mask area.
Move to
the far left side.
Add a nice
drop shadow.
Now we
will begin to build the tag out around her.
Open
element 60 and re-size by 75% and then again by 85%.
Copy and
paste as a new layer and drag under your tube.
Move to
the top left behind her head.
Open
element 82 and copy and paste as a new layer.
Drag down
to just above your mask layer.
Center
within the mask area.
Open
element 95.
Re-size by
75% and then again by 85%.
Copy and
paste as a new layer and place along the bottom.
Hide your
tubes cut off legs behind the rear wheel and seat of the bike.
Add a drop
shadow.
Open
element 137.
Copy and
paste as a new layer.
Drag down
to just above the white center of the frame mask area.
Re-size
until it will fit nicely tucked behind your tube and across the mask
layer to the right.
Use my tag
for reference if needed.
Open
element 19.
Copy and
paste as a new layer.
Re-size so
it will fit nicely in the front of the bike above the front wheel.
Add a drop
shadow.
Open
element 44.
Copy and
paste as a new layer.
Drag to
just below the wings.
Re-size by
85%.
Image flip
horizontal.
Place in
front of the bike and behind the wings.
Add a drop
shadow.
Open
element 140.
Go to
adjust hue and saturation then colorize.
Set both
values to 0.
Copy and
paste as a new layer.
Re-size by
75% 2x/
Move over
to the far left above the rear wheel of the bike and across the tube
a bit.
Add a drop
shadow.
Open
element 133.
Copy and
paste as a new layer.
Re-size by
50% and then again by 65%.
Drag down
to below your tube.
Place
anywhere within your tag and then duplicate many times and move them
around just randomly on your tag.
Add a drop
shadow to each one.
Open
element 77 and copy and paste as a new layer at the top.
Move to
the bottom of the tag.
Using the
font of your choice add the words “ your world” by the “ROCK”
wordart.
Add your
name.
Add your
copyright and licensing information.
If you are
not going to animate then crop and save.
If you are
going to animate lets put this together.
Layers new
raster layer and drag to the bottom.
Flood fill
with white.
Hide all
of your layers.
Now unhide
your white background, the mask layer and the white center layer.
Merge
these 3 layers together.
Now hide
that layer.
Unhide the
rest of the layers and merge them together.
This
leaves you with 2 layers.
Unhide the
bottom layer and copy it.
Open
animation shop and paste as a new animation.
Open your
animation.
Take note
of the amount of frames in your animation.
If you are
using the one I am then it has 20 frames.
Delete the
first frame that is black and then select all the rest of the frames.
Back to
your tag duplicate those frames to match 20 frames.
Select all
of those frames.
Drag the
first frame of your animation onto the first frame of your tag.
Once you
have it where you want it release it.
Place in
the center of the white area.
Back to
psp and copy the layer that has the remainder of your tag on it.
In
animation right click and paste as a new animation.
Again
duplicate the frames to 20.
Select all
frames and drag the first frame to the first frame of your tag.
Once you
are happy with placement release it.
View your
animated tag and if you are happy re-size and save.

No comments:
Post a Comment