
Afraid
Of Light
written
10/23/2015
This
tutorial is meant purely as a guide. Feel free to make your tag
unique by using your own tube and scrap kit. If you want your tag to
look just like mine then use the same tube and the same scrap kit.
Use my tag for reference for placement of items.
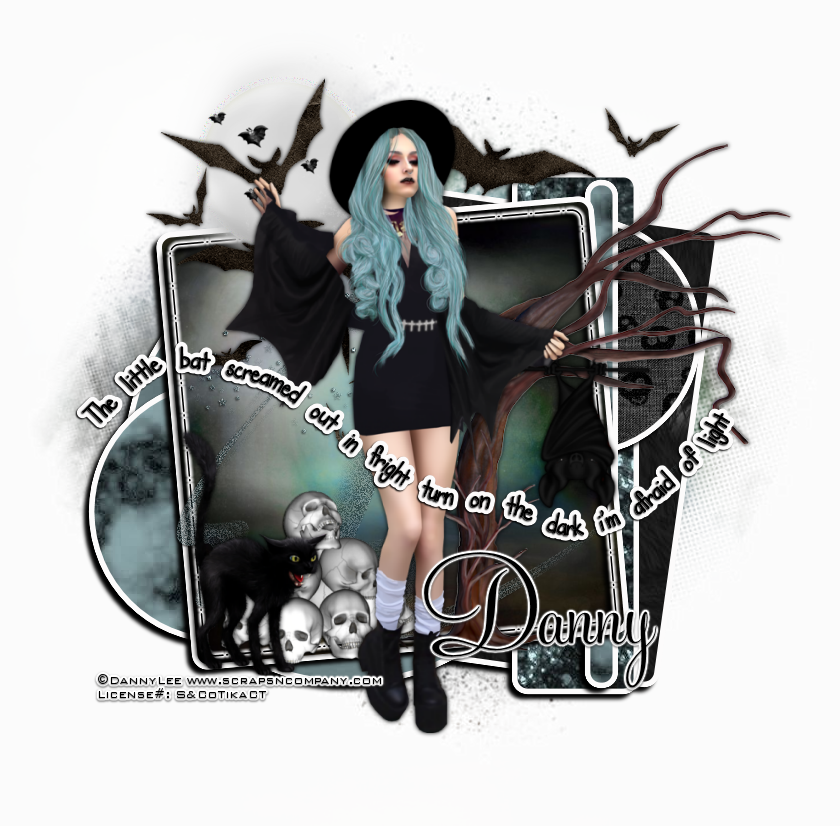
Supplies
Used:
Tube
by Danny Lee. You can get it at
http://scrapsncompany.com/index.php?main_page=product_info&cPath=113_132_219&products_id=14813
Scrap
Kit by Blissful Designs. You can get it at
http://scrapsncompany.com/index.php?main_page=product_info&products_id=14818
Mask
of your choice. I am using mask #134 by Millies PSP Madness. You can
get it at
http://milliespspmadness.blogspot.com/2015/09/mask-134-and-tag-w-verymany-and-pink.html
Template
#10 by Dangerously Delicious Designz. You can get it in the Halloween
Templates 1-10 on the left side of her blog at
http://dangerouslydeliciousdesignz.blogspot.ca/
Font
of your choice. I am using DJB Teacher for the text on a path. This
is a PTU font so use whatever you like and for the name I used
Feelscript which is also a PTU font.
Plugins:
Eye
Candy 4000 or Eye Candy 5 Gradient Glow
Let's
Begin:
Open
the template and shift+D to duplicate.
Close
the original.
Remove
the following layers:
info,
You drive me, Batty Black, Batty White, blue star and bg.
Merge
together raster 9 and raster 11.
Move
them up to the top left of the template
Make
your canvas large enough to work with.
Starting
with the green square layer.
Selections
select all float and defloat.
Open
paper 10 and copy and paste as a new layer.
Selection
invert and hit delete.
Selections
select none.
Delete
the original green square layer.
Repeat
the above steps with all layers except the orange square and the
circles that we merged together.
On
the orange square selections select all float and defloat.
Layers
new raster layer.
Open
paper 1 and copy and paste into selection.
Selections
select none.
Delete
the original orange square layer.
Now
starting with the bottom layer apply a gradient glow in white of your
choice on size and what not to each of the layers except the merged
circles.
Then
add a drop shadow to each layer.
Open
paper 1 and copy and paste as a new layer and drag to the bottom.
Apply
the mask of your choice.
Delete
the mask layer and merge the group.
Open
your tube and re-size if needed.
Copy
and paste as a new layer.
Position
where you want.
Move
the merged circles up behind her head but to the left of it.
Open
element 68 and copy and paste as a new layer and re-size as needed
but place it in the center of the merged circles to cover the green
inside of it.
I
chose to greyscale mine but that is completely up to you.
Now
lets dress this tag up with some elements.
I
will list the elements that I used and placement is up to you.
Unless
you want your tag to look just like mine then use my tag for
reference.
Elements
used:
element
4
element
13
element
21
element
23
element
26 (I added noise to this element)
element
59
Add
a drop shadow to all elements.
Using
your pen tool and turning off your background color.
Draw
a vector path across your tag up and down that we can add some text
to.
Add
the text of your choice.
Add
your name.
Add
your copyright and licensing information.
Crop
and save.


No comments:
Post a Comment