


Off With
Her Head – 3 piece set
written
10/20/2015
This
tutorial is meant purely as a guide. Feel free to make your tag
unique by using your own tubes and scrap kit. If you want your tag to
look just like mine then use the same supplies that I have and use my
tag for reference on placement of items.
Supplies
Used:
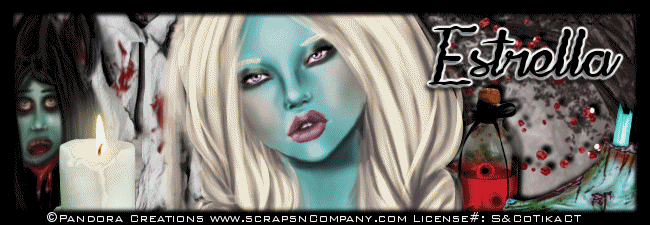
Tube by
Pandora Creations. You can get it at
http://scrapsncompany.com/index.php?main_page=product_info&cPath=113_348_136&products_id=14809
Scrap Kit
By Bibi's Collection. You can get it at
http://scrapsncompany.com/index.php?main_page=product_info&cPath=112_114_168&products_id=14808
Mask of
your choice. I am using mask #30 from Insatiable Dreams. You can get
her masks at http://insatiabledreams.net
Font of
your choice. I am using La Maison de Papier. You can get it at
http://www.dafont.com/la-maison-de-papier.font
Plugins:
NONE
Please
note this is going to be a lengthy tutorial as it is 3 pieces and I
will describe how to create each of the 3 pieces and since 2 of them
are animated it will take a bit of time. *
Let's
Begin:
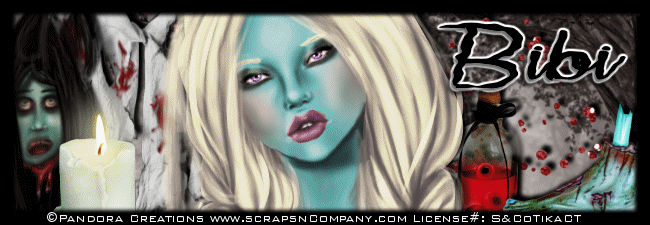
We are
going to start with the first item in the set which will be the
avatar and the easiest.
Open a new
blank canvas that is 98x208.
Selections
select all.
Open paper
6 and copy and paste into selection.
Selections
select none.
Open your
tube.
If you are
using the same tube as me you will have 1 layer that is normal and 1
layer that is bloody. We will be working with both.
First
select all the options you want as far as hair color, makeup etc.
Select the
layer that is bloody first.
Copy and
paste as a new layer onto your avatar canvas.
Re-size by
50%.
Move to
the lower part of the canvas with her head tilting towards the left.
Once you
have her into place go back to your tube and copy and paste as a new
layer the normal tube with the same options as you selected
previously.
Re-size by
50%.
Move down
and make sure you place it directly on top of the first tube.
Add a drop
shadow to both tubes.
Layers new
raster layer and flood fill with black.
Selections
modify and contract by 7 and then hit delete.
Selections
select none.
Add a drop
shadow to the frame.
Add your
name or initial.
Add your
copyright and licensing information and lets get ready to animate.
I am going
to go over the animation instructions and it will be the same for
this avatar and the banner tag.
Hide the
bottom tube layer which should be your bloody layer.
Copy
merged the normal layer.
Open
animation shop and right click and paste as a new animation.
Go to
effects image transition and select fade.
Delete the
very last frame which will leave you 20 frames.
Copy the
above steps with the bloody tube.
Click on
the last frame of the normal tube animation and copy and paste all
the frames of the bloody tube animation after that frame.
Adjust the
frame properties until you are happy with the effect.
This is
all trial and error.
Now lets
go back to psp and work on the banner tag.
Open a new
blank canvas that is 650x225.
Open paper
6 and copy and paste as a new layer and position how you want on your
canvas.
Copy and
paste your bloody tube and then your normal tube like you did on the
av.
Link them
and then move them to position how you want in the center of the tag
canvas.
Add a drop
shadow as you did on the avatar.
Dress up
your banner by adding some of the elements from the kit.
Add an
outside banner like you did with the avatar. Only I made mine 10
thick on this banner.
Now
animate your banner just like you did your avatar.
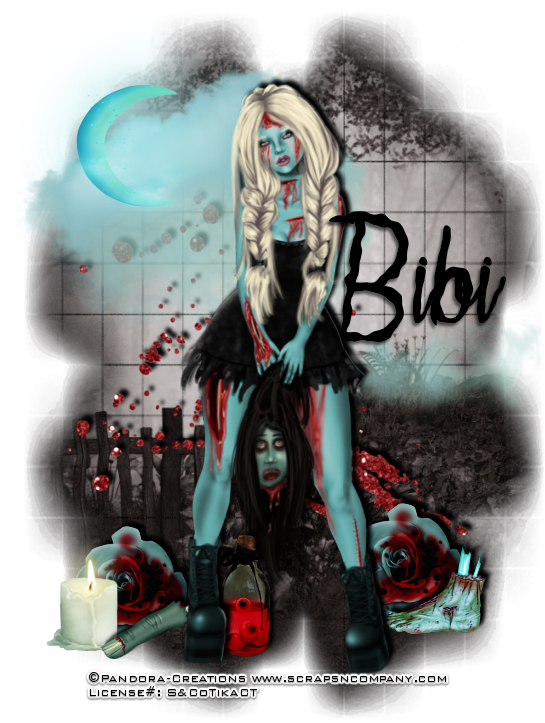
Lets move
on to the actual tag.
Open paper
6 and shift+D to duplicate.
Close the
original.
Promote
your background layer to a raster layer.
Apply the
mask of your choice.
Delete the
mask layer and merge the group.
Selection
select all float and defloat.
Selections
modify and expand by 6.
Flood fill
with black and you might have to do it a couple of times until you
get it as full as you want.
Selections
select none.
Drag the
black layer under the mask layer.
Merge
these 2 together.
Open your
tube either the normal or the blood your choice.
Copy and
paste as a new layer and position on your tag.
Add a drop
shadow.
Now dress
up your tag with elements from the kit.
Add your
name to all 3 pieces along with copyright and licensing information.
Crop and
save.
Thanks for
trying my tutorial.

No comments:
Post a Comment