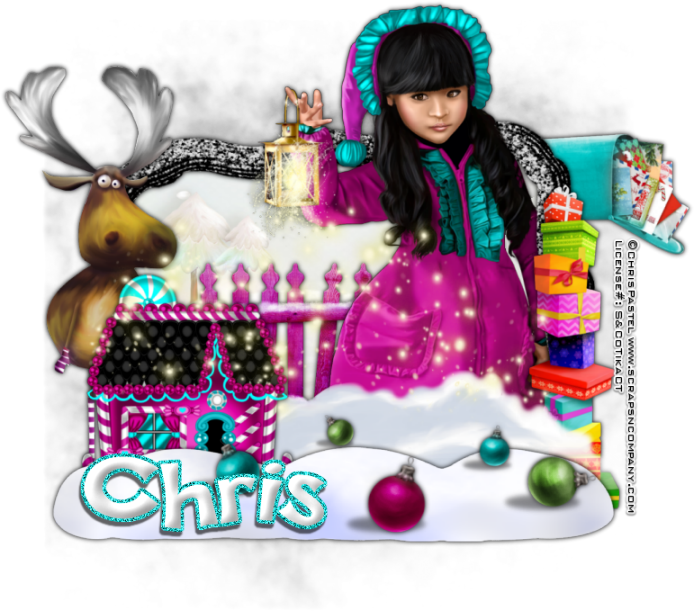
Magical
Workshop
written
11/19/2015
This
tutorial is meant purely as a guide. Feel free to make your tag
unique by using your own choice of tube and scrap kit. If you want
your tag to look exactly like mine then use the same supplies that I
have used.
Supplies
Used:
Tube
is an exclusive commission for Scraps and Company store. It is by
Chris Pastel and can be purchased at
http://scrapsncompany.com/index.php?main_page=product_info&cPath=305&products_id=15537
The
cute and whimsical scrap kit is by Bibi's Collection. It is called
Elf Town. It's a great match for the tube. You can purchase it alone
at
http://scrapsncompany.com/index.php?main_page=product_info&products_id=15541
or you can get a great bundle deal of the tube and the scrap kit
together at
http://scrapsncompany.com/index.php?main_page=product_info&cPath=305&products_id=15543.
The bundle is on sale for $1.50 right now. You can't beat that.
Mask
of your choice. I am using mask #158 from insatiable dreams. You can
get her masks at http://insatiabledreams.net
Font
of your choice. I am using Happy Sans. You can get it at
http://www.dafont.com/happy-sans.font
Plugins:
NONE
Let's
Begin:
Open
element 119 from the kit and shift+D to duplicate.
Close
the original.
Re-size
by 85%.
Make
your canvas large enough to give you room to work with.
Using
your magic wand select the inside of the frame and go to selections
modify and expand by 8.
Layers
new raster layer and drag under the frame.
Open
paper 1 and copy and paste into selection.
Selections
modify and contract by 7.
Open
your tube and copy and paste as a new layer and position within the
frame.
I
chose to use the tube that was cut off on the right side so that she
would be peeking out from that side.
Once
you have your tube placed use your eraser tool to erase any bits of
the tube outside of the frame that you do not want to be part of the
tag.
Selections
select none.
Add
a drop shadow to both the frame and the tube.
Open
paper 6 and copy and paste as a new layer and drag to the bottom.
Apply
the mask of your choice.
Delete
the mask layer and merge the group.
Add
a slight drop shadow to your mask layer but do not make it too dark.
Open
element 15 and re-size so it will fit nicely in front of the bottom
of the frame on the left side.
Copy
and paste as a new layer.
Add
a drop shadow.
Open
element 11 and re-size so it will fit nicely on the left hand side of
the cottage.
Copy
and paste as a new layer.
Add
a drop shadow.
Open
element 42 and re-size so it will fit nicely along the bottom of the
tag.
Copy
and paste as a new layer and place in front of the cottage and going
along the bottom.
Add
a slight drop shadow.
Open
element 13 and re-size so it will fit nicely along the bottom of the
tag also.
Copy
and paste as a new layer and drag behind the first snow layer, the
cottage and the reindeer.
Make
sure it is peeking up behind the first snow and is in front of your
tube.
Open
element 20 and re-size so it will fit nicely behind the tube and the
cottage.
Open
element 19 and re-size so it will fit nicely along the right side of
the frame.
Drag
to the bottom but above the mask.
Place
it on the right side so the mailbox and letters are peeking out.
Add
a drop shadow.
Open
element 26 and re-size so it will fit nicely in front of the mailbox
on the right size.
Copy
and paste as a new layer.
Add
a drop shadow.
Open
element 90 and re-size so it will fit nicely in the snow at the
bottom of the tag.
Copy
and paste as a new layer.
Add
a drop shadow.
Open
element 115 copy and paste as a new layer and place kind of in the
middle of the tag so it looks like it is falling from the lantern the
tube is holding.
Add
your name.
Add
your copyright and licensing information.
Crop
and save.


No comments:
Post a Comment