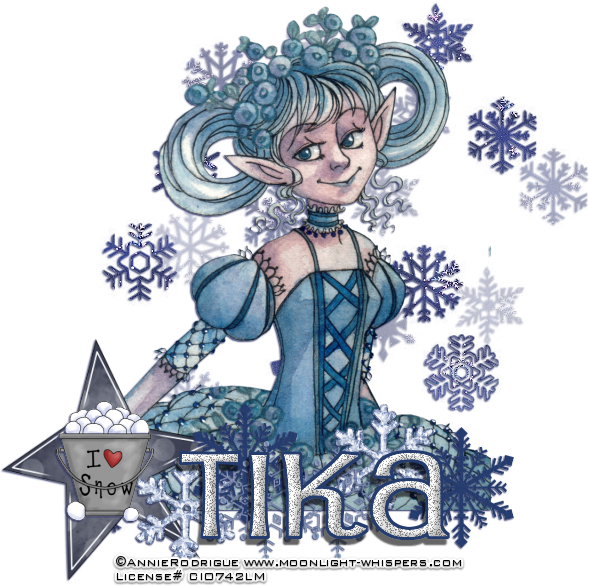
Tuesday, September 29, 2015

Winter Magic


Winter Magic
written 12/27/2014

Supplies Needed:
Tube of your choice. I am using the work of Annie Rodrigue which can be found at http://www.moonlight-whispers.com/ unfortunately she does not sell tubes any longer.

Scrap Kit is a freebie by Tracy F Designz. You can get it at http://freebiefriendsscrapsandmore.blogspot.com/2009/12/wintermagic-kit-ftu-by-tracy.html

Mask of your choice. I am using mask #306 by Vix. You can get her masks at http://www.freewebs.com/vixpsp/ Under Goodies.

Font of your choice. I am using Pupcat. You can get it at http://www.dafont.com/pupcat.font

Plugins:

Lets Begin:
Open paper 23 and shift+D to duplicate.
Close the original.
Promote background to a raster layer.
Make your canvas large enough to work with.
Apply your mask.
Delete the mask layer and merge the group.
Open your tube and copy and paste as a new layer.
Center in your mask.
Add a drop shadow.
Open star element from the kit and copy and paste as a new layer.
Re-size if needed and place to the left and bottom of your tube.
Add a drop shadow.
Open snowflake 2.
Re-size by 50% 2x.
Copy and paste as a new layer.
Place along the bottom of your tube.
Duplicate and place somewhere else along the bottom.
We are going to place these randomly.
Repeat using snowflake 3 and snowflake 4.
Open bucket 1 and re-size by 50% 2x.
Copy and paste as a new layer and move to the center of the star element.
Add a drop shadow.
Add your name.
Add your copyright and licensing information.
Crop and save.
 

Summer Swim


Summer Swim
written 6/23/2015

Supplies Needed:

I am using an older Pin up Toons tube. You can get PUT tubes at http://cdoestore.com

Scrap kit is a freebie by Scrappin Krazy Designs. You can get it at http://scrappinkrazydesigns.blogspot.com/2012/03/ftu-kit-mermaidia.html

Mask of your choice. I am using mask #200 from http://insatiabledreams.net

Font of your choice. I am using Paris Bold. You can get it at http://www.fontpalace.com/font-download/Paris+Bold/

Plugins:
NONE

Let's Begin:
Open element 48 and shift+D to duplicate.
Close the original.
Make your canvas large enough to work with.
Open paper 3 and copy and paste as a new layer.
Drag under the frame.
Apply the mask of your choice.
Delete the mask layer and merge the group.
Using your magic wand select the inside of the frame.
Selections modify and expand by 6.
Layers new raster layer and drag under the frame.
Open paper 9 and copy and paste into selection.
Selections select none.
Add a drop shadow to the frame.
Open your tube and copy and paste as a new layer.
Place where you want. Mine is sitting on the bottom of the frame.
Add a drop shadow to the tube.
Open element 23 and copy and paste as a new layer.
Drag under the tube and place at the bottom so she is sitting/standing on it.
Open element 21 and re-size by 50%.
Copy and paste as a new layer and place in the sand to the right of your tube.
Add a drop shadow.
Open element 20 and re-size by 50% 2x and copy and paste as a new layer and place in the bottom in the sand to the left of your tube.
Add a drop shadow.
Open element 13 and re-size by 50%.
Copy and paste as a new layer and place in the bottom in the sand.
Add a drop shadow.
Open element 4 and copy and paste as a new layer within the frame area.
Open element 24 and element 25 and copy and paste as a new layer.
Drag behind your tube and place near the top overlapping the frame.
Add your name.
Add your copyright and licensing information.
Crop and save.
 

Summer Camp


Summer Camp
written 5/28/2015

Supplies Needed:

No Tube as we will be using elements from the kit.

Time of your life freebie by Wicked Princess Scraps.

Font of your choice. I am using A&S California Plug

Plugins:
NONE

Lets Begin:
Open a new blank canvas that will give you plenty of room to work with.
Open paper 15 and set it as your foreground color.
Turn off your background color.
Using your elipse preset shape and the width set to 15.00 draw out a circle on your canvas large enough that will be your frame.
The size really is up to you. I am a big tag person LOL
Objects align center in canvas.
Convert to a raster layer.
Effects 3D effects inner bevel with the following settings:
Bevel # 2
Width 31
Smoothness 44
Depth 4
Ambience -2
Shininess 34
Color White
Angle 315
Intensity 45
Elevation 32
Using your magic wand select the inside of the frame.
Selections modify and expand by 4.
Layers new raster layer and drag under the frame.
Open paper 23 and copy and paste into selection.
Selections select none.
Duplicate this paper layer.
On the bottom layer go to adjust blur gaussian blur and blur by 25.00
Effects Texture Effects Blinds using the following settings:
Width 2
Opacity 100
Color White
Horizontal and Light from left/top both checked.
Open Tree2 from the kit and copy and paste as new layer.
Move to the left side of the frame.
I erased bits at the bottom to make it look to be coming out of the frame but this is up to you.
Add a drop shadow.
Open Sun1 and re-size by 50%.
Copy and paste as a new layer and drag under the tree.
Move to the right of the tree so some of it is behind the tree but also peeking out.
Open rainbow 2 and copy and paste as a new layer.
Drag down to just above your top paper copy.
Erase any bits hanging out of the frame.
Open person 3 and re-size by 50%.
Copy and paste as a new layer and move to where he is in front of the tree but off to the right a bit.
Add a drop shadow.
Open person 2 and repeat the above the steps but place her to the right of the first person.
Open grass2 and re-size so it fits nicely along the bottom of your frame and copy and paste as a new layer and drag down under your people.
Move it down to the bottom so the people are standing in front of it.
Open bear 2 and repeat steps for people and move to the left of the boy.
Open bee and re-size by 50% 2x and copy and paste as a new layer and place up near the sun.
Open the fox and repeat steps for people.
Place to the left of the girl.
Open the moose and repeat steps for people but drag down behind the girl and the fox and place so the head of the moose is out the right side of the girl.
Open tent and repeat steps for people but drag behind all the people and the animals and place in the middle.
Add your name.
Crop and save.
 

Spring Time


Spring Time
Written 4/6/2015

Supplies Needed:

Tube of your choice. I am using the artwork of Pinup Toons. You can get this image at www.cdoestore.com


Font of your choice. I am using 2 Peas Notebook. It is a PTU font.

Plugins:
NONE

Let's Begin:
Open your template and shift+D to duplicate it.
Close the original so you can use it again.
Delete the creators information and background layers.
Make your canvas large enough to work with.
Starting at the bottom lets fill the layers with papers from the kit.
You can either flood fill or paste the papers as new layers and delete the original layers; its completely up to you.
Either way select each layer by going to selections select all float and defloat and then use the method that you choose.
I will give you the papers I used on each layer:
Layer 1 use paper 1
Layer 2 use paper 2
Layer 3 do not fill with paper but apply noise by going to adjust add/remove noise. Add noise at uniform and monochrome at 75%.
Layer 4 use paper 10
Layer 5 use paper 9
Layer 6 apply the same noise as you did above to layer 3.
Merge layers 7 & 8 together and use paper 7.
Add a slight drop shadow to all layers.
I used the following drop shadow settings:
0 0 60 5.50 black
Open your tube and copy and paste as a new layer.
Position where you want.
I chose to place mine on the right hand side of the tag.
Add a drop shadow to your tube.
Now lets add some elements to dress it up.
The placement of elements is completely up to you so I will just tell you which elements I used and you can position them where you want.
Grass 1
Grass 2
Vine
Watering Can
Butterfly
Frog
Add your name.
Add your copyright and licensing information.
Crop and save.


Ships Ahoy


Ships Ahoy
written 7/22/2015

This tutorial is meant to be a guide. Feel free to use any tubes and scrapkits of your choice. If you want your tag to look just like mine then use the same supplies and use my tag as a reference.

Supplies Used:

Tube by Jose Cano. You can get his tubes at http://canotubes.com/
Preferably use one that has a closeup.

FTU Scrap Kit by Jens Sweet Temptations. You can get it at http://jenssweettemptations.blogspot.ca/2009/05/june-goodie-train.html

Font of your choice. I am using Egregio Script. You can get it at http://www.dafont.com/egregio-script.font

Plugins:
Penta Dot and Cross
Penta Jeans

Let's Begin:
Open the frame and shift+D to duplicate.
Close the original.
Make your canvas large enough to work with.
Using your magic wand select the inside of the frame.
Selections modify and expand by 5.
Open paper 9 and copy and paste as a new layer.
Drag under the frame.
Selections invert and hit delete.
Selections invert again.
Open the close up of your tube and copy and paste as a new layer.
Position within the frame.
Selections invert and erase any bits hanging outside of the frame.
Selections select none.
Change the properties of this layer to luminance legacy.
Apply the Penta Dot and Cross filter and change the top number to 50.
Make your paper layer active and apply Penta Jeans using default settings.
Add a drop shadow to both the tube and the frame.
Open water element and re-size so it will fit along the bottom of the frame.
Copy and paste as a new layer layer and position at the bottom.
Go to adjust add/remove noise and add noise at 60%.. uniform and monochrome checked.
Add a drop shadow.
Open lighthouse1 from the kit and re-size by 85%.
Copy and paste as a new layer and drag under the water.
Move to the far left side of the frame.
Add a drop shadow.
Open boat1 from the kit and re-size so it will fit nicely in front of the lighthouse.
Copy and paste as a new layer and place to the far left in front of the lighthouse and the water.
Add a drop shadow.
Open wheel from the kit and re-size so it will fit nicely in the far right hand corner.
Copy and paste as and position.
Add a drop shadow.
Add your name.
Add your copyright and licensing information.
Crop and save.

Secrets


Secrets
written 8/9/2015

This tutorial is meant purely as a guide. Make your tag unique to you by using your own tubes and scrap kit. If you want your tag to look just like mine then use the same supplies as I am.

Supplies Used:

Tube of your choice. I am using the work of Paul Ballard. I am not sure where to purchase his work now but I got this tube when he was with CILM.

Scrap kit is a great freebie from Horse Play Pasture Designs. It is called Her Diary. You can get it at http://horseplayspasturedesigns.blogspot.ca/2015/05/another-round-of-freebies.html

Font of your choice. I am using FLW Script

Plugins:
NONE

Lets Begin:
Open element 66 from the kit.
Shift +D to duplicate.
Close the original.
Re-size to a size you are happy with as this will be the base of your tag.
Make your canvas large enough to give you room to work with.
Using your magic wand select the inside of the frame.
Selections modify and expand by 8.
Layers new raster layer and drag under the frame.
Open the paper of your choice and edit copy and paste into selection.
Selections select none.
Open your tube and copy and paste as a new layer and position within the frame.
Erase any bits that are hanging out of the frame that you do not want.
Add drop shadow to the frame and your tube.
Now I will list the elements that I used and the placement is completely up to you.
If you want your tag to look just like mine then use my tag for reference.
Elements used:
element 18
element 27
element 34
element 35
element 38
element 39
element 46
element 50
element 52
element 53
element 54
element 57
Add your name and copyright and licensing information.
Crop and save.

School Girl Fantasy


School Girl Fantasy
written 8/9/2015

This tutorial is simply meant as a guide. Make your tag your own and unique to you by using any tubes and scrap kits of your choice. If you want your tag to look just like mine then use the same supplies as I have.

Supplies Used:

Tube of your choice. I am using the work of Garrett Blair. You can no longer purchase his tubes and I got this tube when he was with CILM.

Scrap kit is a freebie from Polka Dot Scraps. It is called Twi-tastic. You can get it at http://polkadotscraps.blogspot.ca/2011/06/old-ptu-kits-now-ftu-again.html?zx=65268130ff410f53

Tag Template by A Space Between. I am using template #40. You can get it at http://acreativespacebetween.blogspot.com/2014/12/ssam-tag-templates-14-45.html

Font of your choice. I am using 4 Vasona DNA. This is a PTU font.

Plugins:
Xero Radiance (optional)

Let's Begin:
Open your template and remove the following layers:
creators information
background
Make your canvas large enough to work with
Make your border big circle layer active and add noise with the following settings:
100
Uniform and monochrome checked.
Do this with all the border layers.
Now we are going to fill the rest of the layers with papers from the kit.
Start at the bottom with the big circle layer and then work your way up using whatever papers/textures you want to use.
Once you are done delete all the original template layers.
Add a drop shadow to every layer.
Open your tube and copy and paste as a new layer.
Position where you want.
I chose to place mine in front of the large open space in the square area.
Add a drop shadow.
I will list the elements that I used.
Placement is entirely up to you.
If you want to have your tag look like mine then use my tag for reference.
Elements used:
element 10
element 16
element 29
element 30
element 40
element 46
Add your name and your copyright and licensing information.
Once done I applied the Xero Radiance filter using the default settings but that is completely up to you.
Crop and save.


Luv Conversation


Luv Conversation
written 1/19/2015

Supplies Needed:

Tube of your choice. I am using the work of Elias Chatzoudis. You can get his tubes at http://www.eliasartshop.com/

Scrap Kit by Grunge and Glitter. It is called Candied Hearts and you can get it at http://grungeandglitter.blogspot.com/2013/05/old-freebie-set-1.html

Font of your choice. I am using Marylin. You can get it at http://www.dafont.com/marylin.font

Plugins:
Penta Dot & Cross

Lets Begin:
Open the circle of hearts and shift + D to duplicate.
Close the original.
Re-size by 85%.
Make your canvas large enough to work with.
Duplicate the element.
On the bottom element apply a Gaussian Blur of 12.00.
Apply Penta Dot and Cross using the default settings to this same layer.
Add a slight drop shadow to the top copy.
Open frame 2 and re-size by 85%.
Copy and paste as a new layer.
Place in the center of the circle of heart.
Using your magic wand select the inside of the frame and go to selections modify and expand by 5.
Open paper 7 and copy and paste as a new layer.
Drag under the frame.
Selections invert and hit delete.
Selections select none.
Open your tube and copy and paste as a new layer.
Place wherever you would like.
Mine is along the bottom of the frame since she is sitting.
Add a drop shadow.
Open the candy hearts element and re-size by 50%.
Copy and paste as a new layer and center in the frame.
Drag down to just above your background paper layer.
Add a drop shadow.
Open candy hearts box and re-size by 50%.
Copy and paste as a new layer.
Move to the opposite side of the frame than your tube.
Add a drop shadow.
Open bow2 and copy and paste as a new layer.
Place at the top center of the frame.
Add a drop shadow.
Add your name.
Add your copyright and licensing information.
Crop and save.


Luau In The Sun


Luau in the Sun
written 5/21/2015

Supplies Needed:

Tube of your choice. I am using the work of Michael Calandra. I got this tube when he was at MPT. You can now get his work at http://cdoestore.com

Scrap kit of your choice. I am using a freebie bit from the Scrap your heart out blog train. This bit is from Melissaz Creationz. You can get it at http://melissazcreationz.blogspot.com/2015/05/scrappin-your-out-blog-train-may-luau.html

Font of your choice. I am using 2Peas Barefoot Professor. This is a PTU font so feel free to substitute for one of your choice.

Plugins:
Xero Radiance. Optional

Let's Begin:
Open a new blank canvas large enough for you to work with.
You can re-size and crop when we are done.
Set your background color to white and your foreground color turned off.
Using your elipse preset shape tool draw a circle as large as you want in the center of your canvas. This will be the base for your tag.
Before converting to a raster layer go to objects and align and then center in canvas.
Now convert to a raster layer.
Now go to adjust add/remove noise and add noise at 75% with uniform and monochrome checked.
Selections select all float and defloat.
Selections modify and contract by 15.
Layers new raster layer.
Open paper 4 and copy and paste into selection.
Selections select none.
Add a slight drop shadow to both circle layers.
Now open your tube and copy and paste as a new layer.
Position where you would like her.
Add a drop shadow.
Now I am going to list the elements that I used.
The placement of the elements is completely up to you and to be honest you can use any elements you wish. My tutorial is just a guide and you should try to make the tag your own.
The elements I used are :
10
11
20
21
33
36
37
39
Add your name.
Add your copyright and licensing information.
If you want then apply Xero Radiance at the settings of your choice.
Crop and save.
 

Forever Rockin'


Forever Rockin'
written 3/7/2015

Supplies Needed:

Tube of your choice. I am using the work of Dave Nestler. I got this image at CILM however you can now purchase his work at http://cdoestore.com/


Mask of your choice. I am using mask #151 by Vix. You can get her masks at http://www.freewebs.com/vixpsp/

Font of your choice. I am using Hendrix. You can get it at http://www.dafont.com/hendrix.font

Plugins:
Alien Skin Xenofex 2 constellation

Let's Begin:
Open Frame 1 and shift+D to duplicate.
Close the original.
Make your canvas large enough to work with.
Image free rotate to the right 90 degrees.
Using your magic wand select the inside of the frame and go to selections modify and expand by 4.
Layers new raster layer and drag under the frame.
Open paper 12 and edit copy and paste into selection.
Selections select none.
Add a drop shadow to the frame.
Open paper 7 and edit copy and paste as a new layer and drag to the bottom.
Apply your mask.
Delete the mask layer and merge the group.
Apply the Xenofex Constellation plugin using the following settings:


Open your tube and copy and paste as a new layer.
Place on either the far left or far right side; wherever your tube will look best.
Add a drop shadow.
Now we are going to use some elements and dress it up.
I will simply give you the list of elements that I used and you can place them wherever you would like according to your taste.
All of my elements are within the framed area minus the backstage pass which is on top of the frame in the top corner opposite my tube and the devil horns which are just below my tube but on top of the frame at the top and also the piano keys which are just below my tube at the bottom so my tube is standing on them.
Elements:
backstage pass
devil horns
headphones
microphone
piano keys
speakers
pick
Apply the constellation plugin to the piano keys like you did to your mask.
Add your copyright and licensing information.
Crop and save.


Fall'in For You


Fall'in For You
written 9/24/2014

Supplies Needed:

Tube of your choice. I am using the work of CEI Stickers. I got this tube at MPT when they were around. Not sure where to get their work now but you can use any tube of your choosing.

Scrap Kit is a freebie by Mizteeque's Digital Designs. You can get it at http://mizteeques.blogspot.com/2014/09/new-freebie-kit-fallin-for-autumn.html

Leaf brushes of your choice. I am using brushes by bmjewell. You can get these brushes at http://www.deviantart.com/art/Leaf-Brushes-98947069

Sparkle brush of your choice. I am using one by Tempting-Resources. You can get it at http://www.deviantart.com/art/Sparkle-Brushes-103230407

Font of your choice. I am using Magnolia. You can get it at http://www.dafont.com/magnolia.font

Lets Begin:
Open a blank canvas that will give you plenty of room to work with.
Set your foreground color to any color of your choice and turn off your background color.
Using your rectangle preset shape tool with the width set to 9.00
Draw a long vertical rectangle in the center of your canvas.
Convert to a raster layer.
Selections select all float and defloat.
Flood fill with a gradient made from 2 colors from your tube.
Using your magic wand select the inside of your frame and go to selections modify and expand by 3.
Layers new raster layer and drag under your frame.
Open paper 7 and copy and paste into selection.
Selections select none.
Add a drop shadow to the frame.
Open your tube and copy and paste as a new layer at the top.
Place inside the frame area but more to the right and its ok to have bits hanging out.
Add a drop shadow to your tube.
Open element 32 and re-size so its going to fit nicely into the corner of your frame.
Its ok for it be a little on the big side but you don't want it overbearing.
Copy and paste as a new layer and place in the top left corner.
Add a drop shadow.
Duplicate.
Flip horizontal.
Move the duplicate to the far top right corner.
Merge these 2 layers together.
Duplicate this new layer and image flip vertical.
Move this new layer down to the bottom of the frame.
Merge these 2 layers together.
Open element 21 and again re-size so it will fit nicely along your frame.
Copy and paste as a new layer and place in the bottom left corner.
Add a drop shadow.
Duplicate and image flip horizontal.
Move this layer to the bottom right corner.
Merge these 2 layers together.
Duplicate and move this layer to the top of the tag.
Merge these 2 layers together.
Open element 12.
Re-size.
Copy and paste as a new layer and place in the bottom of the tag in the lower left.
I erased part of the stem as it was too long for what I wanted but this is up to you.
Add a drop shadow.
Duplicate and flip horizontal.
Move this duplicate to the bottom right corner.
Merge these 2 layers together.
Duplicate and image flip vertical.
Move this layer to the top.
Merge these 2 layers together.
Open element 1 and re-size so it will fit nicely at the bottom of your tag.
Copy and paste as a new layer and add a drop shadow.
Open element 29 and copy and paste as a new layer at the top center of the frame.
Re-size so it will fit nicely there.
Add a drop shadow.
Add a new raster layer and drag all the way to bottom.
Now using one of the papers as your background color.
Apply some leaf brushes to your tag so they are peeking out behind the tag.
Layers new raster layer at the top.
Apply some sparkle brushes using white.
Add your name.
Add your copyright and licensing information.
Crop and save.


Crisp Autumn


Crisp Autumn
written 11/6/2014

Supplies Needed:

Tube of your choice. I am using the work of Pinup Toons. You can get this tube at www.cdoestore.com

Scrap Kit is a freebie by Simone. You can get it at http://scrappybitoffun.blogspot.com/2009/09/autumn-scrap-kit-freebie.html

Mask of your choice. I am using mask #275 by Weescotlass Creations. You can get this mask at http://weescotslasscreations.blogspot.com/2009/04/masks.html

Font of your choice. I am using 2 Peas Beef and Broccoli.

Lets Begin:
Open paper 9 and shift +d to duplicate.
Close the original.
Re-size to a nice workable size. You are going to use this to apply your mask to.
Promote the background layer to raster layer.
Apply your mask and delete the mask layer and then merge the group.
Make your canvas large enough to work with.
Add a nice drop shadow to the mask layer.
I used
0
0
100
9.50
dark brown color from the paper.
Open your tube and copy and paste as a new layer and place on the far left of the mask area.
Add a drop shadow.
Open the barrel of apples and copy and paste as a new layer.
Drag under your tube and move to the right of your tube kind of behind the leg.
Open element 6 and re-size by 85% 2x.
Copy and paste as a new layer and move to the far right side of the tag at the bottom.
Add a drop shadow.
Open tree 1 and re-size by 75%.
Copy and paste as a new layer and drag under the pumpkins.
Move to the far right behind the pumpkins.
Add a drop shadow.
Open owl from the kit and re-size by 50%.
Copy and paste as a new layer and place so it is sitting in the tree.
Open umbrella 3 and image flip horizontal.
Re-size by 60%.
Copy and paste as a new layer and move to the far right in front of the tree but behind the pumpkins.
Add a drop shadow.
Open fence and re-size by 60% and then again by 90% and copy and paste as a new layer layer.
Drag to just above your mask and position along the bottom of the mask area.
Add a drop shadow.
Add your name.
Add your copyright and licensing information.
Crop and save.