
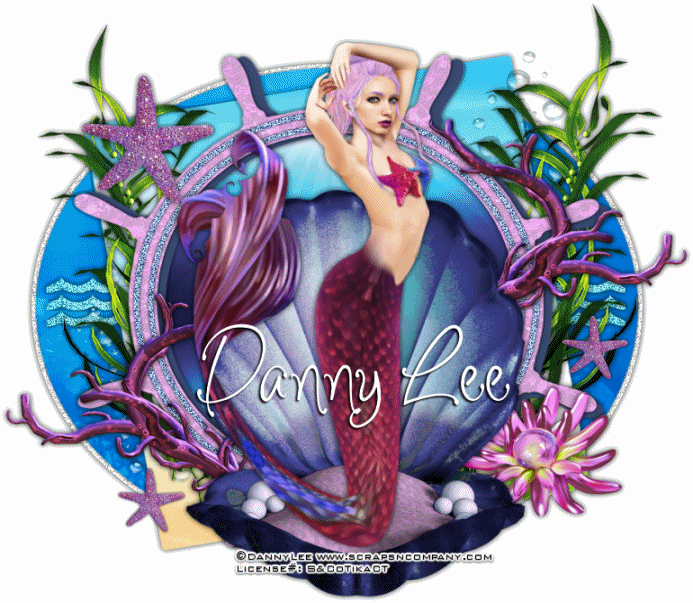
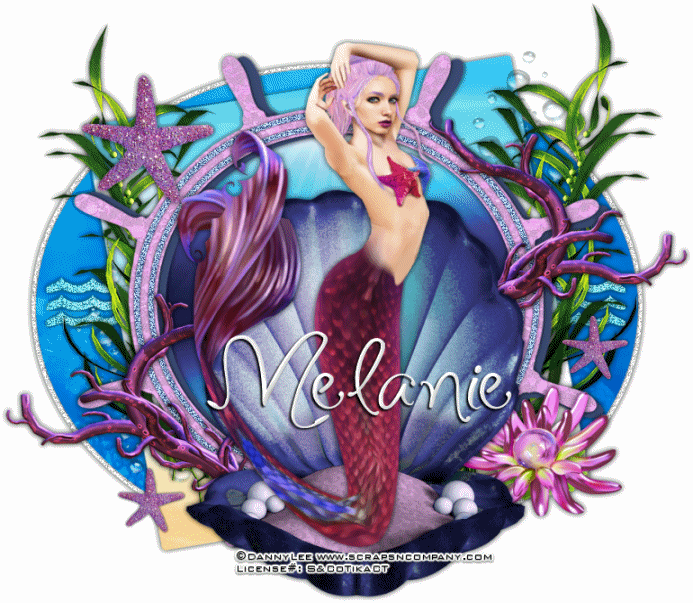
Mermaids
Have More Fun
written
2/27/2016
This
tutorial is meant purely as a guide. Feel free to make your tag
unique by using your own choice of tube and scrap kit. If you want
your tag to look just like mine then use the same supplies that I
have used. Any resemblance to any other tag or tutorial is purely
coincidental.
Supplies
Used:
Tube
by Danny Lee. You can purchase her at
http://scrapsncompany.com/index.php?main_page=product_info&cPath=113_132_219&products_id=17376
Matching
Scrap Kit by Blissful Designs. You can purchase it at
http://scrapsncompany.com/index.php?main_page=product_info&products_id=17379
Tag
Template by Dangerously Delicious Designz. You can download it at
http://dangerouslydeliciousdesignz.blogspot.ca/2015/06/template167mermaid.html
Animation
By Love Shack. You can download it at
http://loveysshack.blogspot.com.ar/2011/07/animations-for-today_19.html
Font
of your choice. I am using Violet Bee. You can purchase it at
https://thehungryjpeg.com/product/381-violet-bee-font/
Plugins:
NONE
Let's
Begin:
Open
the tag template and shift+D to duplicate.
Close
the original.
Remove
the following layers from the template:
Raster1,
font info, mermaid blue, mermaid white, mermaid d/s, be your own kind
of white, be your own kind d/s and bg.
Make
your canvas large enough to work with.
Starting
at the bottom and working up fill each of the layers with papers from
the kit.
On
the bottom oval layer add another layer underneath it and make it a
little large and fill with white and apply noise.
On
the waves layer add the same noise as you did to the white layer.
On
the inner blue circle and outer blue circle apply the same noise.
Once
done add a drop shadow to all layers.
Open
your tube and copy and paste as a new layer at the top and re-size
if necessary.
Position
in the center of the tag template.
Add
a drop shadow.
Open
element 71 and re-size by 80%.
Copy
and paste as a new layer and drag under your tube.
Move
to the bottom and set so your mermaid is sitting in the clamshell.
Add
a drop shadow.
Open
element 67 and copy and paste as a new layer.
Drag
under the clamshell.
Move
to the far left so it is peeking out from behind the bottom of the
clamshell.
Add
a drop shadow.
Duplicate
and image flip horizontal.
Move
this one to the top right of the clamshell.
Open
element 59 and re-size by 50% and then again by 60%.
Copy
and paste as a new layer drag under the clamshell.
Move
to the right side and make it peek out from the side of the shell.
Open
element 48 and copy and paste as a new layer.
Re-size
as you wish.
I
duplicated mine a few times and re-sized each of them and placed them
randomly around the tag.
Open
element 24 and copy and paste as a new layer.
Drag
down to just above the squarish layer.
Move
to the far left side so it is peeking out behind the wheel layers.
Add
a drop shadow.
Duplicate
and image flip horizontal.
Move
to the far right.
Add
your name.
Add
your copyright and licensing information.
Crop.
Now
lets get ready to add the animation.
Merge
together all layers from the top down to your tube (include your tube
in this first set of merged layers.
Hide
this new layer.
Merge
together the rest of the layers.
Layers
new raster layer and drag to the bottom.
Flood
fill with white.
Copy
merged the white layer and the layer with the clamshell on it.
Open
animation shop and right click and paste as a new animation.
Open
the animation you are going to use.
I
am using the bubble fountain.
Take
note of the amount of frames in the animation. For me its 18.
Duplicate
your tag layer to match the frames.
Select
all frames in both your animation and your tag.
Grab
frame 1 of the animation and drag it onto frame 1 of your tag.
Place
where you want.
Now
back to psp and copy the layer that has your tube on it.
Back
to animation shop and paste this as a new animation.
Repeat
the same steps as above.
Duplicate
and drag onto the tag.
View
your animated tag.
Optimize
and save.

No comments:
Post a Comment