

The Final
Victory
written
4/14/16
This
tutorial is meant purely as a guide. Feel free to make your tag
unique by using your own choice of tube and scrap kit. If you want
your tag to look just like mine then use the same supplies I have
used. This tutorial assumes you have knowledge of paint shop pro. Any
resemblance to any other tag or tutorial is purely coincidental.
Supplies
Used:
Tube by
Andy Cooper. You can purchase her at
http://scrapsncompany.com/index.php?main_page=product_info&cPath=113_304&products_id=18916
Awesome
matching scrap kit by Bibi's Collection. You can purchase it at
http://scrapsncompany.com/index.php?main_page=product_info&products_id=18914
Mask of
your choice. I am using mask 102 by Vix. You can download her awesome
masks at http://www.freewebs.com/vixpsp/
Font of
your choice. I am using Lazy Spring Day. You can download it at
http://www.dafont.com/de/lazy-spring-day.font
Plugins:
Alienskin
Xenofex 2 Constellation.
Drop
shadow used throughout:
0 0 75
9.00 black
Let's
Begin:
Open
element 25 and shift + D to duplicate.
Close the
original.
Re-size
until you are happy. This will be the base of your tag.
Make your
canvas large enough to give you plenty of room to work with.
Open paper
20 and copy and paste as a new layer.
Drag under
the frame.
Re-size if
needed.
Apply the
mask of your choice.
Delete the
mask layer and merge the group.
I chose to
duplicate the mask layer and image flip horizontal but this is
completely up to you.
Using your
magic wand select the inside of the frame.
Selections
modify and expand by 4.
Layers new
raster layer and drag between the frame and your mask.
Open paper
13 and copy and paste into selection.
Selections
select none.
Add a drop
shadow to the frame.
Using your
preset rectangle shape.
Turn off
your background color and set your foreground color to black.
Change the
width in the settings of the preset shape to 6.50
Draw out a
rectangle in the center of the frame and make it overlap outside of
the frame on both sides.
Convert to
raster layer.
Using your
magic wand select the inside of this rectangle.
Selections
modify and expand by 1.
Layers new
raster layer and drag under the rectangle.
Open paper
8 and copy and paste into selection.
Selection
select none.
Add noise
to the frame at 100% monochrome and uniform.
Open
element 78 and copy and paste as a new layer.
Re-size so
it is the same size as your rectangle.
Move so it
lines up with the bottom and sides of this frame.
Add a drop
shadow.
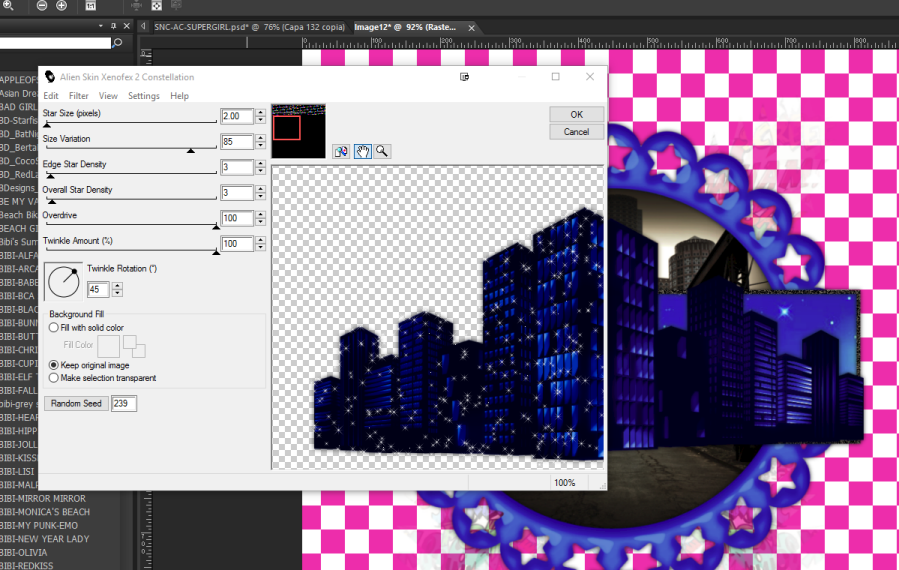
Apply the
Constellation plugin with the following settings:
Merge
together the buildings, the rectangle frame and its fill paper
together.
Open your
tube and copy and paste as a new layer.
Place in
the center of the tag.
Re-size so
she is just larger than the tag.
Add a drop
shadow.
Now lets
dress it up with some of the elements from the kit.
I will
list the elements I used.
Placement
is completely up to you.
Feel free
to use other elements that I didn't use.
Elements I
used:
1
6
16
86
104
109
111
122
126
129
130 ( I
placed this one so it looked to be wrapped around her legs)
Add a drop
shadow to all of the elements.
Add your
name.
Add your
copyright and licensing information.
Crop and
save.


No comments:
Post a Comment