
Chocolate Sweetie
Written 1/18/2017
This tutorial is meant purely as a guide. Feel free to
use your own choice of tube or scrap kit to make your tag unique. If you want
your tag to look just like mine them use the same supplies I have used. This
tutorial assumes you have a knowledge of paint shop pro. Any resemblance to any
other tag or tutorial is completely coincidental.
Supplies Used:
Tube of your choice. Preferably one with a close up
but if not I will show you how to make it work without a close-up. I am using a
tube by Very Many Tubes called Elsie. You can purchase this tube at http://verymanytubes.com/
I am using a freebie scrap kit by Gina’s Gems Scraps.
It is called Chocolate Cherries Add On. You can get it at http://ginasgemsscraps.blogspot.ca/2012/05/chocolate-cherries-free-add-on.html
Mask of your choice. I am using mask# 351 by
Insatiable Dreams. You can find her masks at http://insatiabledreams.net
Font of your choice. I am using 2Peas Fragile. This is
a PTU font.
Plugins:
NONE
Drop shadow used throughout:
0 0 55 12.00 black
Let's Begin:
Open paper 9 from the kit. Shift+D to duplicate. Close
the original. Re-size if you wish. Promote your background layer to a raster
layer. Apply the mask of your choice. Delete the mask layer and merge the
group. Make your canvas large enough to give you plenty of room to work with.
You will be able to crop and/or re-size when you are finished.
Open paper 4 from the kit and copy and paste as a new
layer. Apply the same mask again. Delete the mask layer and merge the group.
Re-size this mask by 80%. Move down and to the right a little bit. Selections
select all float and defloat. Now open the close-up of your tube and copy and
paste as a new layer. Position in the selected area. Selections invert and hit
delete. Selections select none. **If you do not have a close up then use your
tube and once you copy and paste as a new layer you can re-size greater than
100% to help it fill the selected area** Adjust hue and saturation colorize and
set both values to 0. Add a drop shadow.
Open your tube
and copy and paste as a new layer. Re-size as needed. Position in the center of
the masks near the bottom. Not all the way to the bottom. Add a drop shadow to
your tube.
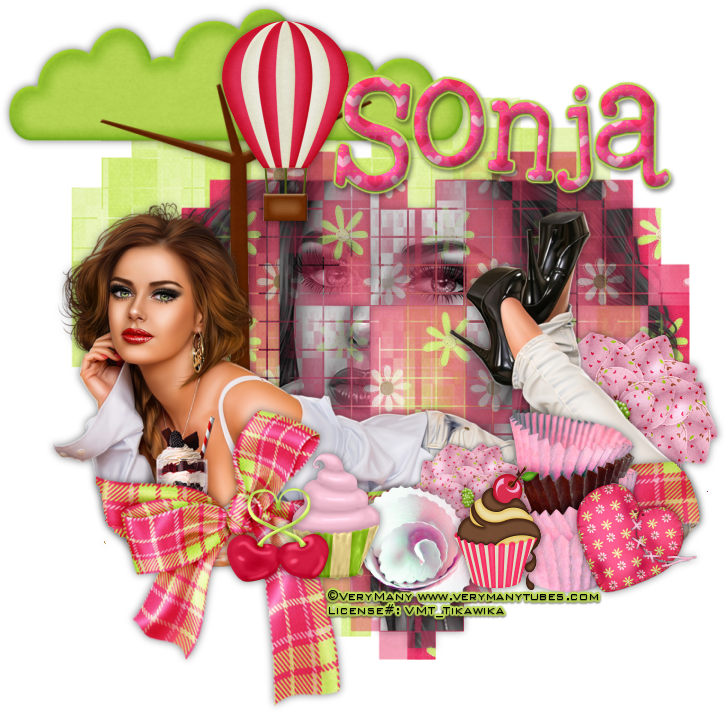
Open the GGS-CandyWrappers from the kit and copy and
paste as a new layer. Re-size until appropriate with the tube that you used.
Place over to the far right. Add a drop shadow.
Open GGS_Tree from the kit and copy and paste as a new
layer. Again re-size until appropriate with your tube and tag. Move behind your
tube and to the far left. Mine is just above her shoulders. Add a drop shadow.
Open GGS_TornHeart from the kit and copy and paste as
a new layer. Again re-size. Image free rotate to the right 24 degrees. Adjust
sharpness sharpen. Move to the bottom right slightly in front of the candy
wrappers to the right of them. Add a drop shadow.
Open GGS_Hot air balloon from the kit. Copy and paste
as a new layer. Again re-size. Place near the top of the tree on the right side
of the trunk. Add a drop shadow.
Open GGS_Cupcake with cherries from the kit. Copy and
paste as a new layer. Again Re-size. Move to the bottom in front of the candy
wrappers but to the left slightly overlapping. Add a drop shadow.
Open GGS_Heart cherries from the kit. Copy and paste
as a new layer. Again re-size. Place along the bottom with the other elements.
Mine is over near her hand. Add a drop shadow.
Open GGS_Hortensia flower from the kit and copy and
paste as a new layer. Again re-size. I placed 2 of these on my tag. One is
behind her legs at the far right and its larger. I then duplicated it and
re-sized this duplicate and placed it along the bottom behind the cupcake with
cherries. Add a drop shadow to both of them.
Open GGS_cupcake. Copy and paste as a new layer. Again
re-size. Place along the bottom with the other elements. Mine is over behind
the heart cherries but to the right of them. Add a drop shadow.
Open GSS_Rolled bloomie from the kit. Copy and paste
as a new layer. Again re-size. Move to the bottom with the other elements mine
is between the 2 cupcakes. Add a drop shadow.
Now that you have most everything placed we are going
to add a ribbon/bow to the tag that will take a little work. Open the GGS_Satin
Bow wrap from the kit. Copy and paste as a new layer and drag down to just
above your tube in your layer palette. Now re-size so it is just longer/larger
than your tube on both sides. Now lower the opacity of the ribbon so you can
see your tube through it. Using your eraser set on a size that is comfortable
for you and zoom in if you need to but erase any bits of the ribbon that are
NOT on your tube just at the sides. Be careful to not erase any of the bow. You
can keep raising the opacity to check your work if you need to. Once you are
done and happy add a drop shadow.
Add your name to your tag.
Add your copyright and licensing information.
Crop and Re-size if you wish.
Save your tag.
♥♥♥

No comments:
Post a Comment