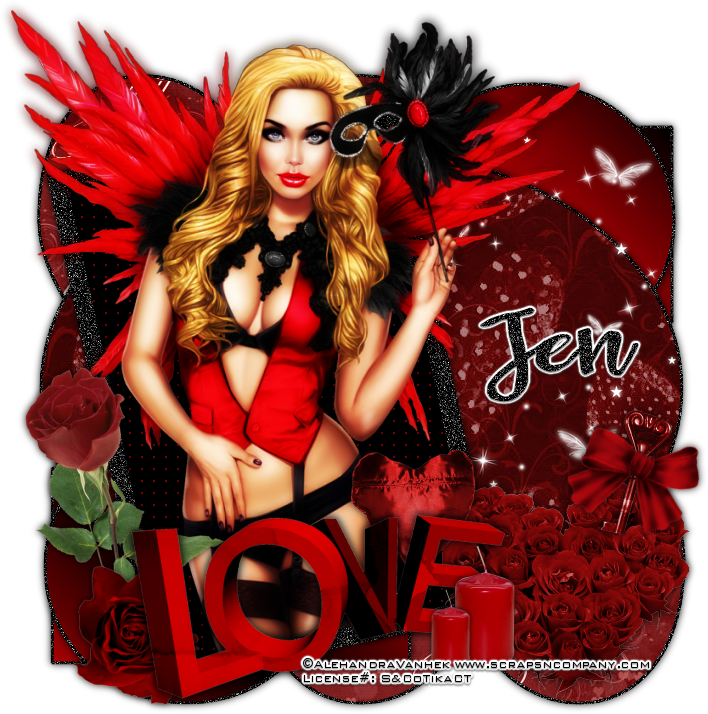
Masked Lover
Written 1/23/2017
This tutorial is meant purely as a guide. Feel free to
use your own choice of tube or scrap kit to make your tag unique. If you want
your tag to look just like mine them use the same supplies I have used. This
tutorial assumes you have a knowledge of paint shop pro. Any resemblance to any
other tag or tutorial is completely coincidental.
Supplies Used:
Tube of your choice. I am using one by Alehandra
Vanhek. You can purchase this tube at http://scrapsncompany.com/index.php?main_page=product_info&cPath=113_499&products_id=25417
Scrap Kit by Jens Sweet Temptations. You can get this
kit at http://scrapsncompany.com/index.php?main_page=product_info&cPath=112_655&products_id=25442
Template #1 by Sharon which you can download at http://creativemisfitscreations.blogspot.ca/2015/02/new-valentines-templates.html
Font of your choice. I am using Shingitalis Typeface.
This is a PTU font.
Plugins:
NONE
Drop shadow used throughout:
0 0 85 11.00 black
Let's Begin:
Open the tag template and shift+D to duplicate. Close
the original. Delete the following layers from the template: Raster 2 and
Raster 1. Make your canvas large enough to give you plenty of room to work
with.
Merge together Heart Right and Heart Left layers.
Selections select all float and de-float. Open paper 7 and copy and paste as a
new layer. Selections invert and hit delete. Selections invert again.
Selections modify and expand by 3. Layers new raster layer and flood fill with
black. Adjust add/remove noise. Add noise at 90%. Monochrome and uniform
checked. Drag this layer under the hearts. Selections select none. Delete the
original heart layer. Add a drop shadow to the black noise layer. If you like
to keep your layer palette organized like I do then go ahead and merge these 2
layers together at this time.
Repeat the above steps with rectangle top right and
rectangle bottom left layers only flood fill your new layer with a gradient
made with 2 colors from your tube with the gradient angle set to 45 and repeats
on 4.
Repeat the above steps with the circle top right and
circle bottom left layers using the same gradient as you did on the rectangle
layer.
Make the oval layer active and selections select all
float and de-float. Open paper 8 and copy and paste as a new layer and
selections invert and hit delete. Selections invert again and selections modify
and expand by 3. Flood fill with black. Add noise as you did before. Selections
select none. Drag under the oval layer. Add a drop shadow and merge the 2
layers.
Make the square layer active. Selections select all
float and de-float. Layers new raster layer. Flood fill with black. Effects
texture effects weave and use the following settings:
Gap size – 2
Width – 10
Opacity – 1
Weave color – complimentary color from your gradient
Gap color – same as above
Fill gaps – checked
Delete the original square layer.
Open your tube
and copy and paste as a new layer. Re-size as needed. Position within the
selected part of the framed area. Selections invert and use your eraser tool to
erase any bits you do not want hanging out of the frame and feel free to leave
some bits hanging out like I did. Selections select none. Duplicate the tube. On
the top copy adjust blur Gaussian blur and set it to 5.00. Change the
properties of this layer to Overlay. Add a drop shadow to the bottom copy.
Make the frame layer active and selections select all
float and de-float. Layers new raster layer. Flood fill with black and add
noise as you had to the other layers. Selections select none. Delete the
original frame layer. Add a drop shadow.
Now let’s dress the tag up with elements from the kit.
I will list the elements I used. Feel free to use other elements to make your
tag unique. Placement of the elements is completely up to you. If you want your
tag to look just like mine then use my tag for reference.
Elements I used:
3
5
6
9
46
48
52
62
65
Add your name.
Add your copyright and licensing information.
Crop and re-size if you wish.
Save your tag.
♥♥♥


No comments:
Post a Comment