


Little Miss Mardi Gras
Written on 1/1/2024.
This tutorial is meant purely as a
guide. Feel free to use your own choice of tube or scrap kit to make your tag
unique.
If you want your tag to look just
like mine, then use the same supplies I have used. This tutorial assumes you
have some knowledge
of paint shop pro. Any resemblance to
any other tag or tutorial is completely coincidental.
Supplies Used:
Tube is by Laguna and can purchased
at Pics for Design. https://picsfordesign.com/catalogue/id_134275_girl_with_pekingese.pix
You must have a license to use this
image.
--
Scrap kit is by Wicked Diabla Designs.
You can purchase this kit at her store. https://wickeddiabladesigns.com/index.php?main_page=product_info&cPath=3_16_73&products_id=3708
Font of your choice. I am using Black
Palkons
Plugins: (plugins are most generally
optional)
Penta Color Dot
Let's Begin:
Open a blank canvas that will give
you plenty of room to work with. I use 900x900 and then crop and resize when I
am done.
Open a paper of your choice from the
kit. I am using paper #5. Set this as your foreground color. Turn off your
background color.
Using your rectangle preset shape
tool with the width set to 15 draw out a rectangle to the size you would like.
Now lets create a gradient with 2
colors from our tube or paper I am using purple and yellow. Create a gradient
out of the 2 colors and set it as either your foreground or background color.
In this case it does not matter. If you don’t
want to do this or are not sure how then use any gradient of your choice. Using
your magic wand select the inside of your frame. Selections modify and expand
by 5. You should already have an empty layer under frame so floodfill this
layer with your gradient. Selections select none. Duplicate the gradient layer.
Adjust Blur Gaussian blur set to 7.00. Change the property layers of this top
gradient layer to screen. Using the penta color dot filter apply this filter with
whatever settings you choose. I like mine fairly light so I set my top value to
29.
Merge your 2 gradient layers
together.
Open
your tube and copy and paste as a new layer.
Resize to a size you are happy with.
I left mine just slightly larger than the rectangle layer.
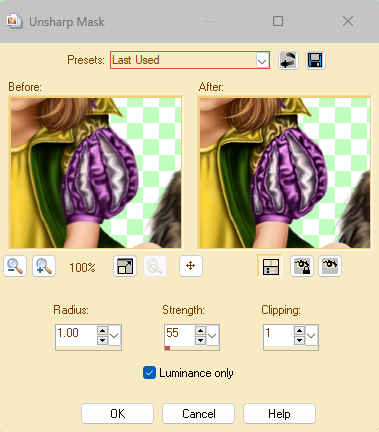
Remember once you resize we will want
to sharpen it so go to Adjust Sharpen Unsharp Mask with the following settings:
Move your tube to wherever you would
like it placed on your tag. Mine is to the far right side.
Now let’s dress the tag up with
elements from the kit. I will list the elements I used. Feel free to use other
elements to make your tag unique. Placement of the elements is completely up to
you. If you want your tag to look just like mine, then use my tag for
reference.
Elements I used:
24
27
31
32
40
57
Now I did turn mine into a 3 piece forum
set. You can do this also. Its very simple. Take the elements you used on the
tag and even other ones from the kit if you want to and make a smaller banner.
Then of course an avatar.
Add your copyright and licensing information.
Crop and resize as you would like.
Thanks for trying my tutorial.
No comments:
Post a Comment