
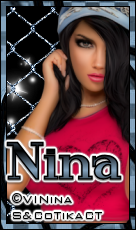

City Babe
– Forum Set
written
8/10/2014
Supplies
Needed :
Tube of
your choice. I am using the work of Vi Nina. You can get this tube at
http://scrapsncompany.com/index.php?main_page=product_info&cPath=161&products_id=4924
Scrap kit
is by Bibi's Collection. You can get it at
http://scrapsncompany.com/index.php?main_page=product_info&products_id=4925
Font of
your choice. I am using Hardly Worth It. You can get this at
http://www.fontspace.com/nicks-fonts/hardly-worthit
Plugins:
Xero
Porcelain – Optional.
Lets
Begin:
Open a new
canvas 650x225
Flood fill
with Black.
Open
element 33 and re-size so it will fit inside the tag area.
Copy and
paste as a new layer and move to the far left side.
Open
element 62 and resize by 60%.
Copy and
paste as a new layer and drag under the brick wall layer.
Move so it
meets up to the far right side.
Adjust
add/remove noise.
Add noise
at 100% monochrome and uniform.
Open your
tube and copy and paste as a new layer.
Move to
the far right.
Crop the
tag so it gets rid of any excess tube.
Apply the
Xero Porcelain filter if you choose.
Add a drop
shadow.
Open
element 11 and re-size by 50% and then again by 75%.
Copy and
paste as a new layer and place in the top left corner.
Open
element 129 and copy and paste as a new layer and drag down to just
above your black layer.
Move it
around to position how you want so you can see it through the fence
and behind your tube.
Crop the
tag again to get rid of any excess.
Open
element 32 and resize by 75%.
Copy and
paste as a new layer right above your black layer.
Position
how you want in the tag and lower the opacity of this layer to 50.
Open
element 73 and re-size by 50% and then again by 60%.
Copy and
paste as a new layer and move to the far lower left in front of the
wall.
Add a drop
shadow.
Open
element 82 and re-size by 50%.
Copy and
paste as a new layer and drag to where it is under your tube.
Move to
the far top right.
Add your
name.
Add your
copyright information.
Add a
border of 2 in black.
Add a
border of 8 in any color – it doesnt matter because we are going to
cover it in paper.
Add
another border of 2 in black.
Using your
magic wand select the colored border and then open paper 3 and edit
copy and paste as a new layer.
Selections
invert and hit delete.
Selections
select none.
Merge
visible.
Now lets
put the avatar together.
Open a new
canvas of 122x216.
Flood fill
with black.
Open
element 129 and copy and paste as a new layer.
Position
how you want.
Crop the
tag to clear the excess.
Open
element 62 and re-size so it will fit nicely in the avatar and not be
over bearing.
Apply the
same noise as you did in your tag above.
Open your
tube and re-size and copy and paste as a new layer.
Place on
the right side of the avatar.
Apply the
Xero Porcelain plugin again if you choose.
Add your
name or initial.
Add your
copyright information.
Add a
border of 1 in black.
Then a
border of 5 in any color.
Then
another border of 1 in black.
Using your
magic wand select the border of 5 and copy and paste paper 3 again
like you did on your tag.
Selections
invert and hit delete.
Selections
select none.
Save both
your tag and your avatar.


No comments:
Post a Comment